The Web automation package helps in the process of developing robots to automate the tasks performed by humans on a webpage, using the activities that are grouped under it in the SmartDesigner tool. It has the capability to interact with elements in websites using their unique attributes or identifiers. Hence, it can navigate easily between webpages, extract and transfer data from various parts of the screen and carry out data entry tasks.
Pre-requisite:
While using internet explorer as the operative browser ensure the protected mode for all zones are enabled. Follow the below given steps to achieve the same,
- Open Internet Explorer
- Go to Tools menu ÔÇô Internet option
- Select Security tab
- In select a zone to view or change security settings choose Internet and select the checkbox od Enable Protected Mode (requires IE restart).
- Similarly, select the checkbox of Enable Protected Mode for other three such as Local Intranet, Trusted Sites and Restricted Sites.
OpenWebBrowser
|
Activity Name |
Picture |
|
OpenWebBrowser |
|

When to use the OpenWebBrowser activity
This activity helps you launch the browser and load a particular webpage using the indicated URL
Technical Reference
|
Figure 1.0
|
S.no |
Description |
|
1 |
Select the chosen browser type: 32-bit or 64-bit |
|
|
2 |
Select the chosen browser to launch the application |
|
|
3 |
Specify the unique name of the session |
|
|
4 |
It enables you to enter the websiteÔÇÖs URL |
|
|
5 |
Displays the action that the activity performs in the workflow |
|
|
6 |
Specify whether to continue executing the workflow even if the activity fails |
|
|
7 |
It enables running of the robot in the backend |
|
|
8 |
Define the condition that you prefer to validate. It supports only Boolean value |

![]() Bit can be selected based on your system configuration.
Bit can be selected based on your system configuration.
Scenario
Assume you want to extract the data from theÔÇ£Google WikipediaÔÇØ and the extracted information/data is required to be translated into French language.
Illustration
![]() Activity: The ÔÇ£OpenWebBrowserÔÇØ activity helps you open the website for the action that needs to be performed for further processing.
Activity: The ÔÇ£OpenWebBrowserÔÇØ activity helps you open the website for the action that needs to be performed for further processing.
LetÔÇÖs start building the bot
Step 1 ÔÇô Open the SmartDesigner tool
Step 2 ÔÇô Open a new workflow
Step 3 ÔÇô Drag an ÔÇ£Open browserÔÇØ activity (Refer figure 1.0,1.1 & 1.11)
- Go to the property section and select the "Bit," based on your system configuration as 32 bit/64 bit
- Double-click the activity and click on the Spy symbol to open the SmartSpy window on the screen
- Select the Browser type, based on your requirement
- Specify the unique name of the session. Here, the session is ÔÇ£WikiÔÇØ
- Specify the website link in the "URL" field that needs to be acted on
- Click "Go" to load the webpage, once the webpage is loaded the property fields gets auto-populated.
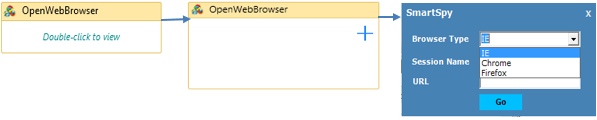
Figure 1.1
- The next step will be explained using the ÔÇ£GetTextÔÇØ activity.
GetText
|
Activity Name |
Picture |
|
GetText |
|
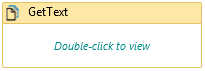
When to use the GetText activity
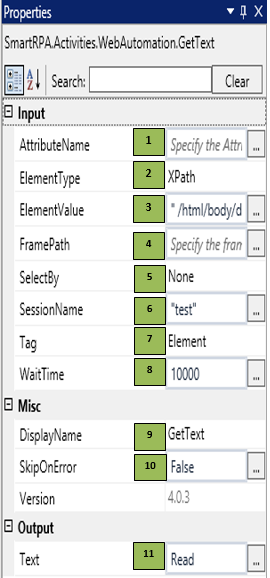
This activity helps you extract the data from a particular field/element/ region of the webpage and store it as a variable.
Technical Reference
|
Figure 1.2
|
S.no |
Description |
|
1 |
Specify the attribute name, which will extract the data that needs to be processed |
|
|
2 |
Gets auto-filled, once the element is indicated in the webpage, using the SmartSpy |
|
|
3 |
Gets auto-filled, once the element is indicated in the webpage, using the SmartSpy |
|
|
4 |
Gets auto-filled, once the element is indicated in the webpage, using the SmartSpy |
|
|
5 |
SelectBy dropdown has multiple options such as: Value: Accepts the default assigned HTML value of a webpage Text: Accepts text input of the dropdown options Index: Index position of the data in a dropdown that needs to be extracted |
|
|
6 |
Gets auto-filled once the chosen session is selected through the SmartSpy. |
|
|
7 |
Tag has two options to choose from such as: Field: It helps you extract the data from fields/text boxes Element: It helps you extract data from regular web content/text areas as indicated, using the corresponding element ID |
|
|
8 |
Specify the wait time for the activity to terminate (in milliseconds) |
|
|
9 |
Displays the action that the activity performs in the workflow |
|
|
10 |
Specify whether to continue executing the workflow even if the activity fails |
|
|
11 |
Enter the declared variable name where the extracted data has been stored |
![]() ElementType has multiple options to choose from. Once the ElementType is changed, the ElementValue changes on its own, corresponding to the element type.
ElementType has multiple options to choose from. Once the ElementType is changed, the ElementValue changes on its own, corresponding to the element type.
In case the session is closed by mistake, go back to the OpenBrowser activity and specify the Browser Type, Session Name & URL and change the Session name in the following activity.
Note: The Session Name should not be an existing name.
Illustration
![]() Activity: The GetText activity helps you store the extracted data.
Activity: The GetText activity helps you store the extracted data.
Step 4 ÔÇô Drag a ÔÇ£GetTextÔÇØ activity and connect under the ÔÇ£OpenWebBrowserÔÇØ activity. (Refer figure 1.2,1.3 & 1.4)
- Double click the activity and click on the spy symbol to open the SmartSpy window
- Select the chosen session in the SmartSpy window and click on the attach to highlight the webpage that you were already working on
- Spy/indicate the element that is required to be extracted and click Export to auto-fill the property details
- Select the ÔÇ£TagElementÔÇØ based on your requirement
- Add the chosen wait time in the WaitTime field (WaitTime value is in Milliseconds)
- Declare a new ÔÇ£StringÔÇØ variable (Refer figure 1.3 & 1.2)
![]()
Figure 1.3
- Enter the declared variable name in the ÔÇ£TextÔÇØ field.
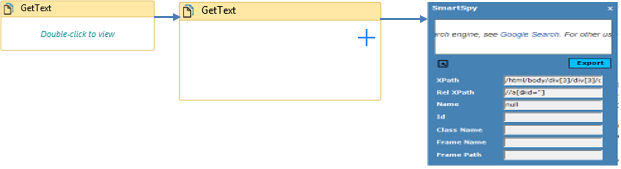
Figure 1.4
Step 2 ÔÇô Drag a ÔÇ£Message BoxÔÇØ activity to print the stored data and connect under the ÔÇ£GetTextÔÇØ activity. (Refer figure 1.5)
- Enter the variable name in the ÔÇ£TextÔÇØ field
- Add ÔÇ£ExpirySecs,ÔÇØ as preferred.

Figure 1.5
- The next step will be explained using the ÔÇ£DisconnectBrowserÔÇØ activity.
|
Activity Name |
Picture |
|
DisconnectBrowser |
|
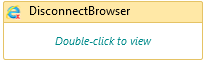
When to use the DisconnectBrowser activity
This activity is used to disconnect the browser once the action is completed during run-time.
Technical Reference
|
Figure 1.6
|
S.no |
Description |
|
1 |
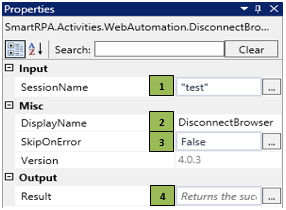
Enter the SessionName to close the particular browser |
|
|
2 |
Displays the action that the activity performs in the workflow |
|
|
3 |
Specify whether to continue executing the workflow even if the activity fails |
|
|
4 |
Define the condition that you prefer to validate. It supports only Boolean value |
Illustration
Step 5 ÔÇô Drag a ÔÇ£DisconnectBrowserÔÇØ activity and connect under the ÔÇ£Message BoxÔÇØ activity. (Refer figure 1.6 & 1.11).
- Enter the ÔÇ£SessionNameÔÇØ as ÔÇ£TestÔÇØ (It Disconnects the ÔÇ£TestÔÇØ Session)
Step 6 ÔÇô Drag an ÔÇ£OpenWebBrowserÔÇØ activity and connect under the ÔÇ£DisconnectBrowserÔÇØ activity to translate the stored data into French language. (Refer figure 1.7 & 1.11)
- Go to the property session and select the "Bit" based on your system configuration as 32 bit/64 bit
- Double-click the activity and click on the Spy symbol to open the SmartSpy window on the screen
- Select the Browser type based on your requirement
- Specify the unique name of the session. Here, the session is given as ÔÇ£DataÔÇØ
- Specify the website link in the "URL" field
- Click "Go" to load the webpage. Once the webpage is loaded the property fields get auto filled.
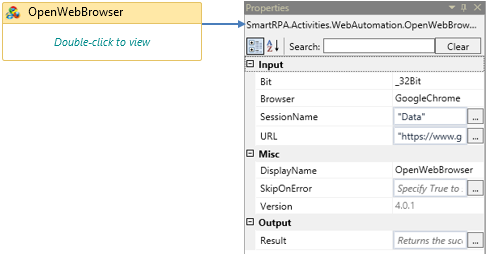
Figure 1.7
- The Next step will be explained using the ÔÇ£SetTextÔÇØ activity.
SetText
|
Activity Name |
Picture |
|
SetText |
|

When to use the SetText activity
This activity is used to type the input data into any field or textbox in the webpage.
Technical Reference
|
Figure 1.8
|
S.no |
Description |
|
1 |
The Specified field will be cleared before typing |
|
|
2 |
Gets auto-filled, once the element is indicated in the webpage, using the SmartSpy |
|
|
3 |
Gets auto-filled, once the element is indicated in the webpage, using SmartSpy |
|
|
4 |
Gets auto-filled, once the element is indicated in the webpage, using SmartSpy |
|
|
5 |
Enter the input value that is required to be entered into a particular field |
|
|
6 |
SelectBy dropdown has multiple options such as: Value: Accepts the default assigned HTML values of a webpage Text: Accepts text input of the dropdown options Index: Index position of the data in a dropdown that needs to be extracted |
|
|
7 |
Gets auto-filled once the chosen Session is selected through the SmartSpy |
|
|
8 |
Specify the wait time for the activity to terminate (in milliseconds) |
|
|
9 |
Displays the action that the activity performs in the workflow |
|
|
10 |
Specify whether to continue executing the workflow even if the activity fails |
|
|
11 |
Define the condition that you prefer to validate. It supports only Boolean value |

![]() ElementType has multiple options to choose from. Once the ElementType is changed, the ElementValue changes on its own, corresponding to the element type.
ElementType has multiple options to choose from. Once the ElementType is changed, the ElementValue changes on its own, corresponding to the element type.
In case the session is closed by mistake, go back to the OpenBrowser activity and specify the Browser Type, Session Name & URL and change the Session name in the following activity.
Note: The Session Name should not be an existing name.
Illustration
Step 7 ÔÇô Drag a ÔÇ£SetTextÔÇØ activity and connect under the ÔÇ£OpenWebBrowserÔÇØ activity to translate the data into French language. (Refer figure 1.9 & 1.11)
- Double-click the activity and click on the Spy symbol to open the SmartSpy window on the screen
- Select the chosen Session in the SmartSpy window and click on the attach to highlight the webpage that you were already working on
- Spy/indicate the element and click Export to auto-fill the property details
- In ÔÇ£InputStringÔÇØ field, enter the variable name which is already declared for the ÔÇ£GetText" activity
- Add the chosen wait time in the WaitTime field (WaitTime value is in Milliseconds)

Figure 1.9
Step 8 ÔÇô Drag a ÔÇ£SetTextÔÇØ activity and connect under another ÔÇ£SetTextÔÇØ activity to select the French language. (Refer figure 1.10 & 1.11)
- Double-click the activity and click on the Spy symbol to open the SmartSpy window on the screen
- Select the chosen Session in the SmartSpy window and click on the attach to highlight the webpage that you were already working on
- Spy/indicate the element that is required to be selected from the drop-down and click Export to auto-fill the property details
- In the text field, enter ÔÇ£FrenchÔÇØ
- Add the chosen wait time in the WaitTime field. (WaitTime value is in Milliseconds)

Figure 1.10
Example
The aforementioned scenario uses the OpenWebBrowser, DisconnectBrowser, SetText & GetText activities to perform the operation.

Figure 1.11
OpenWebBrowser
Step 1 ÔÇô Drag an ÔÇ£Open browserÔÇØ activity. (Refer figure 1.12)
- Right-click on the activity and click Set as the Start Node. This implies that it will be the first activity that gets triggered during execution. Go to the property section and select the "Bit" based on your system configuration as 32 bit/64 bit
- Double-click the activity and click on the Spy symbol to open the SmartSpy window on the screen
- Select the Browser type based on your requirement
- Specify the unique name of the session, here, the session name is given as ÔÇ£HTMLÔÇØ
- Specify the website link in the "URL" field that is required to be acted on
- Click "Go" to load the webpage. Once the webpage is loaded the property fields get auto filled.
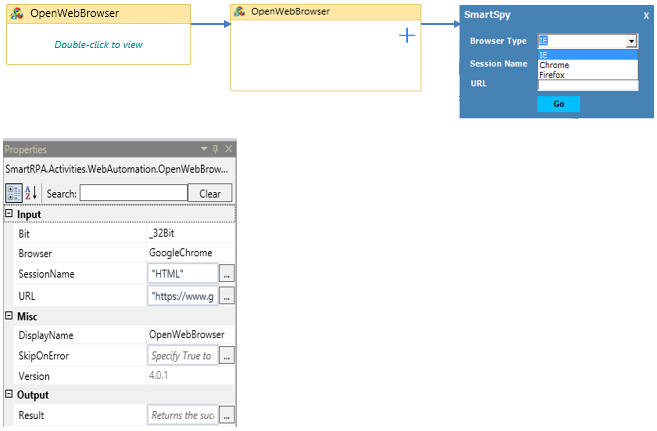
Figure 1.12
ClickEvent
|
Activity Name |
Picture |
|
ClickEvent |
|

When to use the ClickEvent activity
When you are required to click on the particular element in the webpage, this activity can be used.
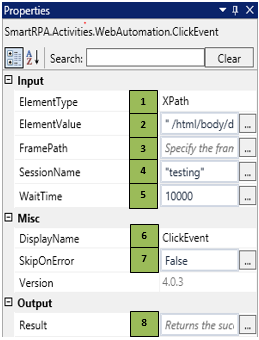
Technical Reference
|
Figure 1.13
|
S.no |
Description |
|
1 |
Gets auto-filled, once the element is indicated in the webpage, using the SmartSpy |
|
|
2 |
Gets auto-filled, once the element is indicated in the webpage using the SmartSpy |
|
|
3 |
Gets auto-filled, once the element is indicated in the webpage, using the SmartSpy |
|
|
4 |
Gets auto-filled once the chosen Session is selected through the SmartSpy. |
|
|
5 |
Specify the wait time to wait for the activity to terminate (in milliseconds) |
|
|
6 |
Displays the action that the activity performs in the workflow |
|
|
7 |
Specify whether to continue executing the workflow even if the activity fails |
|
|
8 |
Define the condition that you prefer to validate. It supports only Boolean value |
![]() ElementType has multiple options to choose from. Once the ElementType is changed, the ElementValue changes on its own, corresponding to the element type.
ElementType has multiple options to choose from. Once the ElementType is changed, the ElementValue changes on its own, corresponding to the element type.
In case the session is closed by mistake, go back to the OpenBrowser activity and specify the Browser Type, Session Name & URL and change the Session name in the following activity.
Note: The Session Name should not be an existing name.
Scenario
Assume you want to extract the HTML table from the webpage and the extracted data is required to be printed in the excel sheet.
![]() Activity: The Click event activity helps you click on a particular control/key in a webpage.
Activity: The Click event activity helps you click on a particular control/key in a webpage.
Illustration
Step 2 ÔÇô Drag a ÔÇ£ClickEventÔÇØ activity and connect under the ÔÇ£OpenWebBrowserÔÇØ activity to click the website for further processing. (Refer figure 1.14)
- Double-click the activity and click on the Spy symbol to open the SmartSpy window on the screen
- Select the chosen Session in the SmartSpy window and click on the attach to highlight the webpage that you were already working on
- Spy/indicate the element that is required to be acted on and click export to auto-fill the property details under ElementType, ElementValue, FramePath & SessionName
- Add the chosen wait time in the WaitTime field (WaitTime value is in Milliseconds)
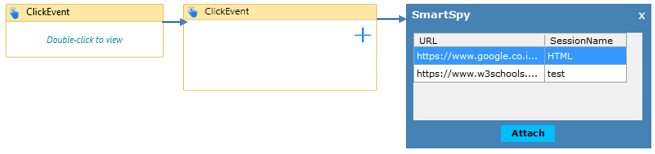
Figure 1.14
- The next step will be explained using the Element Exist activity.
ElementExist
|
Activity Name |
Picture |
|
ElementExist |
|
When to use the ElementExist activity
This activity helps you validate if the given element in the webpage is loaded for further processing.
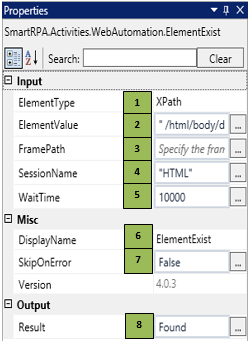
Technical Reference
|
Figure 1.15 |
S.no |
Description |
|
1 |
Gets auto-filled, once the element is indicated in the webpage using SmartSpy |
|
|
2 |
Gets auto-filled, once the element is indicated in the webpage using SmartSpy |
|
|
3 |
Gets auto-filled, once the element is indicated in the webpage using SmartSpy |
|
|
4 |
Gets auto-filled once the chosen Session is selected through SmartSpy. |
|
|
5 |
Specify the amount of time to wait for the activity to terminate (in milliseconds) |
|
|
6 |
Displays the action that the activity performs in the workflow |
|
|
7 |
Specify whether to continue executing the workflow even if the activity fails |
|
|
8 |
Define the condition that you prefer to validate. It supports only Boolean value |
![]() ElementType has multiple options to choose from. Once the ElementType is changed, the ElementValue changes on its own, corresponding to the element type.
ElementType has multiple options to choose from. Once the ElementType is changed, the ElementValue changes on its own, corresponding to the element type.
In case the session is closed by mistake, go back to the OpenBrowser activity and specify the Browser Type, Session Name & URL and change the Session name in the following activity.
Note: The Session Name should not be an existing name.
llustration
Step 3 ÔÇô Drag an ElementExist activity and connect under the ÔÇ£ClickEventÔÇØ activity. (Refer figure 1.15, 1.16 & 1.17)
- Double-click the activity and click on the Spy symbol to open the SmartSpy window on the screen
- Select the chosen Session in the SmartSpy window and click on the attach to highlight the webpage that you were already working on
- Spy/indicate the element that is required to be acted on and click export to auto-fill the property details under ElementType, ElementValue, FramePath & SessionName.
- Add the chosen wait time in the WaitTime field (WaitTime value is in Milliseconds)
- Declare a new variable with the datatype as ÔÇ£Boolean.ÔÇØ (Refer figure)
![]()
Figure 1.16
- Enter the declared variable name as ÔÇ£FoundÔÇØ under the ÔÇ£IsExistÔÇØ field.

Figure 1.17
Step 4 ÔÇô Drag a ÔÇ£FlowDecisionÔÇØ activity and connect under the ÔÇ£ElementExistÔÇØ activity. It checks whether a specified condition is met and executes either of the two-branched sequences. (Refer figure 1.18)
- Enter the variable name which was already declared for the ÔÇ£ElementExistÔÇØ activity under the ÔÇ£ConditionÔÇØ field
- Under the True branch, connect the ÔÇ£HTMLTable to DataTableÔÇØ activity. This activity will be explained in ÔÇ£HTMLTable to DataTableÔÇØ section
- Under the False branch, connect the ÔÇ£CloseInternetExplorerTabÔÇØ. This activity will be explained in ÔÇ£CloseInternetExplorerTabÔÇØ section.
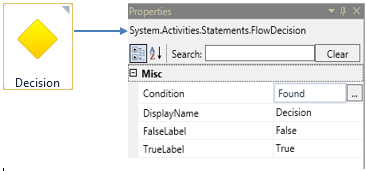
Figure 1.18
HTMLTable to Datatable
|
Activity Name |
Picture |
|
HTMLTable to Datatable |
|
When to use the HTMLTable to Datatable activity
When you are required to convert the HTMLTable table to a Datatable, this activity can be used.
Technical Reference
|
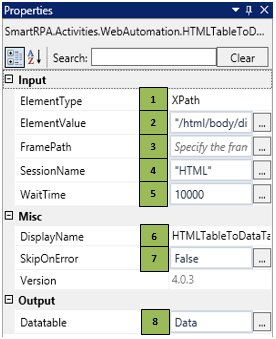
Figure 1.19
|
S.no |
Description |
|
1 |
auto-filled, once the element is indicated in the webpage using SmartSpy |
|
|
2 |
auto-filled, once the element is indicated in the webpage using SmartSpy |
|
|
3 |
auto-filled, once the element is indicated in the webpage using SmartSpy |
|
|
4 |
auto-filled once the chosen Session is selected through SmartSpy. |
|
|
5 |
Specify the amount of time to wait for the activity to terminate (in milliseconds) |
|
|
6 |
Displays the action that the activity performs in the workflow |
|
|
7 |
Specify whether to continue executing the workflow even if the activity fails |
|
|
8 |
Enter the data-table variable created to store the data |
![]() ElementType has multiple options to choose from. Once the ElementType is changed, the ElementValue changes on its own, corresponding to the element type.
ElementType has multiple options to choose from. Once the ElementType is changed, the ElementValue changes on its own, corresponding to the element type.
In case the session is closed by mistake, go back to the OpenBrowser activity and specify the Browser Type, Session Name & URL and change the Session name in the following activity.
Note: The Session Name should not be an existing name.
Step 5 ÔÇô Drag a HTML to Datatable activity and connect it under the ÔÇ£True BranchÔÇØ (Refer figure 1.18, 1.19 & 1.120)
- Under the True branch connect the ÔÇ£HTMLTable to DataTableÔÇØ activity.
- Double-click the activity and click on the Spy symbol to open the SmartSpy window on the screen
- Select the chosen Session in the SmartSpy window and click on the attach to highlight the webpage that you were already working on
- Spy/indicate the element that is required to be clicked and click export to auto-fill the property details under ElementType, ElementValue, FramePath & SessionName
- Add the chosen wait time in the WaitTime field (WaitTime value is in Milliseconds)
- Declare a new variable in the Variables section by selecting "browse for types" in the Variable Type dropdown and entering the type name as ÔÇ£System.data. datatableÔÇØ (Refer figure 1.20 & 1.21)

Figure 1.20
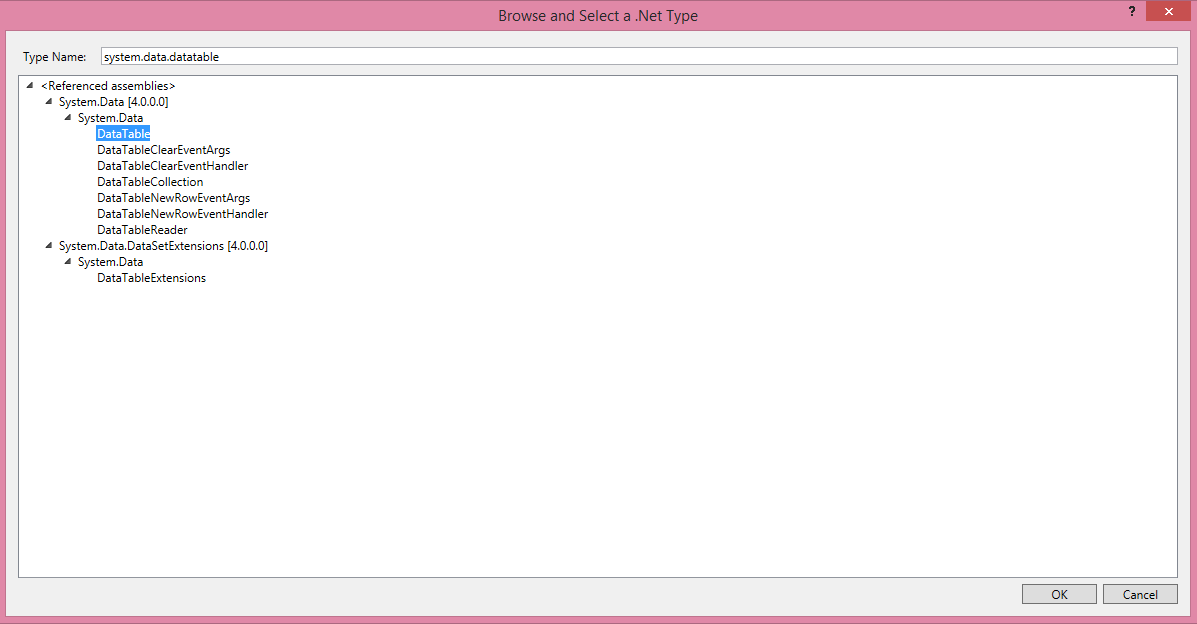
Figure 1.21

Figure 1.22
- Enter the declared variable ÔÇ£DataÔÇØ under the ÔÇ£OutDataÔÇØ field.
Step 6 ÔÇô Look for an ÔÇ£ExcelAutomationÔÇØ grouping in the Toolbox, drag a ÔÇ£WriteÔÇØ activity and connect it under the ÔÇ£HTMLTable to DataTableÔÇØ activity to update the extracted data into an excel (Refer figure 1.23 & 1.24)
- Go to the property section and fill in the details. FilePath is appended with the filename by double clicking the activity and selecting the file from the respective folder or as an alternative enter the file name in the FilePath property as a string (ÔÇ£ÔÇØ) and specify the sheet, where data is required to be written e.g. "C:\Users\<username>\Desktop\Input.xlsxÔÇØ
- Select the ÔÇ£IncludeColumnHeadersÔÇØ checkbox
- Select the process type as ÔÇ£Write till dataÔÇØ
- Key in both the Start Column & the Start Row field with value as 1
- Update the variable name in the ÔÇ£DatatableInputÔÇØ field which was already declared for ÔÇ£HTML to DatatableÔÇØ activity.

Figure 1.23
CloseInternetExplorerTab
|
Activity Name |
Picture |
|
CloseIETab |
|
When to use the CloseInternetExplorer activity
When you are required to close the IE, this activity can be used.
Technical Reference
|
Figure 1.24
|
S.no |
Description |
|
1 |
It enables you to enter the website link |
|
|
2 |
Displays the action that the activity performs in the workflow |
|
|
3 |
Specify whether to continue executing the workflow even if the activity fails |
|
|
4 |
Define the condition that you prefer to validate. It supports only Boolean value |

![]() Activity: This activity helps close the IE once the action is completed during a run-time.
Activity: This activity helps close the IE once the action is completed during a run-time.
Step 7 ÔÇô Drag a CloseIETab activity and connect under the false branch. (Refer figure 1.24 & 1.25)
- Go to the property details and specify the link in the ÔÇ£URLÔÇØ field that is required to be closed in the run time
- The activity closes the specified IE tab
- The robot is looped again to perform the same process to check if the element is available to manipulate and store the datatable for processing.
Example
The aforementioned scenario uses the ClickEvent, ElementExist, HTMLTODATATABLE & CloseIETab activities to perform the operation.

Figure 1.25
SwitchToWindow
|
Activity Name |
Picture |
|
SwitchToWindow |
|
When to use the SwitchToWindow activity
This activity enables the user to toggle between different sessions/browsers that is applied in the same process.
Technical Reference
|
Figure 1.26
|
S.no |
Description |
|
1 |
Mode selection dropdown has the following options: |
|
|
2 |
Ensure the SessionName correlates with the OpenBrowser activity |
|
|
3 |
Enter the URL to which the control is required to be switched |
|
|
4 |
Specify the amount of time to wait for the activity to terminate (in milliseconds) |
|
|
5 |
Displays the action that the activity performs in the workflow |
|
|
6 |
Specify whether to continue executing the workflow even if the activity fails |
|
|
7 |
Define the condition that you prefer to validate. It supports only Boolean value |
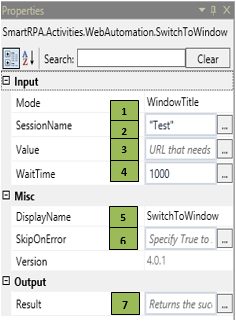
![]() Activity: This activity helps you Switch to another window during the runtime.
Activity: This activity helps you Switch to another window during the runtime.
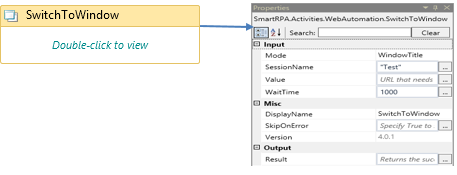
Figure 1.27
SwitchAlert
|
Activity Name |
Picture |
|
SwitchAlert |
|
When to use the SwitchAlert activity
To handle the alerts/pop-ups that appear on the application during execution, this activity can be used.
Technical Reference
|
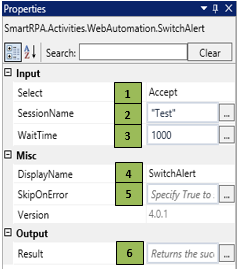
Figure 1.28
|
S.no |
Description |
|
1 |
Select dropdown enables to choose actions from the following options: |
|
|
2 |
Ensure the SessionName correlates with the OpenBrowser activity |
|
|
3 |
Specify the wait time to wait for the activity to terminate (in milliseconds) |
|
|
4 |
Displays the action that the activity performs in the workflow |
|
|
5 |
Specify whether to continue executing the workflow even if the activity fails |
|
|
6 |
Define the condition that you prefer to validate. It supports only Boolean value |
![]() Activity: This activity helps you handle the pop-windows during the runtime.
Activity: This activity helps you handle the pop-windows during the runtime.
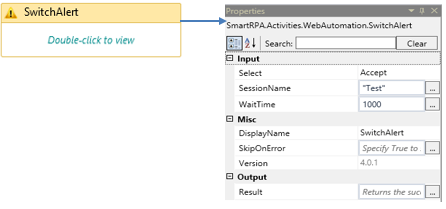
Figure 1.29
Refresh
|
Activity Name |
Picture |
|
Refresh |
|

When to use the Refresh activity
To refresh the webpage during the runtime, this activity can be used.
Technical Reference
|
Figure 1.30
|
S.no |
Description |
|
1 |
Ensure the SessionName correlates with the OpenBrowser activity |
|
|
2 |
Displays the action that the activity performs in the workflow |
|
|
3 |
Specify whether to continue executing the workflow even if the activity fails |
|
|
4 |
Define the condition that you prefer to validate. It supports only Boolean value |
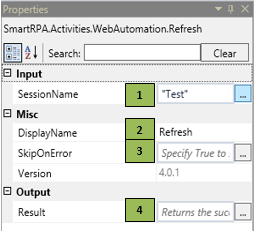

Figure 1.31
Navigate
|
Activity Name |
Picture |
|
Navigate |
|
When to use the Navigate activity
When you are required to navigate to another URL within the session, this activity can be used.
Technical Reference
|
Figure 1.32
|
S.no |
Description |
|
1 |
Ensure the SessionName correlates with the OpenBrowser activity |
|
|
2 |
Specify the target URL to navigate |
|
|
3 |
Displays the action that the activity performs in the workflow |
|
|
4 |
Specify whether to continue executing the workflow even if the activity fails |
|
|
5 |
Define the condition that you prefer to validate. It supports only Boolean value |
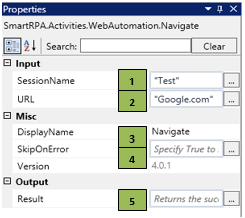
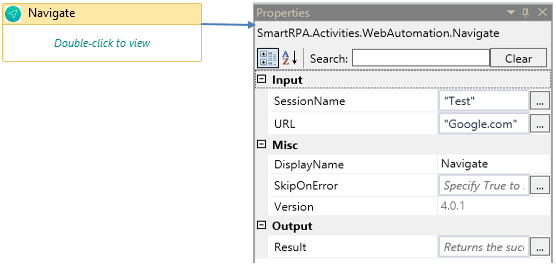
Figure 1.33
GoBack
|
Activity Name |
Picture |
|
GoBack |
|

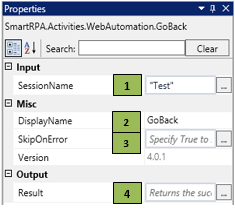
When to use the GoBack activity
When you are required to roll back to a previous page in the same session, this activity can be used.
Technical Reference
|
Figure 1.34
|
S.no |
Description |
|
1 |
Ensure the SessionName correlates with the OpenBrowser activity |
|
|
2 |
Displays the action that the activity performs in the workflow |
|
|
3 |
Specify whether to continue executing the workflow even if the activity fails |
|
|
4 |
Define the condition that you prefer to validate. It supports only Boolean value |
GoForward
|
Activity Name |
Picture |
|
GoForward |
|

When to use the GoForward activity
When you are required to navigate forward to an earlier attempted screen in the same URL, this activity can be used.
Technical Reference
|
Figure 1.36
|
S.no |
Description |
|
1 |
Ensure the SessionName correlates with the OpenBrowser activity |
|
|
2 |
Displays the action that the activity performs in the workflow |
|
|
3 |
Specifies whether to continue executing the workflow even if the activity fails |
|
|
4 |
Define the condition that you prefer to validate. It supports only Boolean value |
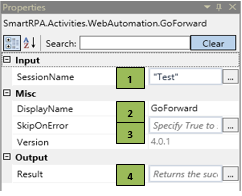
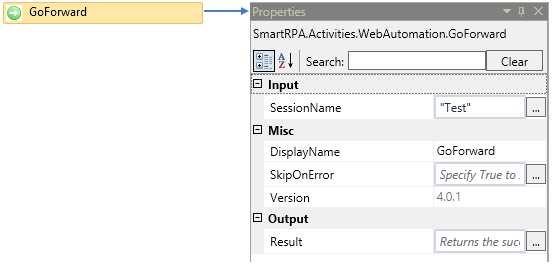
Figure 1.37