The Collection package in the SmartDesigner acts as a container for users and robots to store information / the data during run-time.
Add to Collection
When to use the Add to Collection activity
If you want to dynamically store the data from an Excel file or a web service in a table format for further processing, you can use this activity.
Figure 1
|
Activity Name |
Picture |
|
AddToCollection |
|

Technical Reference
Figure 1.0
Declare a new variable in the Variables section by selecting "browse for types" in the Variable Type dropdown and entering the type name as System.Collections.Generic.ICollection. Then choose String from the type dropdown. (Refer figure 1.1, 1.2, 1.3 & 1.4)
Figure 1.1
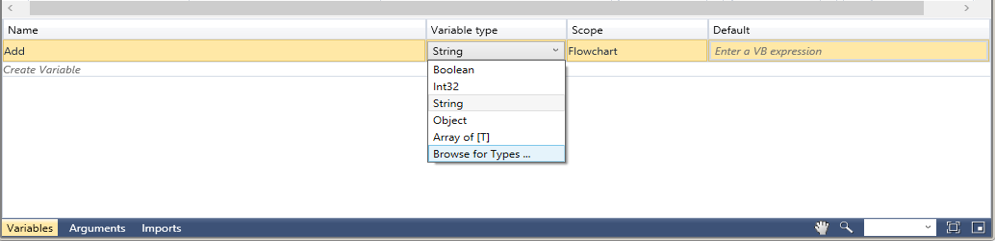
Figure 1.2
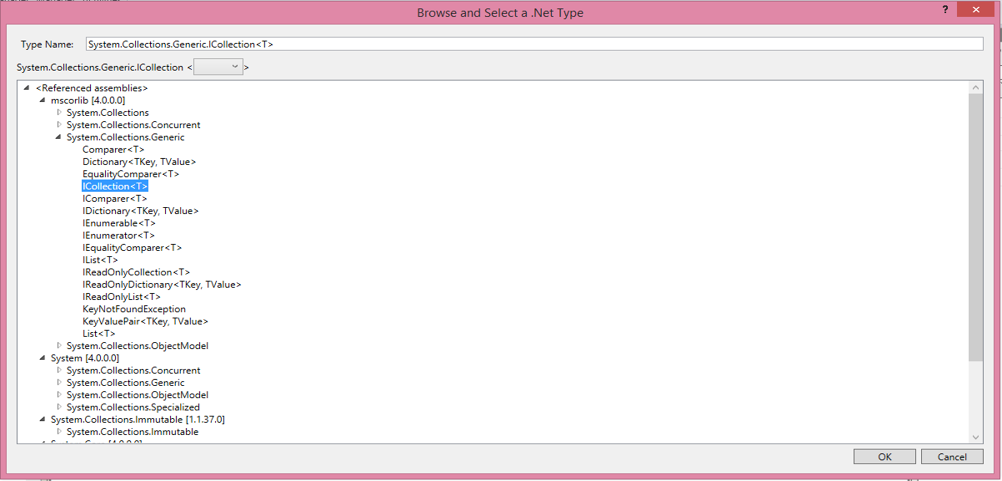
Figure 1.3
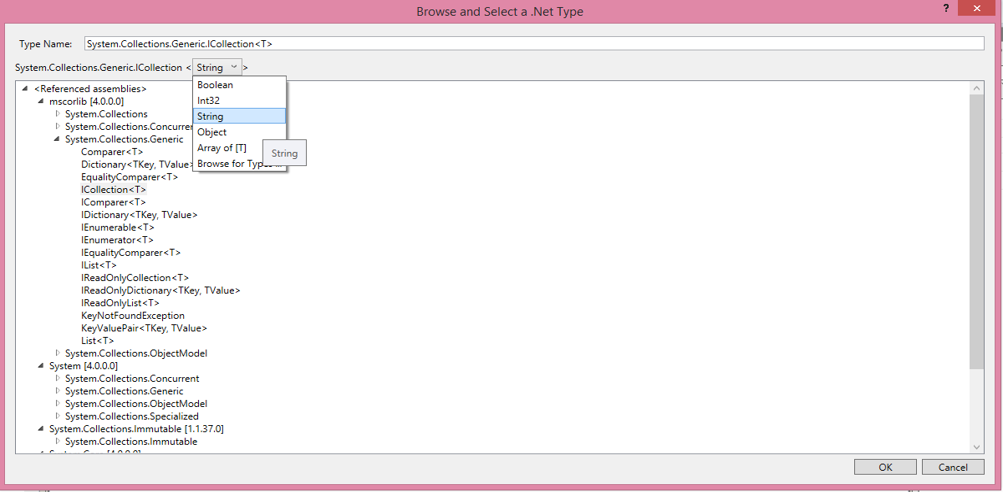
Figure 1.4

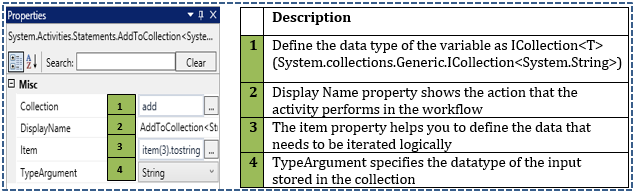
Since the input data is a string. The TypeArgument should be defined as String. However, the TypeArgument can also be Boolean, Integer and Array[t] based on the requirement.
TypeArgument provides multiple datatype to choose from.

Select the datatype based on the variable declared for the collection.
Scenario
Assume you want to collect information about employees who have been working in your organization for more than ten years. All employee details are available in an excel sheet for this illustration.
Prerequisites
Create an Excel file with the required data of the employees for this purpose.

Activity: Open the SmartDesigner tool and read the employee details from the Excel sheet using the Excel Automation activity. Store the information to build the data table using an Add to Collection activity.
Let's start building a robot
Step 1 Open the SmartRPA Designer tool
Step 2 Open a new workflow
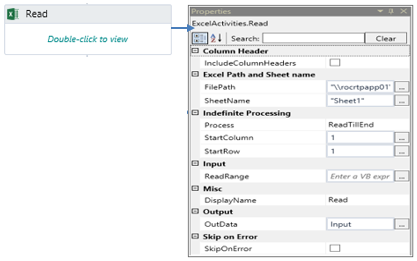
Step 3 Look for ExcelAutomation grouping in the Toolbox, drag a Read Excel activity onto the workflow. (Refer figure 1.8)
Step 4 Go to the property section and fill in the details, give the FilePath Name by double clicking the activity and selecting the file from the respective folder or as an alternative, key in the file name in the FilePath property as a string() and specify the sheet number to extract the data that needs to be executed e.g. "C:\Users\<username>\Desktop\Input.xlsx.
- Right-click on the activity and click Set as Start Node. This implies that it will be the first activity that gets triggered during execution
- Select the process type as Read till End
- Key in both the Start Column & the Start Row field with value as 1
- Declare a new variable in the Variables section by selecting "browse for types" in the Variable Type dropdown and entering type name as system.data.datatable (Refer figure 1.5, 1.6 & 1.7)
Figure 1.5

Figure 1.6
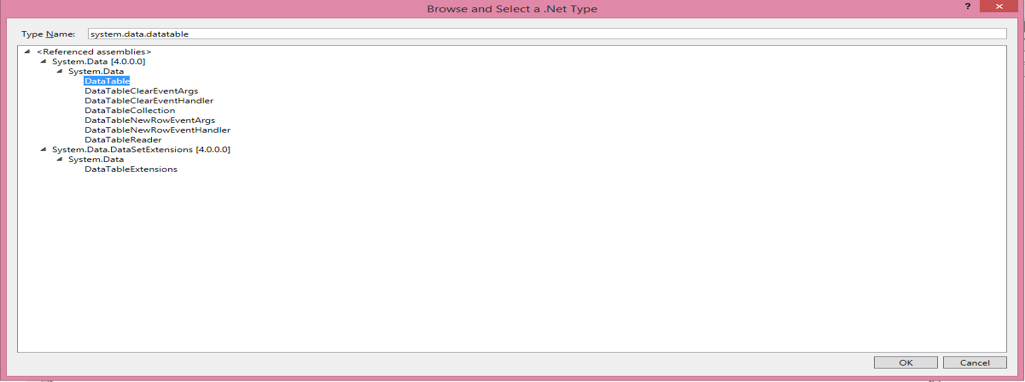
Figure 1.7

- Update the declared variable name 'Input "under the "OutData "field that contains the entire data, read from the Excel in a table format. (Refer figure 1.7)
Figure 1.8
Step 5 Drag a "For Each" activity from the Toolbox to iterate each item from the input file (Refer figure 1.9)
- Select the typeArgument as System.Data.Datarow to iterate the input in a row sequence
- Fill "in" section with the variable name of the datatable appended with ".Asenumerable" e.g. Input.Asenumerable
Figure 1.9
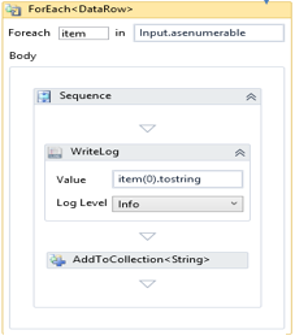
Step 6 Drag an AddtoCollection activity from the Toolbox
- Declare a new variable with the datatype as: "System.Collections.Generic.ICollection<System.String>"and update the default section as "New list(of string)" under the variable section. (Refer figure 1.1, 1.2, 1.3 & 1.4)
- Key in the declared variable "Add," storing the in the collection, in the Properties panel for the "Collection" property
- To iterate row/ input, key in "item(0).tostring" in the string field. In this scenario it is defined as "item (3).tostring "as we require employee experience from the Input excel to be processed
- Select the TypeArgument as "String."
Step 7 -Drag an "Assign activity" from the Toolbox. It is used to increment the counter value. This counter is used to dynamically retrieve the data from collection and to validate if the number of iterations has crossed the collection count (number of rows to be processed).
- Declare a new variable with data type as "Integer" to capture the counter value under variables section (refer figure 1.10)
Figure 1.10

- Key in the declared variable under "To" Field, enter the variable name as "I "and enter "0 " in value field to increment the value.
Step 8 - Drag a "Flow Decision" activity from the Toolbox and define a condition based on the requirement to execute the flow. (Refer figure 1.13)
Count Validation
- Define the condition as "I<add.count" - hence the bot will check if the counter value i. e "i" is less than add. count which contains the count of employees in the collection
- Under True branch, connect a 'Flow Decision" activity and define a condition as Convert.toint32(add(i))>10. Here we are converting the string to integer since we receive the data from the data table as a string
- Under False branch, connect a "WriteLog" activity to print "Process completed" message, which denotes the completion of execution
- Drag a "Clear Collection" activity to clear the entire data in the collection. This part will be explained in the "Clear Collection "activity section.
Experience Validation
- Define the condition as "Convert.toint32(add(i))>10." This condition checks if the employee experience is more than 10 years
- Under True branch, connect a "WriteLog" activity to print the employee name with more than 10 years of experience
- Under False branch, connect a "Flow Decision" activity from the toolbox and apply a condition as Convert.toint32(add(i)) <=3. As per this condition, the bot will remove the data of the employees with work experience that is less than 3years. This part will be explained in Remove from collection activity section.