The home tab has several menus to aid the user in creating a given workflow. A detailed walk-through of the options follows.
Figure 1
The New menu helps users to create a new workflow in the Designer for the same project. The save option will be enabled once you drag and drop any activity to start creating a workflow.
Figure 2

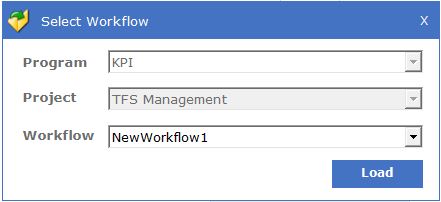
The Open menu allows the user to access workflows, which are mapped under the same project.
Figure 3

Select the workflow that you require and click the Load button.
Figure 4
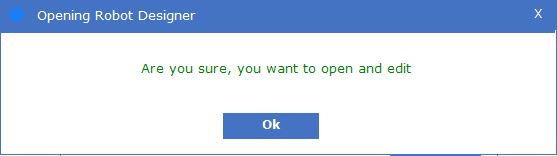
Click on Ok button to open the selected workflow and continue to edit or work on it.
Figure 5
Previously, if the user opens an older version of the workflow, makes changes and click save, it would overwrite the latest version of the workflow. Now the logic has been changed to prevent this. So, this action of the user would now automatically create an updated version for the latest workflow if the user intends to save changes to an older version of the workflow.
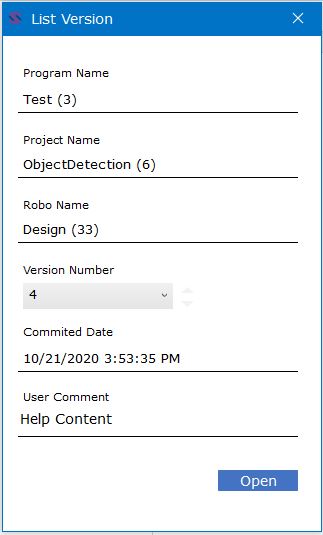
This menu displays the entire list of versions of any given workflow, thereby, the Previous Versions of the workflow can be accessed.
Figure 6

It lists out the Program Name, Project Name, Version #, Committed Date with Time and Comments provided about a workflow at the time of saving. Any listed workflow version from the drop-down can be opened through this option. It always opens the selected workflow version in a new tab.
Figure 7
About
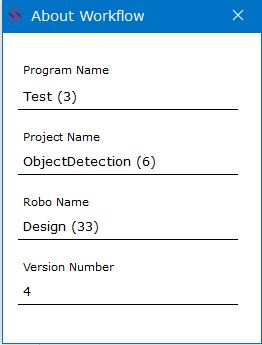
About menu provides users with current workflow information. When users are working on multiple workflows with innumerable loops, they would want to know about their current work, and at those times, this menu comes in handy. This enables users to take stock of which activity they are currently working on and gives them clarity and visibility.
Figure 8

Click on the About menu. It displays a summary about the workflow, such as Program Name, Project Name, Robot's Name and the Version Number.
Figure 9
The Save option will be enabled at the beginning of workflow creation and whenever users makes a change in the workflow.
Figure 10

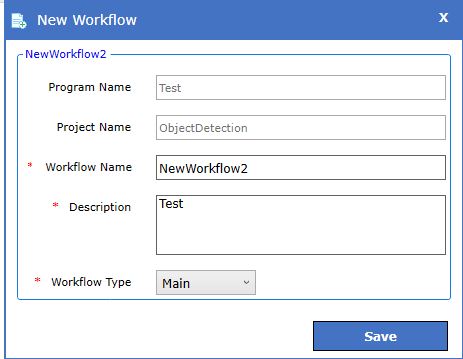
If a user has created a new workflow against the same project, he/she is required to fill the mandatory fields that are marked with red asterisks. Click on the Save button.
Figure 11
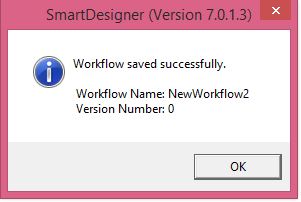
The workflow is saved successfully, and a reiterating message is displayed.
Figure 12
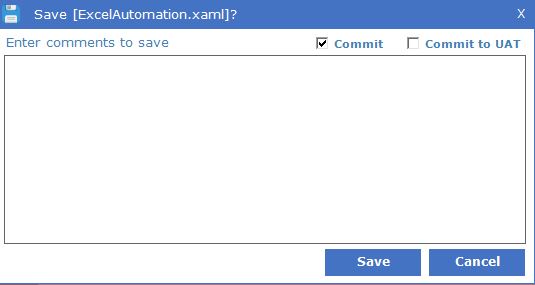
To create a version of the workflow that has been built, enable the Commit checkbox and then save. One checks the Commit to UAT checkbox to commit & deploy the workflow in the UAT environment.
Figure 13
Manage Features
The Manage Features menu facilitates seamless downloading and installation of features available in the Designer. Click on the menu to enable the Manage Feature screen as displayed in the ensuing image.
Figure 14

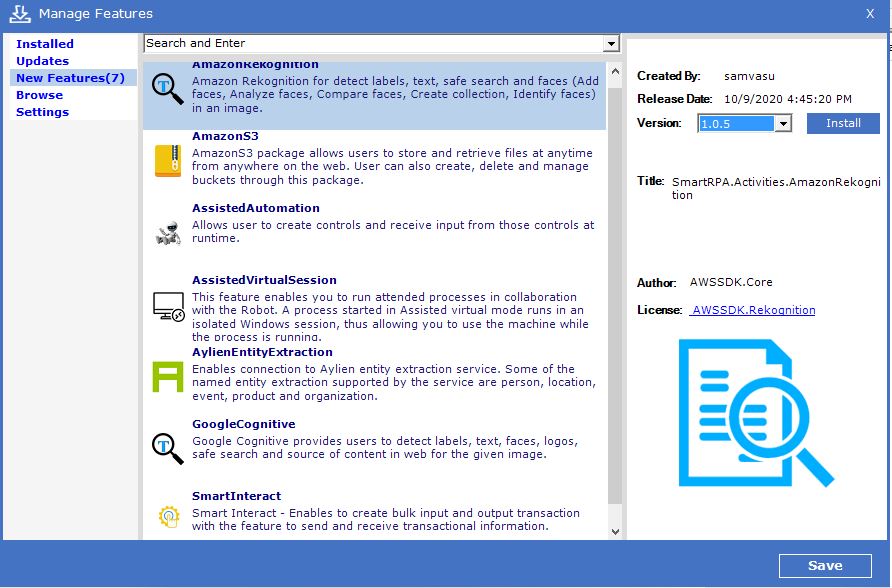
The Manage Features screen will now show a count of new features that are available for the Designer if it has not been installed as yet.
Figure 15
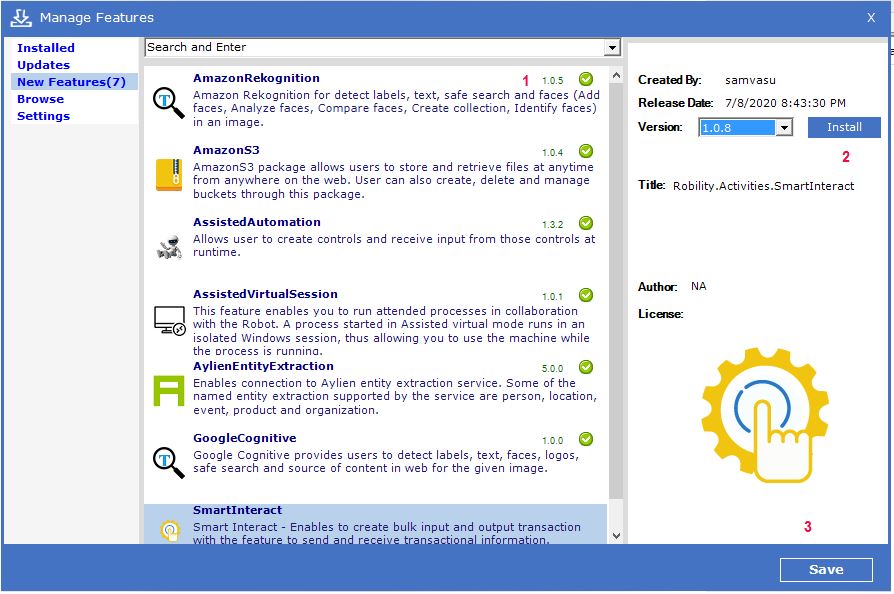
(1) Select the features, (2) Click on the Install button and Save. (3) The features will be downloaded and installed.
Figure 16
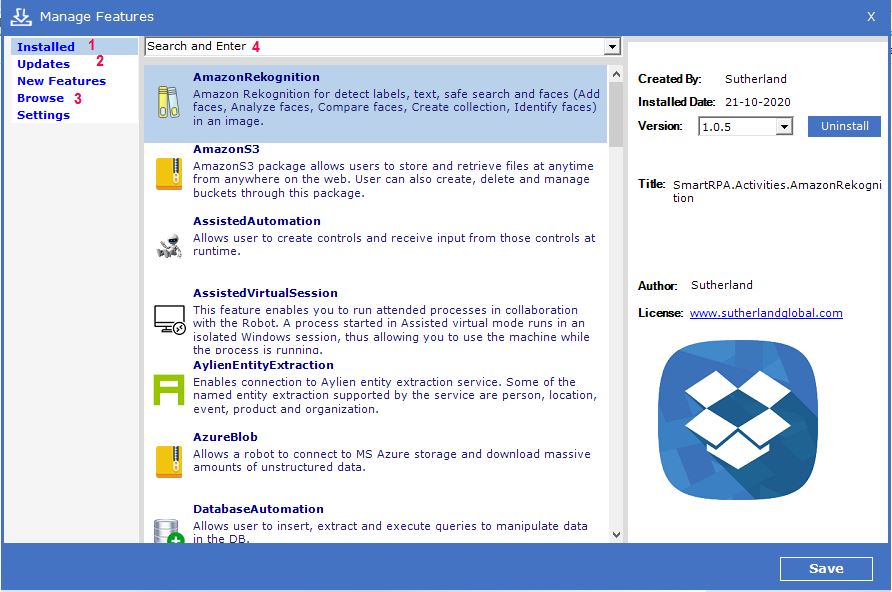
Thus, you can view the (1) Installed features, use the (2) Updates option to update the installed feature to its latest version, (3) Browse and upload features in offline mode and (4) Filter Search for a specific feature.
Figure 17
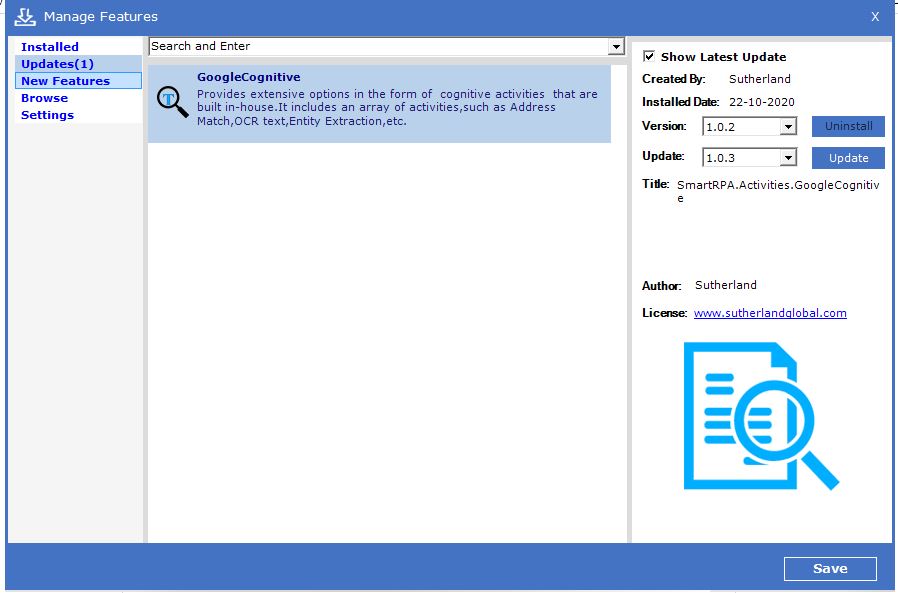
In the Updates, all information to the current version and updated version, etc. will be displayed. Select the activity, its corresponding updated version and Save.
Figure 18
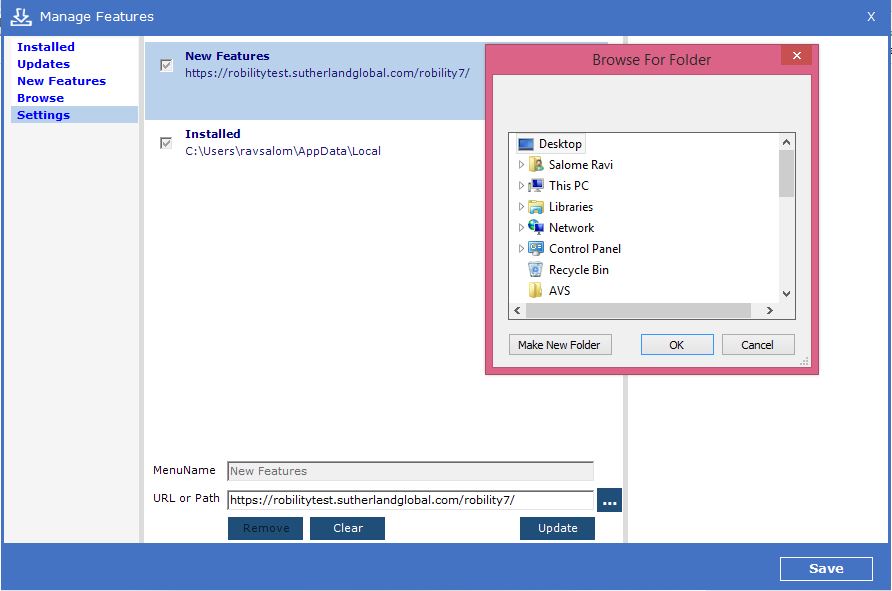
Using the Settings option in the Manage Feature menu, you can view the New Features' URL and Installed Features' path. In the URL/Path field you can define the New Features' URL or use the ellipsis to download features from a folder in the local path.
Figure 19
Let us proceed with the next menu in the Home tab, namely, Missing Features.
Missing Features
To prevent users from saving workflows with missing activities, Missing Features menu facilitates to intuitively help the developer to install missing actives before working or saving the workflow. If you do not have any missing features for the current workflow the menu will be disabled.
Figure 20

To prevent users from saving workflow with missing activities, an alert message has been enabled to intuitively help the developer to install missing actives before working or saving the workflow.
Additionally, this validation is also available for previous version of the workflow if loaded into the Designer canvas. Earlier this validation was only performed for the workflow which was launched with the Designer.
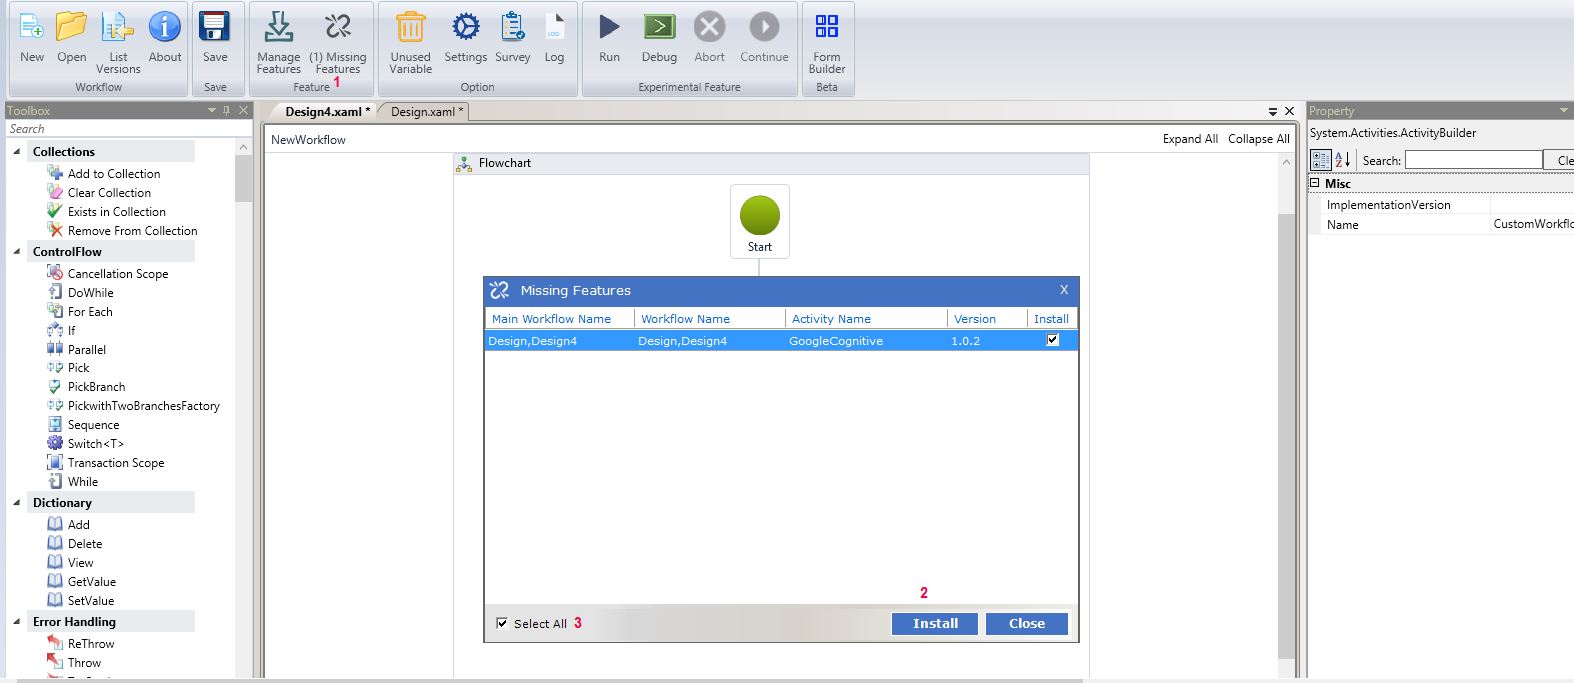
In the following example the user is intimated about the count of missing features that are required for the current workflow he/she is working on. (1) So, by clicking on the missing features menu users can instantly install the missing feature and proceed. If there are more than one missing features (2) check the Select All check box to simultaneously (3) install all the missing features to continue work without any hindrance.
Figure 21
Unused Variable
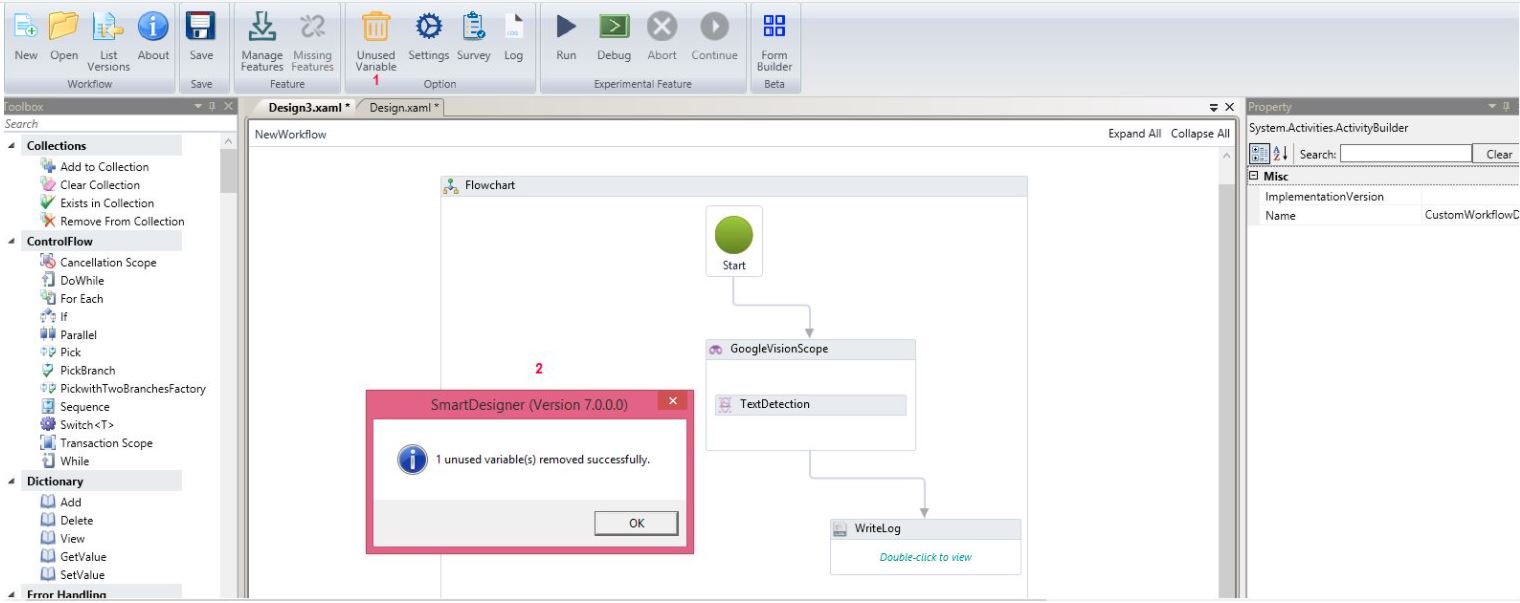
Unused Variable instantly clears all unused variables with a single click on the menu as displayed in the ensuing image.
Figure 22

Click on the Unused Variable menu to clear all unused variables.
Figure 23
Settings
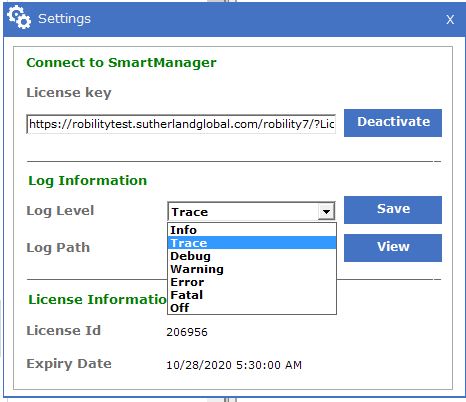
Settings menu opens the application settings screen with options and license information, such as License ID and its Expiry date for an enhanced user experience to keep them notified about the validity period, so, they are not taken by surprise when the license expires. Armed with this detail users never have to worry about discontinued work by inadvertently forgetting the expiry date.
Figure 24

The Settings Options
If you are required to Deactivate the Designer from the SmartManager and view license details, this menu can be used.
Figure 25
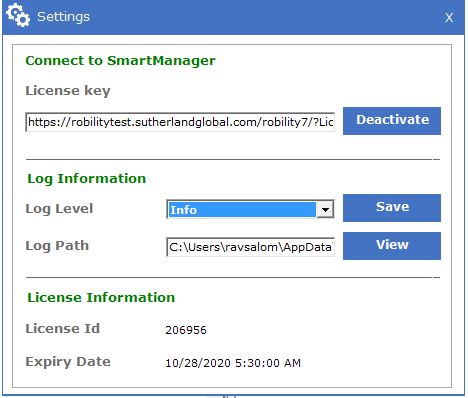
Likewise, Log Levels can be set using the option available in the Log Information field, under the Log Level drop-down.
The Log Level drop-down has the following options:
Figure 26
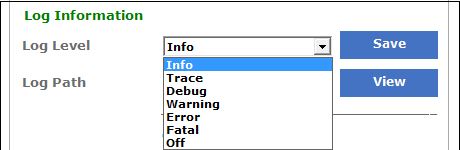
Based on the requirement of the project, the user defines the level of data that needs to be recorded during execution by using the Log Level option.
Info
This log level provides information pertaining to the start and end of the execution of the workflow. Errors if any, warnings and fatal errors, if any, will be captured if the user selects the info log level.
Trace
Trace level allows the user to capture every single action or step executed by the robot, along with the step by step information. Info, Debug and the succeeding levels are traced when one chooses the trace level.
Debug
If the requirement is for the initiation and completion details of the activities, barring the system information, choose the Debug level. Information, Warning and the subsequent levels will be captured (if present) when one chooses the Debug level. Except for trace, all other log levels will be displayed.
Warning
The Warning level can be set in instances where the exception does not act as a barrier for processing, but needs to be addressed. Just as in the aforementioned log levels, the warning will also capture the following levels, such as Error and fatal.
Error
In certain runs, some part of the workflow will be executed, and some others may not, due to errors and in such instances the user could set Error to check where, why and how the mistake has occurred.
Fatal
The execution of the robot that can be interrupted due to factors such as the prime input being invalid is of high importance and therefore will be tracked under the fatal option.
Off
You can turn off the log levels if you do not require them.
Thus, the various log levels are used to record the footprint from the start to end of an execution of the workflow. Of course, the levels chosen are based on the requirements of the project and are completely the user's choice. In Figure 24 , one can see the current log level is Info. It can be changed to Trace, by easy selection from the drop-down and saving.
Figure 27
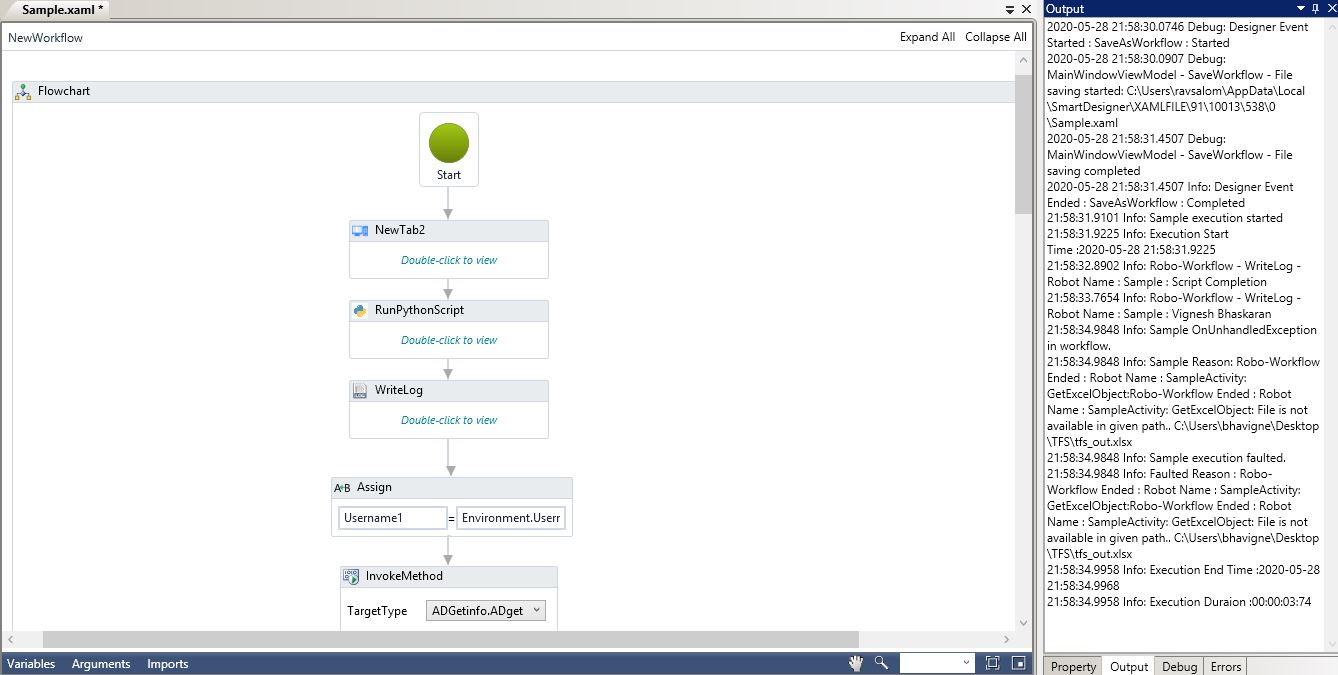
When you execute the workflow with the Log level set as Trace, the output is displayed accordingly, as shown in the following image.
Figure 28
Survey
Survey menu is intended to engage with the users for providing feedback on the application. This is valuable as we can enhance and make Designer prolific from the user's perspective. Click on the menu to access it.
Figure 29

Log
The Log menu provides accurate information of the robot execution for capturing and tracking errors as well as maintaining sophisticated audit trails. We have added workflow execution duration, removed character limitation on the Designer output console to make it more informative and user-friendly. Click on Log to access the activity's log details which is user specific and precise.
Figure 30

Form Builder
Clicking on the Form Builder enables the General Form. You can name it as desired and customize it using the options provided in the Property Window. To know more, refer the following link:
https://robilitydocs.sutherlandglobal.com/node/289
Figure 31
