This activity allows users to read emails from Outlook. It requires the Microsoft
MailItem Interface to access the Outlook account and automate related activities.
This activity serves as a scope for all other activities in email automation.
Technical Reference
|
|
INPUT |
AccountName: Specify the name of the “Outlook account” from which the email needs to be accessed. This field accepts the value in "String" format. |
|
Filter: Specify the filter values that need to be applied while reading emails from the account name. This field accepts values in “String” format. It is optional and reads all emails if no value is provided. |
||
|
FolderName: This specifies the Outlook account name from which the email needs to be accessed. Specifying the account name here facilitates integration with a "Microsoft account." It accepts the value in “String” format. |
||
|
MarkAsUnread: This property indicates whether read emails should be marked as unread after the automation is completed. Specify “True” or “False” to enable or disable the marking of emails as unread during the mail reading process. True: Enables marking emails as unread after they are read. False: Disables marking emails as unread after they are read. None: If this option is left blank, the property will not take effect, and by default, emails will be read without marking as unread. |
||
|
NoOfMails: Enter the number of emails that need to be read within the specified account name. This field accepts values in “Int” format. If values are not provided, the workflow will throw an error. |
||
|
SortBy: This property sorts the emails either in ascending or descending order for reading within the specified account name. By default, it functions with the 'Ascending' order option. Choose the option from the drop-down: Ascending - Sorts the emails in ascending order. Descending - Sorts the emails in descending order. |
||
|
SortbyFieldName: This property specifies the field options such as “From,” “To,” “Subject,” and “Received Time” for sorting and reading emails. Provide the value to sort against the “FilterValue” property. This drop-down contains field names as follows: From – Sorts using the “From Address” provided in the “FilterValue” option. To - Sorts using the “To Address” provided in the “FilterValue” option. Subject - Sorts using the “Subject” provided in the “FilterValue” option. Received time - Sorts using the “Received time” provided in the “FilterValue” option. |
||
|
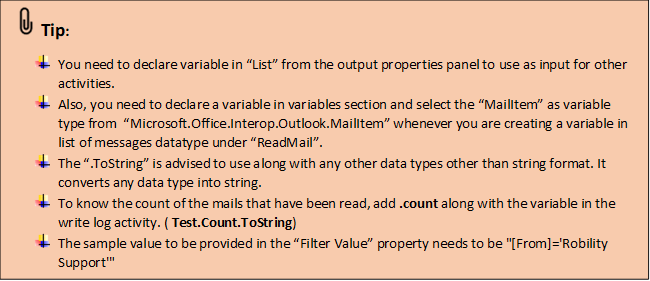
SubFolderName: Specify the folder name from which the emails need to be accessed and read. You can also provide the “SubFolderName” if you need to read emails from a subfolder. (Refer to Tips) |
||
|
Unread: Specify whether to read emails that have not been read yet in the mailbox. Specify either “True” or “False” in the field: True – Enables reading only the “Unread” mails from the mailbox. False – Disables the condition and reads emails according to the sorting order provided, irrespective of whether they are “Read” or “Unread” mails. None – When left out blank, the activity will perform with “False” action. |
||
|
MISC |
Display Name: Displays the name of the activity. The activity name can also be customized which will help in troubleshooting. |
|
|
SkipOnError: It specifies whether to continue executing the workflow even if it throws an error. This supports only Boolean value “True or False”. By default, it is set to “False.” True: Continues the workflow to the next step None: If the option is specified as blank, by default the activity will perform as “False” action. |
||
|
Version: It specifies the version of the Email automation feature in use |
||
|
OUTPUT |
List: It helps to store the mails in the list format that has been read from the mailbox. (Refer to the steps in creating a workflow.) |

* Represents mandatory fields to execute the workflow.
Use Case
The following illustration demonstrates the process of downloading the report and
extracting the “Mail Sender name” and “Received date” using the Email Automation
feature.
A Supervisor needs to extract the daily report of their team members, which is
generated through account. After being extracted, these reports are transferred to
a designated folder for further processing. Upon downloading the report, it's
essential to log the "report name" and the "date received" in an excel spreadsheet
for future analysis.
The daily report consists of team member’s activities such as logged in hours,
idle time, away from the system, system locked status, camera blocked status.
Let’s dive into the steps.
Steps to execute a bot
1. Create a solution named “Report Extraction.”
2. Drag and drop the “GetAccountList” activity from the Email Automation feature
and set as “Start node.”
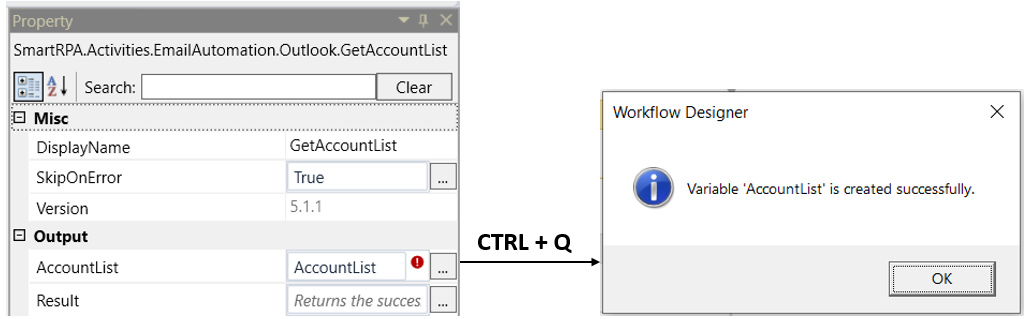
a. This activity helps to retrieve the “account list” that are currently
active on the user’s machine.
b. Navigate to the properties and declare a variable as “Acc_list” in
the “Account list” property to store the account list. It returns the
output in the list format. It will be used as input in further activities
for the “Account Name” property.
c. There are two ways to declare a variable –
i. Method 1 – Click on the "AccountList" property within
the "GetAccountList" activity and enter the variable name.
In this case, we are using " Acc_list." Then, press "Ctrl+Q,"
which is a shortcut key to create a variable.
ii. Method 2 - Click on the Variables pane and enter the
name " Acc_list." Then, in the "Variable Types" column,
select "Browse for Types" from the dropdown menu.
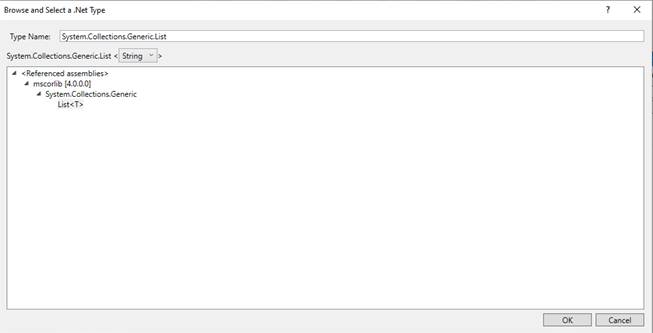
iii. The .Net window for data types will appear on the screen,
enter the type name as “System.Collections.Generic.List”
and choose “String” then click on “OK” button.
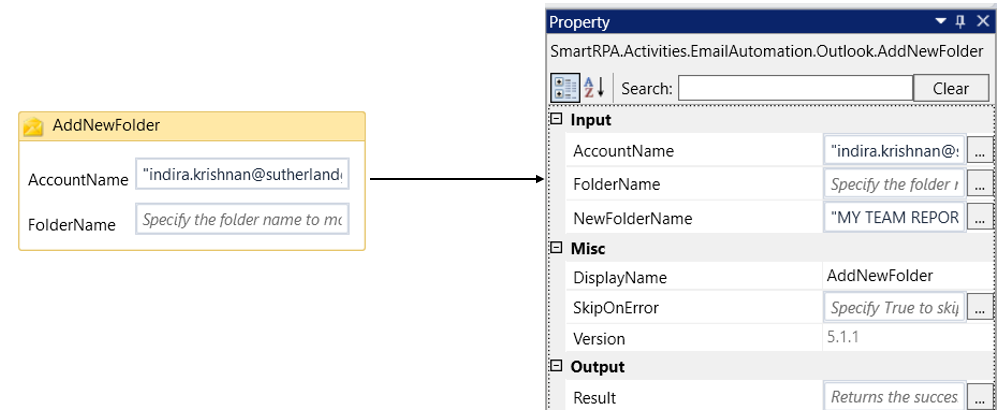
3. Drag and drop the “AddNewFolder” activity and place it next to the
“GetAccountList” activity.
a) The purpose of adding this activity is to create a new folder
as “My Team Report” to move the emails from original folder
“Inbox”.
b) Double click on the activity and enter the “Account Name”
as “Acc_List(0).”
c) Enter the new folder name as “MY TEAM REPORT” in the
“NewFolderName” property to create the folder in the
specified outlook account.
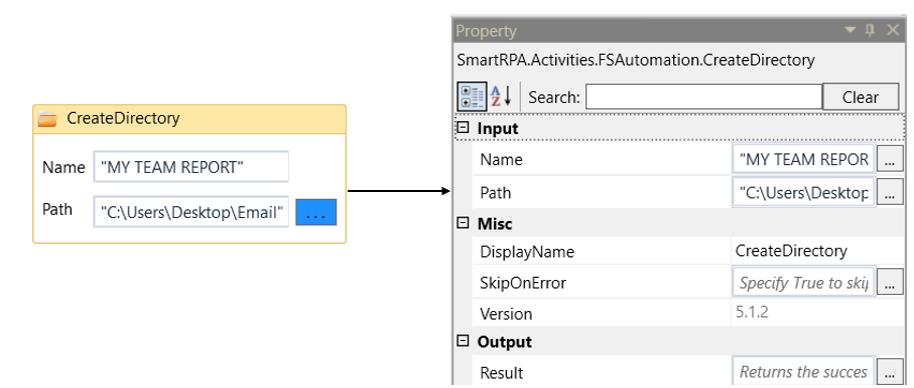
4. Now, drag and drop the “CreateDirectory” activity from the “FS Automation”
feature.
a. This activity is used to create a folder in the specified path
on the user’s machine. Here are creating this folder to
download the report from the mail.
b. Double click on the activity and enter the folder name as
“TEAM REPORT” in the “Name” property.
c. Provide the “full path” where you want to create the folder.
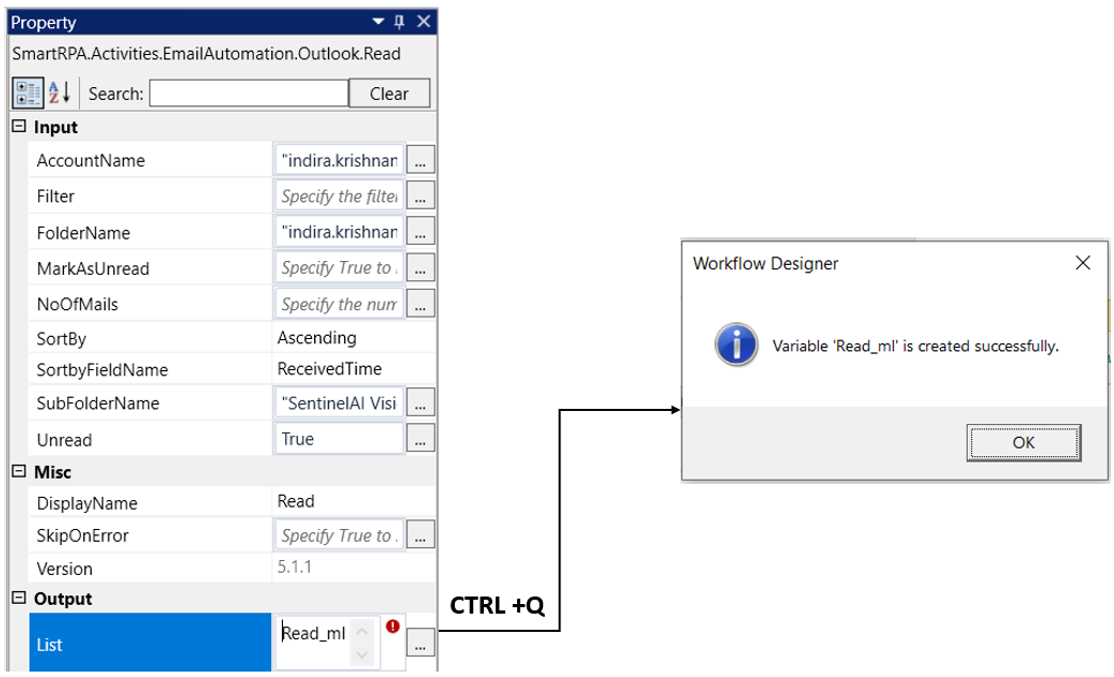
5. Place the “READ” activity from the Email Automation feature next to the Create
directory activity.
a. It helps to read the mail from the specified outlook account
and store the mails in the “MailItem” in a list format. Refer
the steps to create “MailItem” from
“Microsoft.Office.Interop.Outlook.MailItem” as the
“Email Automation” package requires this integration.
b. Double click on the activity and enter the “Account Name”
as “Acc_List(0)” in the property.
c. Specify the “Acc_list(0)” in the “FolderName” property as
well. This property is used to integrate with the account
name provided.
d. Navigate to the properties and specify the “No.of.Mails” as
“10” for the activity to read the number of mails from the
specified outlook account.
e. Set the “SortBy” field as “Ascending” from the drop-down
to sort and read the mails in ascending order.
f. Choose the “SortByFieldName” as “ReceivedDate” from
the drop-down to sort and read the mails with the received
date in ascending order.
g. Enter the “SubFolderName” as “Inbox” in the property to
choose the folder name from which the mails has to be
read.
h. Specify “True” in the “Unread” property to read only the
mails which has not been read.
i. Declare a variable as “Read_ml” in the “List” property to
store the read mails in a variable for further processing. It
will be used as input in other email activities.
i. Method 1 – Click on the "AccountList"
property within the "GetAccountList" activity and
enter the variable name. In this case, we are
using " Acc_list." Then, press "Ctrl+Q," which is
a shortcut key to create a variable.
ii. Method 2 - Click on the Variables pane and enter the name
" Acc_list." Then, in the "Variable Types" column, select
"Browse for Types" from the dropdown menu.
iii. The .Net window for data types will appear on the screen,
enter the type name as “System.Collections.Generic.List” and
choose “Microsoft.Office.interop.Outlook.MailItem” then click
on “OK” button.

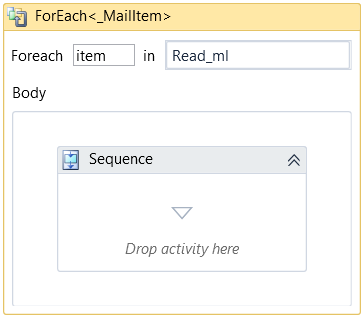
6. Place the “For each” activity next to the read mail to iterate each mail from the “Read_ml”
variable for further process of saving the report and extracting the values.
a. Enter "Read_ml" as the input value here, in which is where we have
stored the read mails.
b. The values from "Read_ml" have been assigned to the "Item."
c. Select "Microsoft.Office.Interop.Outlook.MailItem" as the "TypeArgument"
since it's a list of mails.
7. Drag and drop the “ExtractMailMessage” activity inside the “For Each” activity.
a. Navigate to the properties and provide the “AttachmentPath”
as the new folder path created above to extract the report
the mail and save it to the “folder path.”
b. Choose the “InputType” as “MailItem” from the drop-down
as we are using the “Read_ml” variable as input here.
c. Specify the “MailItem” as “item” here to extract the values
from the mail using the variable.
d. Declare a variable in the “MailSenderName” as “Mail_Sender”
to retrieve the sender mail name from the mails.
i. There are two methods to create a variable –
ii. Method 1 – Click on the "MailSenderName"
property within the "ExtractMailMessage" activity
and enter the variable name. In this case, we are
using " Mail_Sender." Then, press "Ctrl+Q," which
is a shortcut key to create a variable.
iii. Method 2 - Click on the Variables pane and
enter the name " Mail_Sender." Then, in the
"Variable Types" column, select "String" from the
dropdown menu.
e. Declare another variable in the “ReceivedDateTime” as “RDT” to
extract the received date and time from the mails.
iv. There are two methods to create a variable –
v. Method 1 – Click on the " ReceivedDateTime "
property within the "ExtractMailMessage" activity and
enter the variable name. In this case, we are using
" RDT." Then, press "Ctrl+Q," which is a shortcut key
to create a variable.
vi. Method 2 - Click on the Variables pane and enter
the name " RDT." Then, in the "Variable Types" column,
select "Browse for Types" from the dropdown menu.
vii. The .Net window for data types will appear on the
screen, enter the type name as “System.DateTime”
and then click on “OK” button.
8. Drag and drop the “Move” activity and place it next to the “ExtractMailMessage” activity.
a. It helps to move the mails from the “Inbox” folder to the newly created
folder as “TEAM REPORT” folder.
b. Double click on the activity and enter the “Account Name” as
“Acc_List(0)” in the property.
c. Specify the “Acc_list(0)” in the “FolderName” property as well. This
property is used to integrate with the account name provided.
f. Provide the “MailItem” as “item” here to move the mails using the
variable.
d. Specify the “SubFolderName” as “TEAM REPORT” to move the
mails from “Inbox” folder.
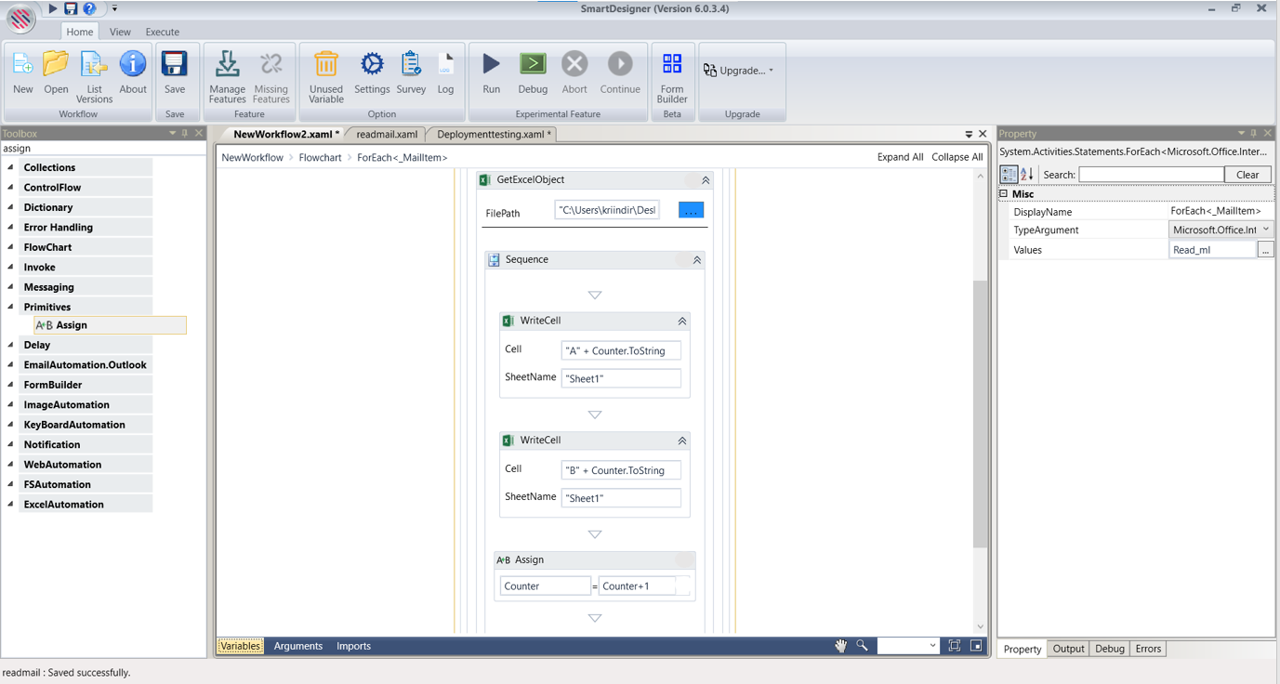
9. Place the "GetExcelObject" next to the "Move" activity and select the input file path
containing the list of inputs.
a) Drag and drop the "WriteCell" activity into the scope. Specify the cell value
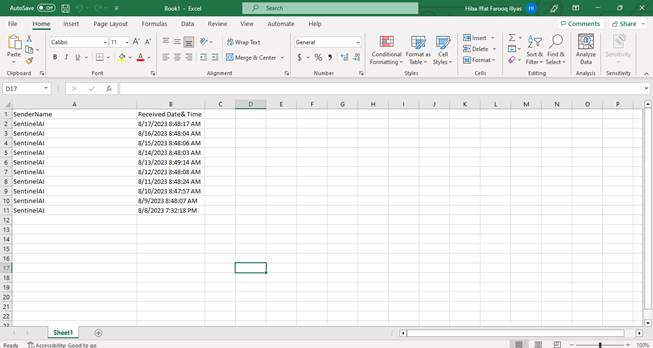
as "A" + Counter.ToString, since the “SenderName” is located in the "A" column.
b) Assign the value stored from "ExtractMailMessage" to the "WriteCell" activity
and set the "InputString" value as "ReceivedDate&Time."
c) Indicate the sheet name as "Sheet1," where the data is stored.
d) Transfer the stored value from "ExtractMailMessage" to the "WriteCell" activity
and set the "InputString" value as "Mail_Sender."
e) The purpose of using a counter is to increment the values for the "WriteCell"
activity. To accomplish this, include an "Assign" activity.
i. Prior to this, declare a variable named "Counter" and select the
"DataType" as "Int32."
ii. The reason for choosing the integer “DataType” is to increment the
value, and specify the default value as "2," as it consider from the
header as 1. Refer 13th point how to assign the counter increment
value in the “Assign” activity.
f) Drag and drop another "WriteCell" activity into the scope. Specify the cell
value as "B" + Counter.ToString, as the Book ID is located in the "B" column.
g) Transfer the stored value from " ExtractMailMessage " to the
"WriteCell" activity and set the "InputString" value as "RDT.ToString."
10. Place an "Assign" activity next to the "GetExcelObject" scope and input the declared
variable, in this case, "Counter." Specify the "To" value as "Counter," and set the "Value"
as "Counter + 1." This increments the counter for further use.
11. Drag and drop the “Send” activity and place it next to the “For each” activity.
a. It helps to send an email using the “SMTP Client” provided by the
organization. Here we are sending an email to the “Supervisor”
once the reports and values has been extracted.
b. Double click on the activity and enter the “TOMailId” as
“SupervisorMailID” to send the notification mail to the supervisor.
c. Navigate to the properties and enter the “body” as “The bot has
completed the process and the reports has been saved in the
specified location” to send this message as mail body.
d. Provide the “MailAddress” as “Acc_list(0)” . It specifies to provide
the address from which account it needs to send.
e. Provide the “SMTP Client” as “YourOrganizationID” to integrate and
send over the mail. It ensures that the mail has been sent securely.
12. Now, execute the workflow.
The bot executes the workflow and fetches the data from the specified
“MailBox” to download the report and then extracts the “MailSenderName”
and “ReceivedDateTime” to update in the excel sheet. Further sends a
notification to the “Supervisor” on the completion of process.