
This activity enables sending emails using the "SMTP Client" from Outlook to
the specified address.

Technical Reference
|
|
INPUT |
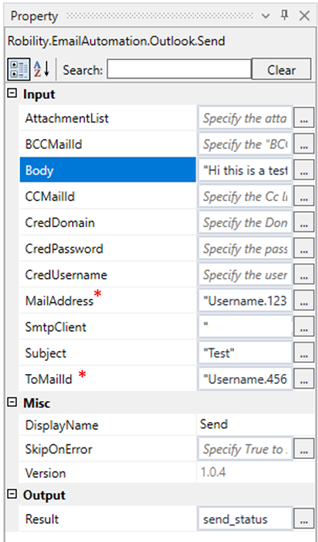
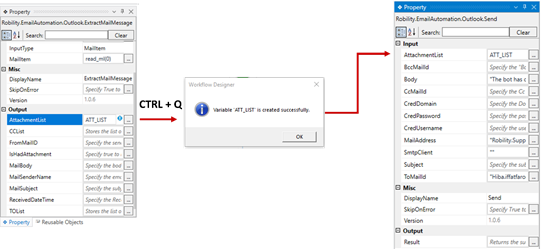
AttachmentList: Indicate the "AttachmentList" (Declared as an output in the "ExtractMailMessage" activity) to include attachments along with the "NewMail." It accepts values in the form of a “list” datatype. |
|
BCCMailID: Provide the "BCC MailID" of the recipients for sending the email. This ensures that the "MailID" mentioned is not disclosed to the other users listed in the "To" and "CC" addresses. This field accepts values in the "String" datatype. |
||
|
Body: Provide the "Mail Body" that needs to be sent as an “email.” This field accepts values in the "String" datatype. |
||
|
CCMailID: Provide the "CC address" of the recipients to send the email. This allows sending email to additional recipients for informational purposes. This field accepts values in the “String” datatype. |
||
|
CredDomain: Specify the “DomainName” for the "SMTP client" mentioned, to send the email. This field accepts values in the “String” datatype. |
||
|
CredPassword: Specify the "Password" credentials for the mentioned "SMTP client" to send the email. This field accepts values in the “String” datatype. |
||
|
CredUsername: Specify the "Username" credentials for the mentioned "SMTP client" to send the email. This field accepts values in the “String” datatype. |
||
|
MailAddress: Specify the "From address," which is the sender's email address used to send the email. This field accepts values in the “String” datatype. |
||
|
SmtpClient: Specify the “SMTP server” name that is required to send the mail. This field accepts values in the “String” datatype. |
||
|
Subject: Specify the "From address," which is the sender's email address used to send the email. This field accepts values in the “String” datatype. |
||
|
ToMailId: Specify the "To address" of the recipient to whom the email should be sent. This field accepts values in the “String” datatype. |
||
|
MISC |
DisplayName: Displays the name of the activity. It can also customize the activity name to helps in troubleshooting. |
|
|
SkipOnError: It specifies whether to continue executing the workflow even if it throws an error. This supports only Boolean value “True or False”. By default, it is set to “False.” True: Continues the workflow to the next step None: If the option is specified as blank, by default the activity will perform as “False” action. |
||
|
Version: It specifies the version of the Email automation feature in use |
||
|
OUTPUT |
Result: It helps to view the execution state of the activity. It returns the values in Boolean format. True: It indicates the activity has been executed successfully without any error. False: It indicates that the activity has been faulted due to some unexceptional error thrown. |
* Represents mandatory fields to execute the workflow

SMTP Client
SMTP, which stands for Simple Mail Transfer Protocol, is a protocol used for sending and
receiving email messages over the Internet. It plays a fundamental role in the email
communication process, enabling messages to be routed and delivered to their intended
recipients. The primary purpose of SMTP is to facilitate the reliable and efficient
transmission of email messages across different email servers and systems.
The “SMTP Client” at “Send” activity in Robility provide a way to integrate email
communication into your automation processes.
Here is an example of how to use the “SMTP Client” in “Email Automation” to send
an email.
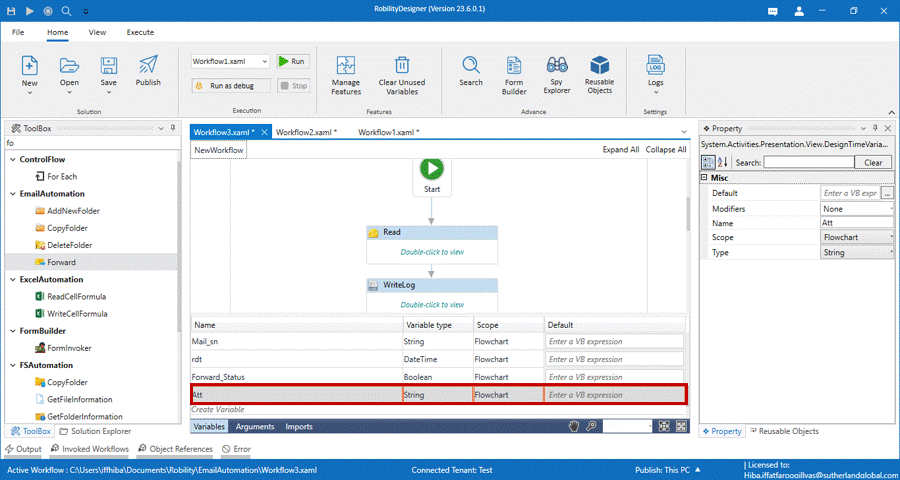
1. Create a new solution named “Email Automation”.
2. Drag and drop the “Send” activity to the workflow from “Email Automation”
feature.
3. Now, configure the “SMTP Server” into the properties.
a. Navigate to the properties and enter the “SMTP Client” as
“SMTP server address”. It will be provided by the organization.
This field accepts values in the "String" datatype.
b. Provide the “DomainName” in the “CredDomain” property.
c. Provide the “Sender’s username” in the “CredUsername”
property to authenticate with the “SMTP Server” provided.
This field accepts values in the "String" datatype.
d. Provide the “Sender’s Password” in the “CredPassword”
property for authentication. This field accepts values in
the "String" datatype.
4. Fill in the other mandatory properties in the activity.
a. From: Specify the “Sender's email address” in the “MailAddress”
property.
b. To: Enter the “Recipient's email address” in the “ToMailId”
property.
c. Subject: Set the “Subject” of the email in the “Subject”
property.
d. Body: Enter the “Content of the email” in the “Body”
property.

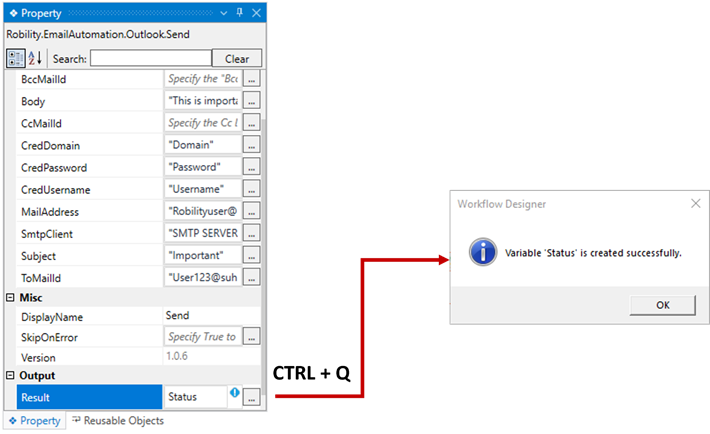
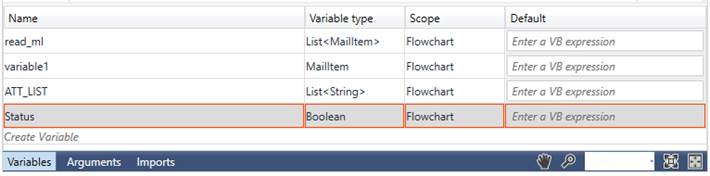
5. Declare a variable in the “Result” box of the output activity as “Status”.
a. Method 1 – Click on the "Result" property within the "Send"
activity and enter the variable name. In this case, we are
using " Status”. Then, press "Ctrl+Q," which is a shortcut
key to create a variable.
b. Method 2 - Click on the Variables pane and enter the name
" Status." Then, in the "Variable Types" column, select
"Boolean" from the dropdown menu.
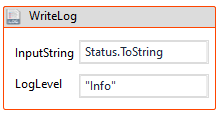
6. Connect the output of the "Send" activity to a “Write log" activity to indicate
that the email has been sent.
a. Double click on the “WriteLog” activity and enter the
“InputString” as “Status.ToString”.
b. The “.ToString” is advised to use along with any other data
types other than string format. It converts any data type into
string.
c. Enter the log level as “Info” in the property.
7. Execute the Workflow.
How to assign the value to Attachment list
The attachments list should be declared as a list of strings from the variables section
and enter the value as new List(of string)(new string(){“value1”,“value2”}).
Enter the location path of the attachments.
Click here to view an example of how the “Send” activity is used in the workflow.