Filter table
This activity can be used to filter a specific value from the table.
Technical reference:
|
|
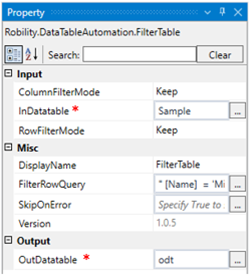
INPUT |
ColumnFilterMode: Select the options from the drop-down to filter the column. Keep: This option allows to filter the column. Remove: This option does not allow to filter the column. |
|
InDatatable: Mention the datatable that needs to be filtered. |
||
|
RowFilterMode: Select the options from the drop-down to enable/ disable to filter the row. Keep: This option allows to filter the rows. Remove: This option does not allow to filter the rows. |
||
|
MISC |
Display Name: Displays the name of the activity. You can also customize the activity name to help troubleshoot issues faster. This name will be used for logging purposes |
|
|
FilterRowQuery: This fields automatically gets filled after selecting the values from the filter wizard. You can also enter the values manually. |
||
|
SkipOnError: It specifies whether to continue executing the workflow even if it throws an error. This supports only Boolean value “True or False” True: Continues to execute the workflow irrespective of any error thrown. False: Stops the workflow if it throws any error |
||
|
Version: It specifies the version of the DataTable automation feature in use. |
||
|
OUTPUT |
OutDatatable: Declare and assign a variable to return the filtered values separately in a datatable format. This is not a mandatory field however declare a variable to view the filtered table. |
* Mandatory fields to execute the workflow.
Utilization of Filter Wizard:
Drag and drop the Filter activity from the Datatable Automation.
Double click on the activity and the filter wizard appears on the screen.
The filter wizard will have two tabs such as “Filter rows” and “Limit columns”.
Limit columns:
This tab has two options,
Keep – This option is used to display the specified column alone.
Remove – This option is used to remove the specified column alone.
1. Enter the column name in the box.
2. If you want to add one or more columns, select the (+) near the column option.
3. Select either to keep or remove the columns.
Filter rows:
1. With the filter rows tab, you can edit and add the rows to be filtered.
2. If you want to filter the rows, select the Keep option from the rows filter mode.
3. Another three tabs will be available – Column, Operation and Value.
4. The column option enables to add the column that needs to be filtered.
5. Enter the column name.


Example:
The following activity helps to filter the rows and columns from the specified table.
1. Drag and drop the filter table activity from the datatable automation feature.
2. Connect it below the generate table activity.
3. Double click on the filter table activity.
4. Select the filter wizard.
5. Select the Filter rows tab and choose keep option.
6. Enter the column as “Name” in the box.
7. Select the operation as “=” from the drop-down.
8. Enter the value as “ Quinn Flynn” in the box.
9. Select ok button.
10. Enter the datatable variable as “Table_2” in the InDatatable from the properties panel.
11. Declare and assign a variable in OutDatatable as “Filtered_Table” in the properties panel.
12. Add a table viewer activity and connect it below the filter table activity.
13. Enter the input as “Filtered_Table” in the properties panel.
14. Enter the table title as “Output”.
15. Now, execute the workflow.

The bot will identify the table and filters the specified rows from the table then displays it in a table viewer.