The SmartRPA Cognitive feature provides extensive options in terms of cognitive functions that enable the user to automate tasks that require adaptability, based on the environment.
AddressMatch
|
Activity Name |
Picture |
|
AddressMatch |
|
When to use the AddressMatch activity
This activity is used to compare two different sets of string (address) and provide the percentage of similarity.
Technical Reference
|
Figure 1.0
|
S.no |
Description |
|
1 |
Specify the input address 1 that needs to be compared |
|
|
2 |
Specify the input address 2 that needs to be compared |
|
|
3 |
Displays the action that the activity performs in the workflow |
|
|
4 |
Specify whether to continue executing the workflow even if the activity fails |
|
|
5 |
Enter the declared variable name to store the Match Percentage of the addresses |
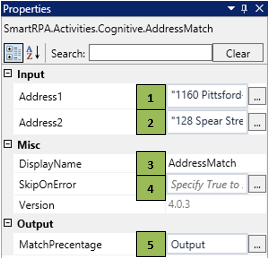
![]() MatchPercentage to be stored as a variable of type ÔÇ£Double.ÔÇØ
MatchPercentage to be stored as a variable of type ÔÇ£Double.ÔÇØ
Illustration
![]() Activity: The ÔÇ£AddressMatchÔÇØ activity helps you compare two different addresses and provides a result that holds the match percentage between the compared strings.
Activity: The ÔÇ£AddressMatchÔÇØ activity helps you compare two different addresses and provides a result that holds the match percentage between the compared strings.

Figure 1.1

Figure 1.2
![]()
Figure 1.3
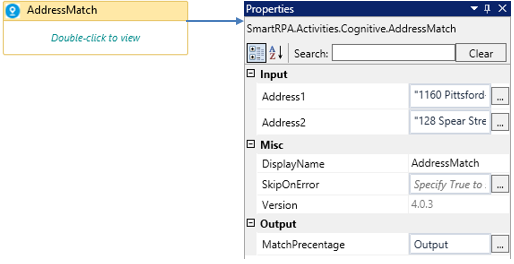
Figure 1.4
ImageEnhancement
|
Activity Name |
Picture |
|
ImageEnhancement |
|
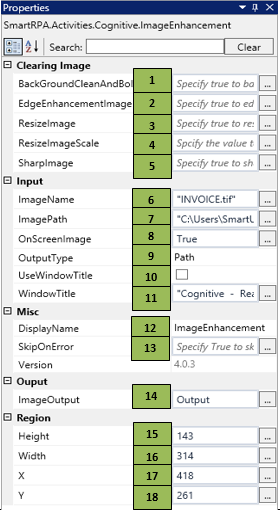
When to use the ImageEnhancement activity
This activity is used to improve the quality of an image that is used in processing.
Technical Reference
|
Figure 1.5
|
S.no |
Description |
|
1 |
Specify True to clean the background and embolden ( to appear in a bold typeface ) the Characters |
|
|
2 |
Specify True to Enhance the edges of the characters |
|
|
3 |
Specify True to Resize the images |
|
|
4 |
Specify The value to resize the image scale |
|
|
5 |
Specify true to sharpen the image/characters |
|
|
6 |
Specify the name of the Input |
|
|
7 |
Specify the path in which the input is stored |
|
|
8 |
Specify as true if an onscreen area is to be enhanced |
|
|
9 |
Choose the Output type from the Drop-down |
|
|
10 |
Check the option to use the ÔÇ£WindowTitleÔÇØ |
|
|
11 |
The window title is auto- filled when the image is snipped |
|
|
12 |
Displays the action that the activity performs in the workflow |
|
|
13 |
Specify whether to continue executing the workflow even if the activity fails |
|
|
14 |
Enter the declared variable name to store the enhanced text |
|
|
15 |
Height gets auto filled once the image is snipped |
|
|
16 |
Width gets auto filled once the image is snipped |
|
|
17 |
X gets auto filled once the image is snipped |
|
|
18 |
Y gets auto filled once the image is snipped |
![]() ResizeImageScale value should be defined as variable type Double.
ResizeImageScale value should be defined as variable type Double.
Illustration
Drag a ÔÇ£ImageEnhancementÔÇØ activity and connect under the start node of the flowchart
- Double-click the activity and click on the scissors symbol to snip the image to be enhanced
- Specify the image name and the image path of the input to the respective fields that needs to be processed
- Specify the declared string variable in the image output field.
![]()
Figure 1.6

Figure 1.7
EntityExtraction
|
Activity Name |
Picture |
|
EntityExtraction |
|
Pre-requisites to execute the ÔÇ£EntityExtractionÔÇØ activity
- The machine in which the activity is being executed should have Python application.
NOTE: Please make sure the machine has internet access.
Steps to install the Python application and packages:
- Download Python 3.6.4 32 bit/63 bit based on the system type.
(https://www.python.org/downloads/windows/)
- Open a command prompt and execute the following command:
python -m pip install --trusted-host pypi.org --trusted-host pypi.python.org --trusted-host files.pythonhosted.org spacy
- With the same command prompt execute the following command:
python -m pip install --trusted-host pypi.org --trusted-host pypi.python.org --trusted-host files.pythonhosted.org (or) use the attached link to download the package
https://github.com/explosion/spacy-models/releases/download/en_core_web_sm-2.1.0/en_core_web_sm-2.1.0.tar.gz#egg=en_core_web_sm
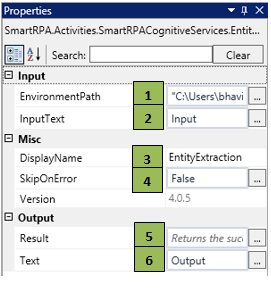
When to use the EntityExtraction activity
This activity helps you classify pre-defined entities from a given value of text.
Technical Reference
|
Figure 1.8
|
S.no |
Description |
|
1 |
Specify the path of the python application |
|
|
2 |
Specify the input text that needs to be classified |
|
|
3 |
Displays the action the activity performs in the workflow |
|
|
4 |
Specify whether to continue executing the workflow even if the activity fails |
|
|
5 |
Specify the Boolean variable which holds the success state of the activity |
|
|
6 |
Specify the variable to which the output needs to be stored. |
![]() InputText can also be a variable of datatype string, that holds the input text.
InputText can also be a variable of datatype string, that holds the input text.
Illustration
![]() Activity: The ÔÇ£NLTKNamedentityExtractionÔÇØ is a cognitive feature, which helps the user to bring machine intelligence through algorithmic functions to locate entities in the input text.
Activity: The ÔÇ£NLTKNamedentityExtractionÔÇØ is a cognitive feature, which helps the user to bring machine intelligence through algorithmic functions to locate entities in the input text.
- Drag a ÔÇ£NLTKNamedentityExtractionÔÇØ activity and drop it to the flowchart
- Enter the location of the python application that is stored in the machine in the ÔÇ£Environment PathÔÇØ property
- Enter the input text (can also be a varchar) in the ÔÇ£InputTextÔÇØ field
- Enter the variable that needs to hold the output with the entity classification.

Figure 1.9

Figure 1.10
OCRText
|
Activity Name |
Picture |
|
OCRText |
|
When to use the OCRText activity
This activity is used to convert an image/ a non-editable document into text. The input can be fed as an input file or by snipping a chosen area.
Illustration
![]() Activity: The ÔÇ£OCRTextÔÇØ is a cognitive feature used extract text data from image /scanned PDF documents which is non-editable, the activity also helps to extract text onscreen by snipping the workarea.
Activity: The ÔÇ£OCRTextÔÇØ is a cognitive feature used extract text data from image /scanned PDF documents which is non-editable, the activity also helps to extract text onscreen by snipping the workarea.
Step 1 ÔÇô Drag a ÔÇ£OCRTextÔÇØ activity and drop it to the flowchart, a wizard opens.
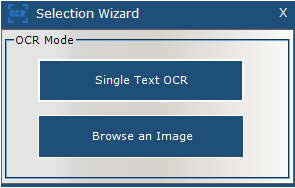
Figure 1.11
Step 2 ÔÇô Click ÔÇ£Single Text OCRÔÇØ to snip onscreen, a snipping cursor appears to snip the preferred work area.
Step 3 ÔÇô Snip over the preferred area that needs to be converted as text.
Figure 1.12
Step 4 ÔÇô On completion of snipping, the data gets processed and the output will be generated.
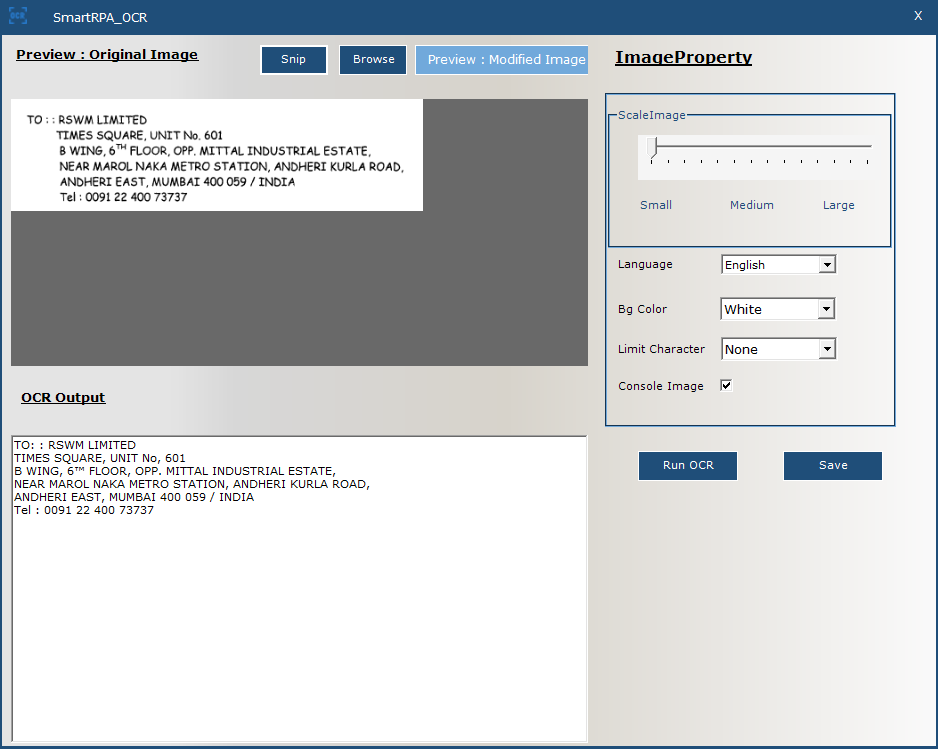
Figure 1.13
Step 5 ÔÇô The image property can be modified based on the requirements of the user.
Step 6 ÔÇô Click Save to autofill the properties to the parameters in the activity.

Figure 1.14
To convert an existing image into text,
Step 7 - click on the browse an image option to choose the input file,

Figure 1.15
Step 8 - click on the browse an image option to choose the input file,
Step 9 ÔÇô Choose the input and click open to process the input and the result will be generated.

Figure 1.16
Step 10 ÔÇô Click Save to autofill the properties to the parameters in the activity.

Figure 1.17