The Desktop Automation package facilitates development of robots to automate tasks performed by humans on a desktop application, using the SmartDesigner tool. The tool has the capability to interact with elements in applications, using their unique attributes or identifiers. Hence, it can navigate easily between applications, perform actions, extract and transfer data from various parts of the screen and carry out data entry tasks.
Note: The Desktop Automation also supports extraction of data from MSUI & MSAA framework of the application.
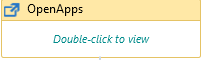
OpenApps
When to use the OpenApps activity
This activity helps you launch an application residing in the system or in the indicated server, using its path.
|
Activity Name |
Picture |
|
OpenApps |
|
|
Figure 1.0
|
S.no |
Description |
|
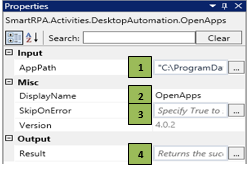
1 |
Specify the path/the application name appended with the file extension |
|
|
2 |
Displays the action that the activity performs in the workflow |
|
|
3 |
Specify whether to continue executing the workflow even if the activity fails |
|
|
4 |
Define a Boolean to validate if the activity has been completed successfully. |
![]() Applications can be triggered with the correct path name/application name appended with the extension.
Applications can be triggered with the correct path name/application name appended with the extension.
Assume you want to schedule a meeting using the Outlook application via the desktop automation activities.
 Activity: The ÔÇ£OpenAppsÔÇØ activity helps you open the outlook application that is required to schedule a meeting.
LetÔÇÖs start building the bot
Step 1 ÔÇô Open the SmartDesigner tool
Step 2 ÔÇô Open a new workflow
Step 3 ÔÇô Drag an ÔÇ£OpenAppsÔÇØ activity. (Refer figure 1.0 &1.1)
Go to the property section and enter the path of the application/ application name with the appropriate extension that is required to be opened.
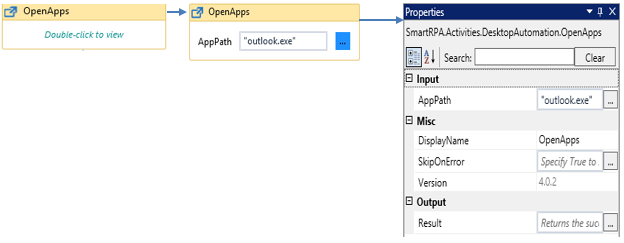
Figure 1.1
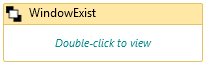
The next step will be explained using the ÔÇ£WindowExistÔÇØ activity.
WindowExist
|
Activity Name |
Picture |
|
WindowExist |
|
This activity helps you realize if an activity is active, by checking if the window/application exists.
|
Figure 1.2
|
S.no |
Description |
|
1 |
Specify the wait time for the activity to terminate the execution |
|
|
2 |
It contains the title of the required window |
|
|
3 |
Displays the action that the activity performs in the workflow |
|
|
4 |
Define a Boolean to validate if the activity is completed successfully. |
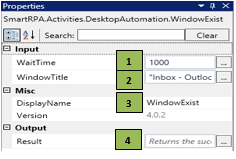
![]() WaitTime should be specified in milliseconds.
WaitTime should be specified in milliseconds.
![]() Activity: The WindowExist activity helps you verify if the application is active/launched.
Activity: The WindowExist activity helps you verify if the application is active/launched.
Step 4 ÔÇô Drag a ÔÇ£WindowExistÔÇØ activity and connect under the ÔÇ£OpenAppsÔÇØ activity. (Refer figure 1.2 & 1.3)
- Double click the activity and click on the dotted option to choose the window and the application that is required to be verified for existence from a list of active windows
- Add the chosen wait time in the WaitTime field (WaitTime value is in Milliseconds.)

Figure 1.3
The next step will be explained using the ÔÇ£WindowStatusÔÇØ activity.
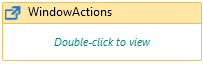
WindowActions
|
Activity Name |
Picture |
|
WindowActions |
|
When to use the WindowActions activity
This activity is used to perform actions such as maximize/minimize and restore a window during run-time.
|
Figure 1.4
|
S.no |
Description |
|
1 |
Specify the action that needs to be performed by choosing from the options |
|
|
2 |
Specify the wait time for the activity to terminate the execution |
|
|
3 |
It contains the title of the required window |
|
|
4 |
Displays the action that the activity performs in the workflow |
|
|
5 |
Specify whether to continue executing the workflow even if the activity fails |
|
|
6 |
Specify the Xposition to move the line item that is to be actioned |
|
|
7 |
Specify the Yposition to move the line item that is to be actioned |
|
|
8 |
Define a Boolean to validate if the activity is completed successfully |
|
|
9 |
Set the WindowHeight as per the requirement |
|
|
10 |
Set the WindowWidth as per the requirement |
|
|
11 |
Set a degree at which the rotation is required to take place. |

Illustration
Step 5 ÔÇô Drag a ÔÇ£WindowActionsÔÇØ activity to print the stored data and connect under the ÔÇ£WindowActionsÔÇØ activity. (Refer figure 1.4,& 1.5)
Double click the activity and click on the dotted option to choose the window and the application that is required to be maximized.
Add the chosen wait time in the WaitTime field (WaitTime value is in Milliseconds.)
Figure 1.5
The next step will be explained using the ÔÇ£SelectItemÔÇØ activity.
SelectItem
|
Activity Name |
Picture |
|
SelectItem |
|
When to use the SelectItem activity
This activity is used to choose an option from a drop down/list of choices.
|
Figure 1.6
|
S.no |
Description |
|
1 |
Specify the input of the option to be selected |
|
|
2 |
Selection is based on the requirement |
|
|
3 |
Gets auto-filled when the element that needs to be actioned is indicated |
|
|
4 |
SelectBy drop-down has multiple options Value: Accepts the default assigned HTML value of a web-page Text: Accepts text input of the drop-down options Index: Index position of the data in a drop-down that needs to be selected |
|
|
5 |
Specify the wait time for the activity to terminate the execution |
|
|
6 |
It contains the title of the required window |
|
|
7 |
Displays the action that the activity performs in the workflow |
|
|
8 |
Specify whether to continue executing the workflow if the activity fails |
|
|
9 |
Define a Boolean to validate if the activity is completed successfully. |
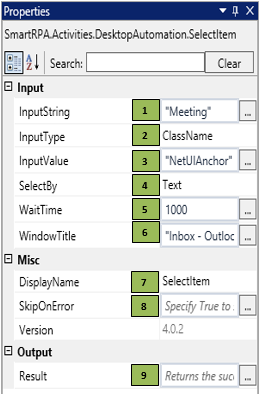
![]() InputType has multiple options to choose from. Once the InputType is changed, the InputValue changes correspondingly.
InputType has multiple options to choose from. Once the InputType is changed, the InputValue changes correspondingly.
InputString should be specified based on the option that is chosen from the SelectBy drop-down.
Step 6 ÔÇô Drag a ÔÇ£SelectItemÔÇØ activity and connect under the ÔÇ£WindowStatusÔÇØ activity to choose the option ÔÇ£meetingÔÇØ from the new items drop-down in the outlook (Refer figure 1.6, 1.7 )
- Double-click the activity and click on the Spy symbol to open the SmartSpy window on the screen
- Select the chosen window/application in which the element needs to be recorded
- Spy the element in which the action needs to be performed and click Export to auto-fill the property details
- In the ÔÇ£InputStringÔÇØ field, enter the input (text, value, index) that needs to be selected from the options
- Add the chosen wait time in the WaitTime field (WaitTime value is in Milliseconds.)
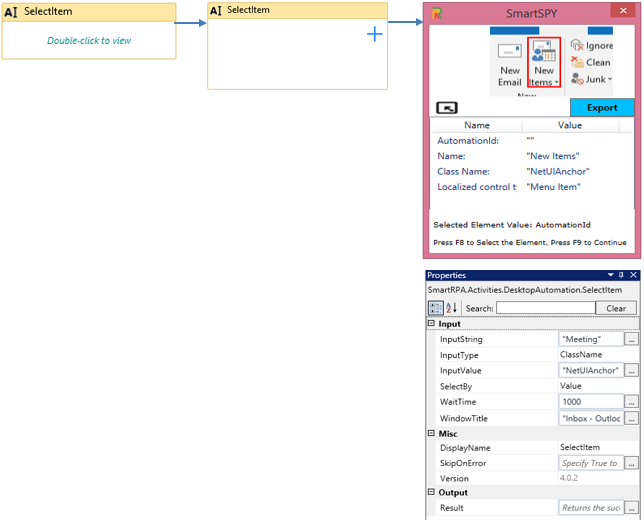
Figure 1.7
- The next step will be explained using the ÔÇ£TypeTextÔÇØ element.
TypeText
|
Activity Name |
Picture |
|
TypeText |
|

When to use the TypeText activity
When it is required to enter data to a specific field in an application, TypeText activity is used.
|
Figure 1.8
|
S.no |
Description |
|
1 |
Enables you to clear the characters that are already present in the field |
|
|
2 |
Specify the hard-coded string or variable that needs to be entered in the specified field |
|
|
3 |
Selection is based on the requirement |
|
|
4 |
Gets auto-filled when the element that needs to be actioned is indicated |
|
|
5 |
Specify the wait time for the activity to terminate the execution |
|
|
6 |
Select the checkbox if you want to type the data in MSUI & MSAA framework |
|
|
7 |
It contains the title of the required window |
|
|
8 |
Displays the action that the activity performs in the workflow |
|
|
9 |
Specify whether to continue executing the workflow if the activity fails |
|
|
10 |
Define a Boolean to validate if the activity is completed successfully. |
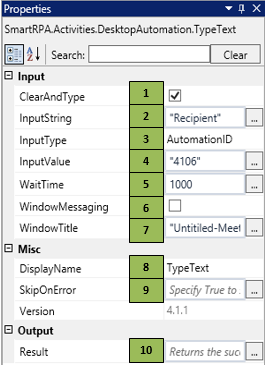
![]() InputType has multiple options to choose from. Once the InputType is changed, the InputValue changes correspondingly.
InputType has multiple options to choose from. Once the InputType is changed, the InputValue changes correspondingly.
Step 7 ÔÇô Drag a ÔÇ£TypeTextÔÇØ activity and connect under the ÔÇ£SelectItemÔÇØ activity to enter the recipient's mail address and using subsequent TypeText activities, enter the subject and the location of the meeting. (Refer figure 1.9)
- Double-click the activity and click on the Spy symbol to open the SmartSpy window on the screen
- Select the chosen window/application in which the element needs to be recorded
- Spy/indicate the element in which the action needs to be performed and click Export to auto-fill the property details
- In the ÔÇ£InputStringÔÇØ field, enter the input that needs to be entered into the corresponding field
- Add the chosen wait time in the WaitTime field (WaitTime value is in Milliseconds.)
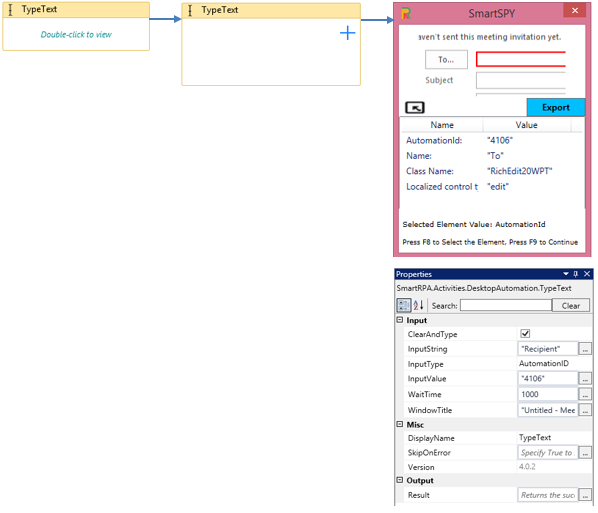
Figure 1.9
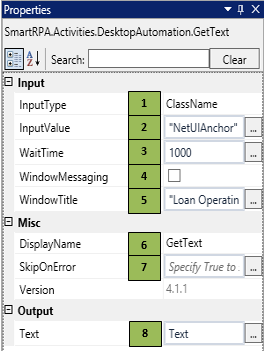
- The next step will be explained using the ÔÇ£ConsoleclickÔÇØ activity.
ConsoleClick
|
Activity Name |
Picture |
|
ConsoleClick |
|
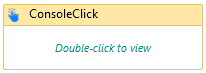
When to use the ConsoleClick activity
This activity helps you click an element in an application.
|
Figure 1.10
|
S.no |
Description |
|
1 |
Selection is based on the requirement |
|
|
2 |
Gets auto-filled when the element that needs to be actioned is spied/indicated |
|
|
3 |
Specify the wait time for the activity to terminate the execution |
|
|
4 |
It contains the title of the required window |
|
|
5 |
Displays the action that the activity performs in the workflow |
|
|
6 |
Specify whether to continue executing the workflow even if the activity fails |
|
|
7 |
Define a Boolean to validate if the activity is completed successfully. |
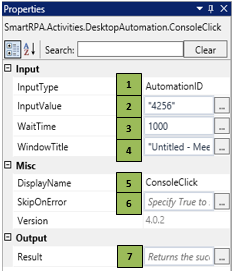
![]() InputType has multiple options to choose from. Once the InputType is changed, the InputValue changes on its own, corresponding to the element type.
InputType has multiple options to choose from. Once the InputType is changed, the InputValue changes on its own, corresponding to the element type.
Step 8 ÔÇô Drag a ConsoleClick activity and connect under the ÔÇ£TypeTextÔÇØ activity to click on the Send option to send the meeting request. (Refer figure 1.10, 1.11 )
- Double-click the activity and click on the Spy symbol to open the SmartSpy window on the screen
- Select the chosen window/application in which the element needs to be recorded
- Spy/indicate the element in which the action needs to be performed and click Export to auto-fill the property details
- Add the chosen wait time in the WaitTime field as chosen (WaitTime value is in Milliseconds)
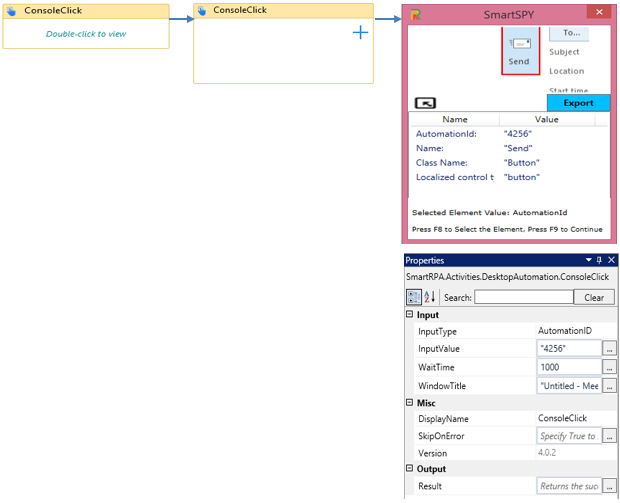
Figure 1.11
- The next step will be explained using the ÔÇ£CloseApplicationÔÇØ activity.
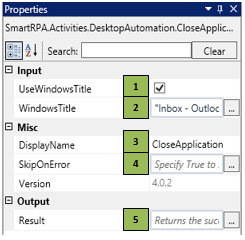
CloseApplication
|
Activity Name |
Picture |
|
CloseApplication |
|
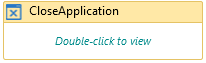
When to use the CloseApplication activity
When you want to close an application during runtime, the close application activity is used.
|
Figure 1.12
|
S.no |
Description |
|
1 |
Clicking on the checkbox enables you to enter the data in the specified window |
|
|
2 |
It contains the title of the required window |
|
|
3 |
Displays the action that the activity performs in the workflow |
|
|
4 |
Specify whether to continue executing the workflow even if the activity fails |
|
|
5 |
Define a Boolean to validate if the activity is completed successfully. |
![]() Applications can be triggered with the correct application name appended with the extension.
Applications can be triggered with the correct application name appended with the extension.
Step 9 ÔÇô Drag a CloseApplication activity and connect under the ÔÇ£ConsoleClickÔÇØ to close the outlook application once the meeting request has been sent (Refer figure 1.13, 1.14 )
- Double click the activity and click on the dotted option to choose the window and the application that needs to be closed from a list of active windows.

Figure 1.13
The aforementioned scenario uses the OpenApps, WindowExist, WindowStatus, SelectItem, TypeText, ConsoleClick and CloseApplication activities to perform the operation.

Figure 1.14
BringToFront
|
Activity Name |
Picture |
|
BringToFront |
|
When to use the BringToFront activity
When you want to toggle and bring an application to focus, this activity is used.
|
Figure 1. 15
|
S.no |
Description |
|
1 |
Specify the wait time for the activity to terminate the execution |
|
|
2 |
Select the window state from the drop-down to select the action |
|
|
3 |
It contains the title of the required window |
|
|
4 |
Displays the action that the activity performs in the workflow |
|
|
5 |
Specify whether to continue executing the workflow if the activity fails |
|
|
6 |
Define a Boolean to validate if the activity is completed successfully. |
![]() Activity: This activity helps you bring an active/idle application to bring from the background to the front during a run-time.
Activity: This activity helps you bring an active/idle application to bring from the background to the front during a run-time.
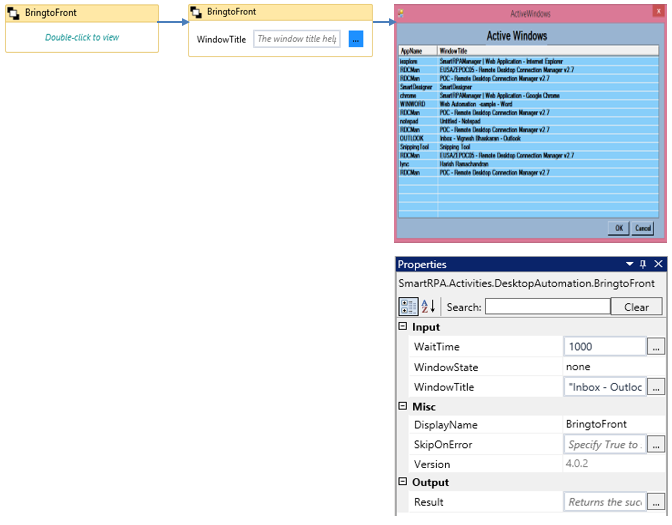
Figure 1.16
GetText
|
Activity Name |
Picture |
|
GetText |
|
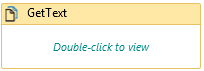
When to use the GetText activity
This activity helps you extract the data from a field/element / region of the application.
|
Figure 1.17
|
S.no |
Description |
|
1 |
Selection is based on the requirement |
|
|
2 |
Gets auto-filled when the element that needs to be actioned is indicated |
|
|
3 |
Specify the wait time for the activity to terminate the execution |
|
|
4 |
Select the checkbox if you want to extract the data from MSUI & MSAA framework. |
|
|
5 |
It contains the title of the required window |
|
|
6 |
Displays the action that the activity performs in the workflow |
|
|
7 |
Specify whether to continue executing the workflow even if the activity fails |
|
|
8 |
Define a Boolean to validate if the activity is completed successfully. |
![]() Activity: The GetConsoleText activity helps you extract and store data.
Activity: The GetConsoleText activity helps you extract and store data.
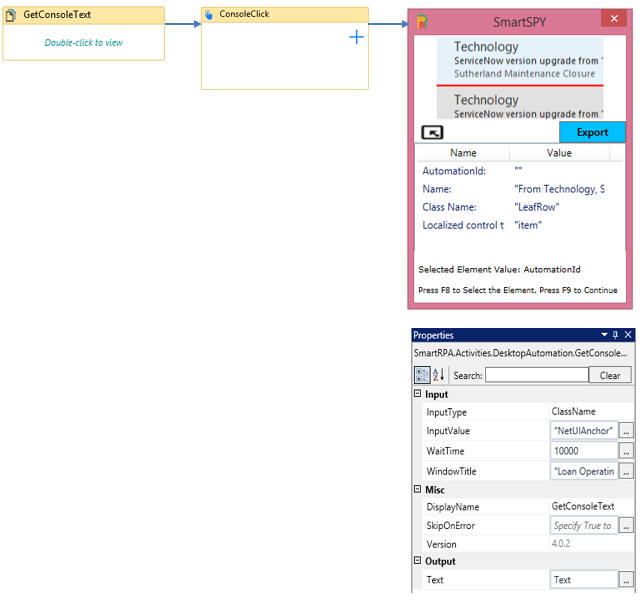
Figure 1.18
ExpandCollapse
|
Activity Name |
Picture |
|
ExpandCollapse |
|

When to use the ExpandCollapse activity
This activity helps you expand and collapse a drop-down control.
|
Figure 1. 19
|
S.no |
Description |
|
1 |
Specify the action to be performed based on the requirement |
|
|
2 |
Selection is based on the requirement |
|
|
3 |
Gets auto-filled when the element that needs to be actioned is indicated |
|
|
4 |
Specify the wait time for the activity to terminate the execution |
|
|
5 |
It contains the title of the required window |
|
|
6 |
Displays the action that the activity performs in the workflow |
|
|
7 |
Specify whether to continue executing the workflow if the activity fails |
|
|
8 |
Define a Boolean to validate if the activity is completed successfully. |
![]() InputType has multiple options to choose from. Once the InputType is changed, the InputValue changes on its own, corresponding to the element type.
InputType has multiple options to choose from. Once the InputType is changed, the InputValue changes on its own, corresponding to the element type.
 Activity: The ExpandCollapse activity helps you open and close a drop-down to choose options.
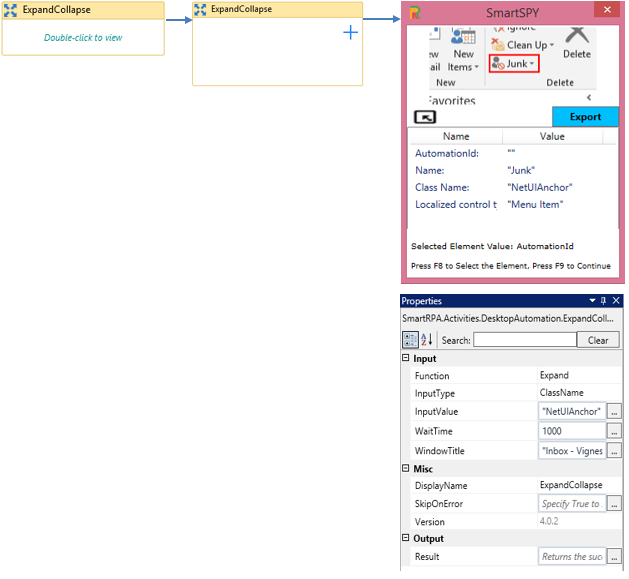
Figure 1.20