Table Viewer
This activity can be used to view the datatable in a table format.
Technical Reference:
|
|
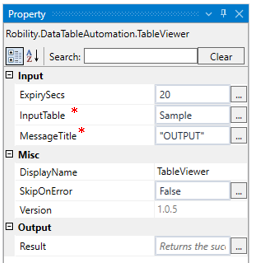
INPUT |
ExpirySecs: This field specifies the expiry seconds to view the table. You need to specify the time in seconds value. This is not a mandatory field. |
|
InputTable: This field specifies the input data table that needs to be viewed. Enter the datatable variable here. |
||
|
MessageTitle: This field specifies title of the table. You need to enter the title within the double quotes. |
||
|
MISC |
Display Name: Displays the name of the activity. You can also customize the activity name to help troubleshoot issues faster. This name will be used for logging purposes |
|
|
SkipOnError: It specifies whether to continue executing the workflow even if it throws an error. This supports only Boolean value “True or False” True: Continues to execute the workflow irrespective of any error thrown. False: Stops the workflow if it throws any error |
||
|
Version: It specifies the version of the Datatable automation feature in use. |
||
|
OUTPUT |
Result: Declare and assign a variable to return the success rate of Skip on error functionality. This is not a mandatory field however declare a variable to get the result. |
* Mandatory fields to execute the workflow.

Example:
The following explains how to add table viewer for the table.
1. Drag and drop the Table viewer activity to the workflow.
2. Connect it below to the Generate table activity.
3. Enter the table variable “Sample” in the Input table from the properties panel.
4. Enter the title for the activity.
5. Now, execute the workflow.

The bot will execute the table and displays the format in table.