ConsoleClick
When to use the ConsoleClick activity
This activity helps you click an element in an application.
Figure 1
|
Activity Name |
Picture |
|
ConsoleClick |
|
|
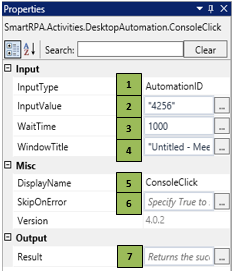
Figure 1.1
|
S.no |
Description |
|
1 |
Selection is based on the requirement |
|
|
2 |
Gets auto-filled when the element that needs to be actioned is spied/indicated |
|
|
3 |
Specify the wait time for the activity to terminate the execution |
|
|
4 |
It contains the title of the required window |
|
|
5 |
Displays the action that the activity performs in the workflow |
|
|
6 |
Specify whether to continue executing the workflow even if the activity fails |
|
|
7 |
Define a Boolean to validate if the activity is completed successfully. |
![]() InputType has multiple options to choose from. Once the InputType is changed, the InputValue changes on its own, corresponding to the element type.
InputType has multiple options to choose from. Once the InputType is changed, the InputValue changes on its own, corresponding to the element type.
Drag a ConsoleClick activity and connect under the TypeText activity to click on the Send option to send the meeting request.
- Double-click the activity and click on the Spy symbol to open the SmartSpy window on the screen
- Select the chosen window/application in which the element needs to be recorded
- Spy/indicate the element in which the action needs to be performed and click Export to auto-fill the property details
- Add the chosen wait time in the WaitTime field as chosen (WaitTime value is in Milliseconds)
Figure 1.2


