ClickEvent
When to use the ClickEvent activity
When you are required to click on the particular element in the webpage, this activity can be used.
Figure 1
|
Activity Name |
Picture |
|
ClickEvent |
|

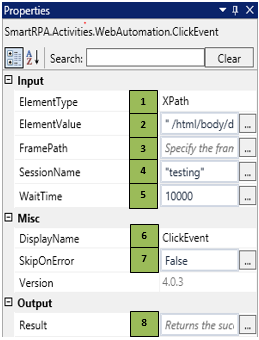
Technical Reference
|
Figure 1.1
|
S.no |
Description |
|
1 |
Gets auto-filled, once the element is indicated in the webpage, using the SmartSpy |
|
|
2 |
Gets auto-filled, once the element is indicated in the webpage using the SmartSpy |
|
|
3 |
Gets auto-filled, once the element is indicated in the webpage, using the SmartSpy |
|
|
4 |
Gets auto-filled once the chosen Session is selected through the SmartSpy. |
|
|
5 |
Specify the wait time to wait for the activity to terminate (in milliseconds) |
|
|
6 |
Displays the action that the activity performs in the workflow |
|
|
7 |
Specify whether to continue executing the workflow even if the activity fails |
|
|
8 |
Define the condition that you prefer to validate. It supports only Boolean value |
![]() ElementType has multiple options to choose from. Once the ElementType is changed, the ElementValue changes on its own, corresponding to the element type.
ElementType has multiple options to choose from. Once the ElementType is changed, the ElementValue changes on its own, corresponding to the element type.
In case the session is closed by mistake, go back to the OpenBrowser activity and specify the Browser Type, Session Name & URL and change the Session name in the following activity.
Note: The Session Name should not be an existing name.
Scenario
Assume you want to extract the HTML table from the webpage and the extracted data is required to be printed in the excel sheet.
![]() Activity: The Click event activity helps you click on a particular control/key in a webpage.
Activity: The Click event activity helps you click on a particular control/key in a webpage.
Illustration
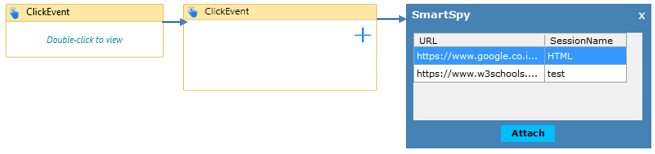
Drag a ClickEvent activity and connect under the OpenWebBrowser activity to click the website for further processing.
- Double-click the activity and click on the Spy symbol to open the SmartSpy window on the screen
- Select the chosen Session in the SmartSpy window and click on the attach to highlight the webpage that you were already working on
- Spy/indicate the element that is required to be acted on and click export to auto- fill the property details under ElementType, ElementValue, FramePath & SessionName
- Add the chosen wait time in the WaitTime field (WaitTime value is in Milliseconds)
Figure 1.2