REST is a WebClient feature which helps the user to invoke a method and retrieve
the results through execution by passing the URL and receiving the response in
different forms. (The activity helps to carry out the following operations: GET,
POST, PUT, PATCH, DELETE, OPTIONS, CONNECT, TRACE).

When does the user need to automate with REST?
The main purpose of using REST in our automation is to perform actions such as
retrieving data, updating information, uploading data, and performing specific tasks
on websites or APIs. There are different methods used to perform different tasks.
For EG., “GET” method is used to fetch the data from the respective web service or
API. “POST, PUT, and PATCH” can be used to update, create, and post data to the
webservice or API. Meanwhile, to delete the data, the "DELETE" method can be used.
These operations can be performed using a service request made in JSON, XML,
PLAIN TEXT, or URLENCODED.
Benefits of REST
1. It is also possible to authenticate or authorize users using REST activity. This can be
performed by providing login credentials or an access token in the request header to
authenticate the resources that are protected.
2. File Upload/Download option – The REST activity simplifies the process by enabling
users to upload the request body in file format to the webservice or API in the respective
content type. Alternatively, the users can download the response from the respective file path.
3. REST activity can be used to integrate with external resources or APIs to exchange data
seamlessly.
4. Handle errors and exceptions based on the response code (404, Connection timeout error)
received from the API or webservice.
5. Activities like Amazon S3, Azure Blob, Interact, cognitive services and Robility AI
models available on the Robility Manager can be performed through REST. And other
activities that require cloud storage, messaging services, machine learning services
can be leveraged through API.
Technical Reference
|
|
INPUT |
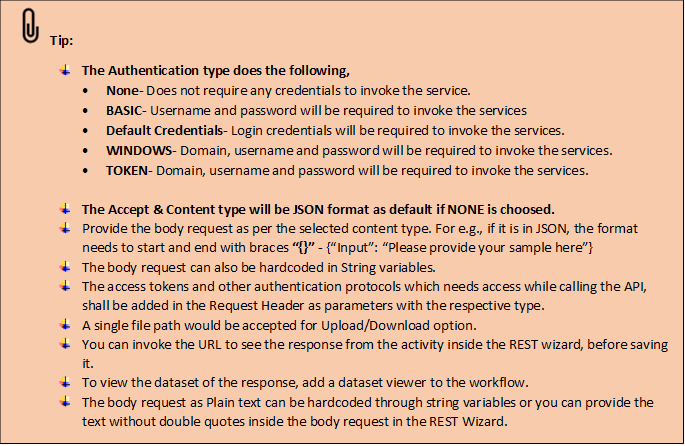
Accept: This specifies the type / format of the web method to accept while processing the URL. Select the options from the drop-down, · None · JSON · XML · URLENCODED · PLAINTEXT This field gets auto filled from Rest wizard after saving it. This is not a mandatory field. By default, it is filled in with JSON. |
|
ContentType: This specifies the type/format of the body request provided. Select the options from the drop-down, · None · JSON · XML · URLENCODED · PLAINTEXT This is a mandatory field. By default, it is filled in with JSON. |
||
|
DownloadPath: Mention the path of the file where the resources needs to be downloaded after calling the method. This is a not a mandatory field. |
||
|
Encode: This specifies the encode format. Select the options from the drop-down, · NONE, · ASCII · DEFAULT · BigEndianUnicode · Unicode · UTF32 · UTF7 · UTF8. |
||
|
GrantType: This field specifies the grant type/ domain of the URL. This is not a mandatory field |
||
|
InputParameters: This specifies the inputs / parameters that is used to request in the URL. This is not a mandatory field. |
||
|
Method: This specifies the method to be used when calling the API URL . The methods that are available are GET, POST, PUT, DELETE, PATCH, UPDATE, OPTIONS AND TRACE. This is a mandatory field. |
||
|
Parameters: This specifies the parameters that enables to add a custom header to the URL. |
||
|
Password: This field specifies the password that is used to access the web page/ URL. |
||
|
RequestText: This specifies body request needs to be included in the URL. This field supports strings and string variables, JSON, XML, URLENCODED AND PLAINTEXT. This is a mandatory field. |
||
|
ResTURL: This specifies the URL that is used to communicate and get the service. This is a mandatory field. |
||
|
ServiceAuthentication:This specifies the authentication type of the method. |
||
|
UploadPath: Mention the path of the file that needs to be uploaded as a resource to the URL. |
||
|
Username: This specifies the username that is used to access the webpage/ URL. |
||
|
MISC |
Display Name: Displays the name of the activity. You can also customize the activity name to help troubleshoot issues faster. This name will be used for logging purposes. |
|
|
SkipOnError: It specifies whether to continue executing the workflow even if it throws an error. This supports only Boolean value “True or False” True: Continues to execute the workflow irrespective of any error thrown. False: Stops the workflow if it throws any error |
||
|
Version: It specifies the version of the Web client automation feature in use. |
||
|
OUTPUT |
ResponseRest: Declare a variable here to get the result as dataset from the response. |
|
|
Text: Declare a variable here to get the output as text from the REST response. This is a mandatory field. |

*Mandatory fields to execute the workflow

Rest Wizard
This wizard appears on the screen once the activity is dragged and dropped
to the workflow.
· URL: Enter the URL or API which needs to be called on to make the
request.
· Methods: The REST API can issue requests to the URL, of which
there are eight types:
1. GET- This requests the webpage to extract the information/
details/ Method from the URL. Click here to know a detailed
explanation.
2. PUT- This request is used to update a method/ service in the
URL.
3. POST - This request is used to create a service/ method in the
URL. Click here to know a detailed explanation.
4. DELETE - This requests to removes the service method in the
URL.
5. PATCH - This request is used to send a patch the service/
method to the URL.
6. OPTIONS- This request is used to get the information about the
permissible and supported HTTP methods that can be used against
the provided URL. Click here to know a detailed explanation
7. CONNECT- This request is used to create a connection with
the requested resources.
8. TRACE- This request is used to debug the servers and provides
the response.
· ContentType: This specifies the type/format of the body request that
needs to be. Select the options from the drop-down,
1. None- When None is selected, by default the type is selected
as JSON.
2. JSON - Specifies the type in JSON, if the request that to be made
is in JSON format, choose this option.
3. XML - Specifies the type in XML, if the request that to be made
is in XML node, choose this option.
4. URLENCODED - Specifies the type in URLENCODED, if the request
that to be made is in URLENCODED format, choose this option.
5. PLAINTEXT - Specifies the type as raw text, if the request that to be
made is in RAW Text, choose this option.
· Accept: This specifies the type / format of the web method to accept while
processing the URL. Select the options from the drop-down,
1. None- When None is selected, by default the type is selected
as JSON.
2. JSON- Accepts the type in JSON, if the request that to be made
is accepted in JSON.
3. XML - Accepts the type in XML, if the request that to be made
is accepted in XML.
4. URLENCODED - Accepts the type in URLENCODED, if the request
that to be made is accepted in URLENCODED.
5. PLAINTEXT - Accepts the type in PLAINTEXT, if the request that to
be made is accepted in PLAINTEXT.
· Encoding: This specifies the encode format when the request needs to be
encoded while calling the API. Select the options from the drop-down,
1. NONE,
2. ASCII
3. DEFAULT
4. BigEndianUnicode
5. Unicode
6. UTF32
7. UTF7
8. UTF8.
· Authentication: Specifies the authentication protocol to be used when calling
the API. The following protocols are supported:
1. None- Does not require any credentials to invoke the service.
2. BASIC- Username and password will be required to invoke the
services.
3. Default Credentials- Login credentials will be required to invoke
the services.
4. WINDOWS- Domain, username and password will be required
to invoke the services.
5. TOKEN- Domain, username and password will be required to
invoke the services.
· Request Header: This enables to add a custom header that needs to be included
in the URL segment.
· InputParameters: This specifies the inputs / parameters that is used to request in
the URL.
· Body-Request: Specifies body request needs to be included in the URL. This
field supports strings and string variables, JSON, XML, URLENCODED AND
PLAINTEXT.
· File -Transfer: Specifies the file path that needs to be uploaded/ downloaded
as a resource
from the URL.
· Output: The output will be returned as a response to the respective URL provided.
Response codes
Each operation is followed by a HTTP response code that indicates if the request was
successful or not. Here are some typical response codes:
- 200 OK - Request accepted, response contains result.
- 201 CREATED - Resource has been created.
- 204 NO CONTENT - Request accepted, nothing to return.
- 404 NOT FOUND - No such resource.
- 405 METHOD NOT ALLOWED - Method cannot be performed against the resource.
Use Case
The following activity illustrates how we can use the REST activity from the webclient
automation feature to correct the misspellings sentences using the Robility AI model –
Spell Check. You can access this API from RobilityManager. Here we are going to correct
the sentences with JSON format using the POST method.
Steps to execute a bot
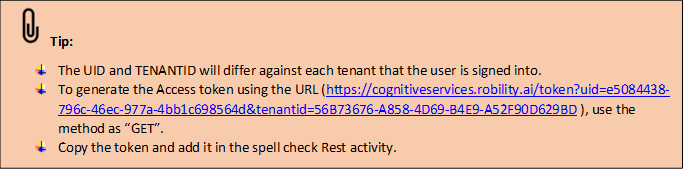
In the following steps, we have already created the token for the spell check model to
use it as an authentication protocol for the API.
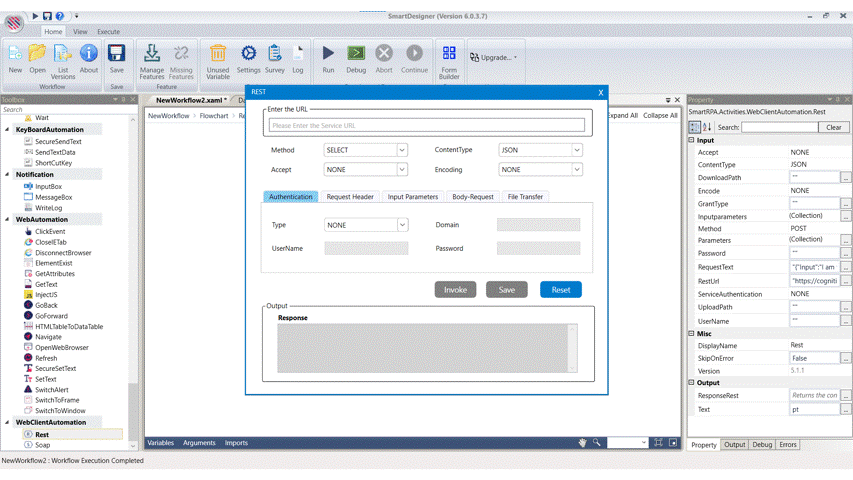
1. Drag and drop the REST activity from the webclient automation feature.
2. The Rest wizard appears on the screen.
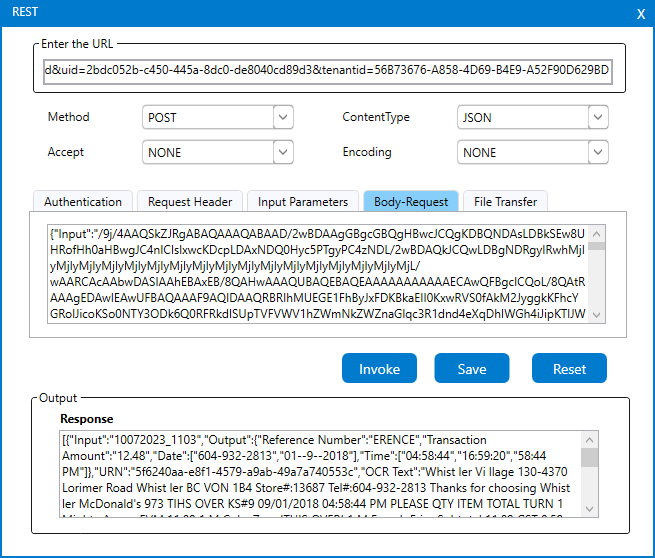
3. Enter the URL from which the details need to be invoked and executed. Here it is
https://cognitiveservices.robility.ai/textract/spellcheck?env=dev&uid=1af82c96-b2d7
-4740-a5ba-a7048bef1903&tenantid=BB43F196-9296-4008-A65D-C9EC5BCA87D8
4. Choose the method as POST as we are sending the incorrect sentences to correct it.
5. Choose the content type as “JSON”.
6. In the request header parameter, enter the parameter as “Authorization” and in
the values enter the following, “Bearer” Access token.(generated from the URL
( https://cognitiveservices.robility.ai/token? )
7. Enter the body request as {"Input":"I am the begt spell cherker!"}.
8. Click the Save option to export the parameters to the activity.
9. Declare a variable in the text from output properties panel.
10. Add write line activity to get the response in the output window.
The bot will execute the activity and returns the result in the Write line activity.