The “ExcelScope” activity serves as the overarching scope for all other activities
within this feature. Users can seamlessly perform a wide range of tasks, including
creating new data, inserting content, deleting entries, reading data, writing data,
and executing macro functions—all within the confines of the Excel sheet. This
comprehensive functionality enhances productivity and flexibility when working with
Excel in this feature.
The scope is where we provide the required excel file, input string, or variable
as an input.
Technical Reference
|
|
INPUT |
CreateNewWorkbook: It indicates to create a new workbook during the runtime. You can check this box if required. When left blank, it will not consider creating a new workbook. |
|
ExcelPath: It indicates the “Path” of the excel file that needs to be utilized for automation.
To choose the “ExcelFile” path, click on the three dots adjacent to the “FilePath” in the activity.
You can also either hardcode the path in a “String” datatype variable or manually enter the “Filepath” in “String” values. This field accepts values in “String” datatype. |
||
|
Password: Indicates to provide the “Password” if the specified excel sheet needs to be securely accessed during the runtime. This field accepts values in “String” datatype. |
||
|
MISC |
Body: Gets auto filled once the "Activity" is dropped into the body. |
|
|
DisplayName: Displays the name of the activity. The activity name can be customized, which aids in troubleshooting. |
||
|
SkipOnError: Specify the "Boolean" value as "True" or "False."
True: Continue executing the workflow regardless of any errors thrown. False: Halt the workflow if it encounters any errors. None: If the option is left blank, the activity will, by default, behave as if "False" were chosen. |
||
|
Version: It indicates the version of the feature being used. |
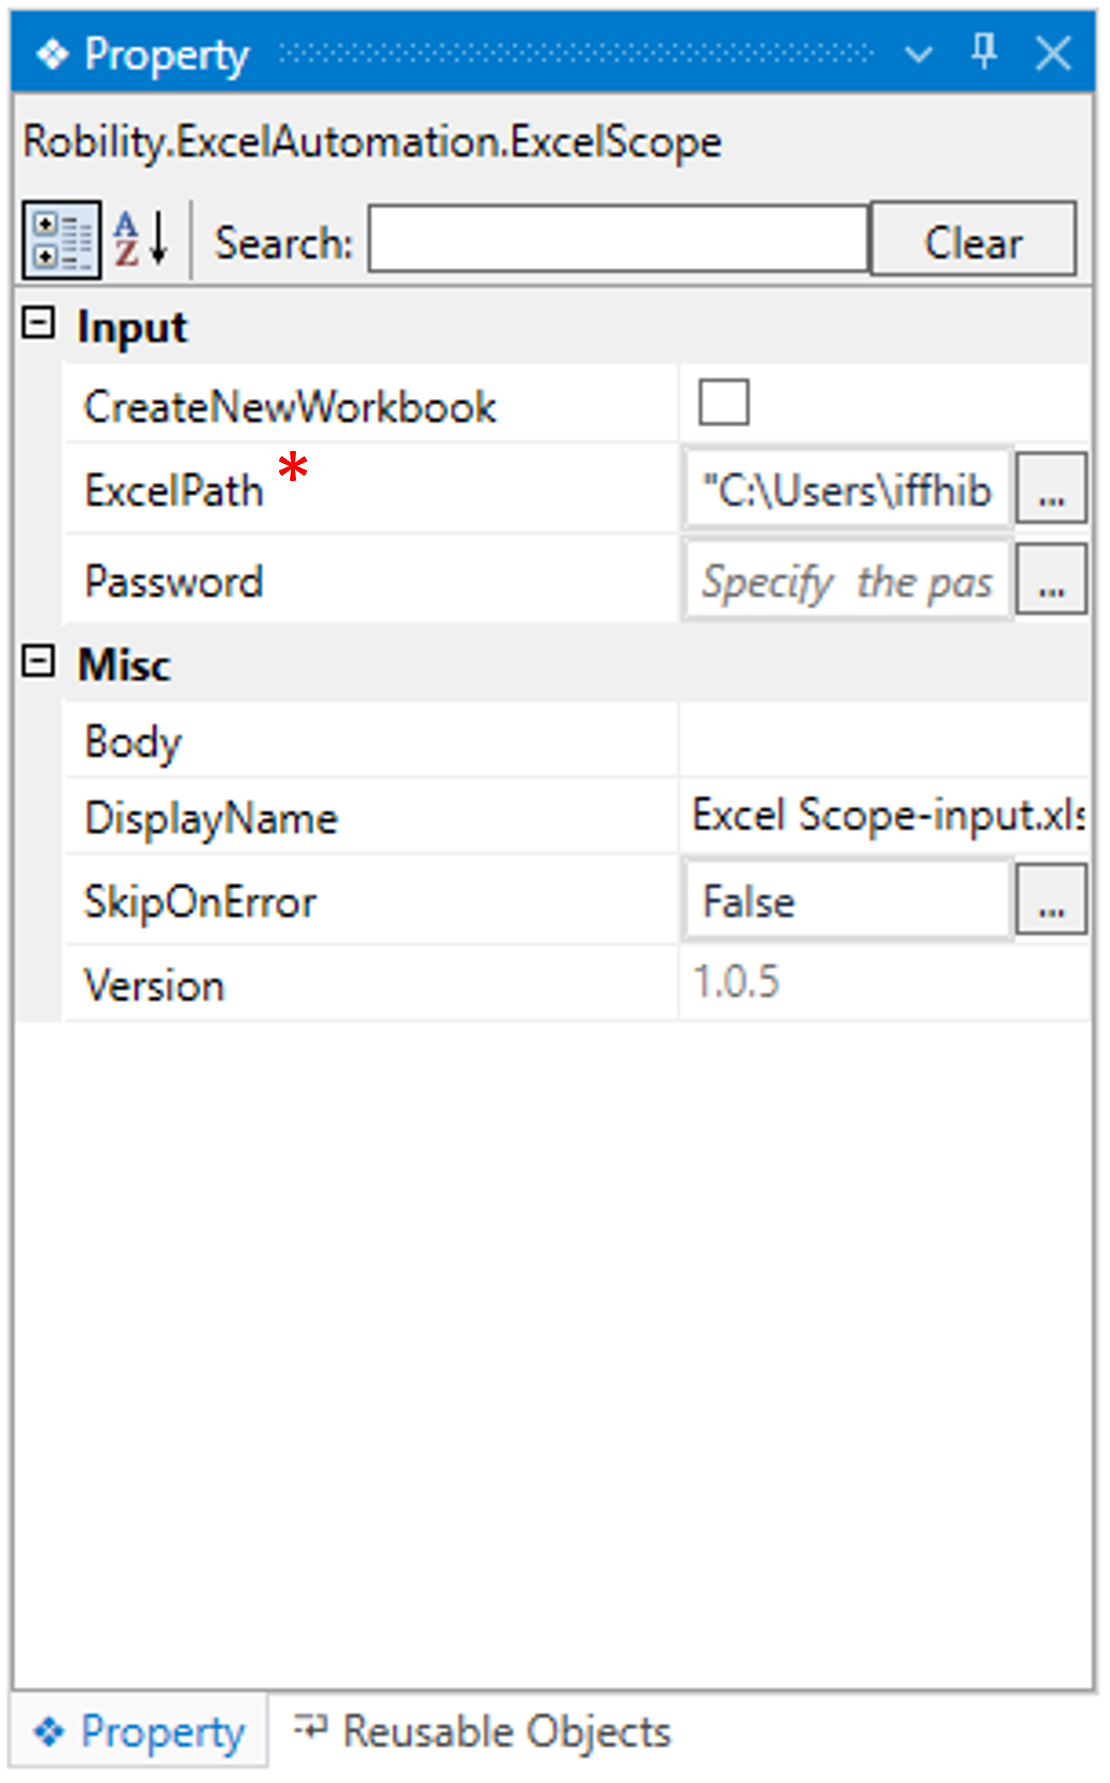
* Represents mandatory fields to execute the workflow

Here’s an example of how “ExcelScope” activity works –
In the following example, I am using the “Excel sheet” which is used to automate in the
Use case. To get a better understanding, click here.
1. Create a solution for building a workflow.
2. Install the "Excel Automation" feature from the "Manage Features" menu.
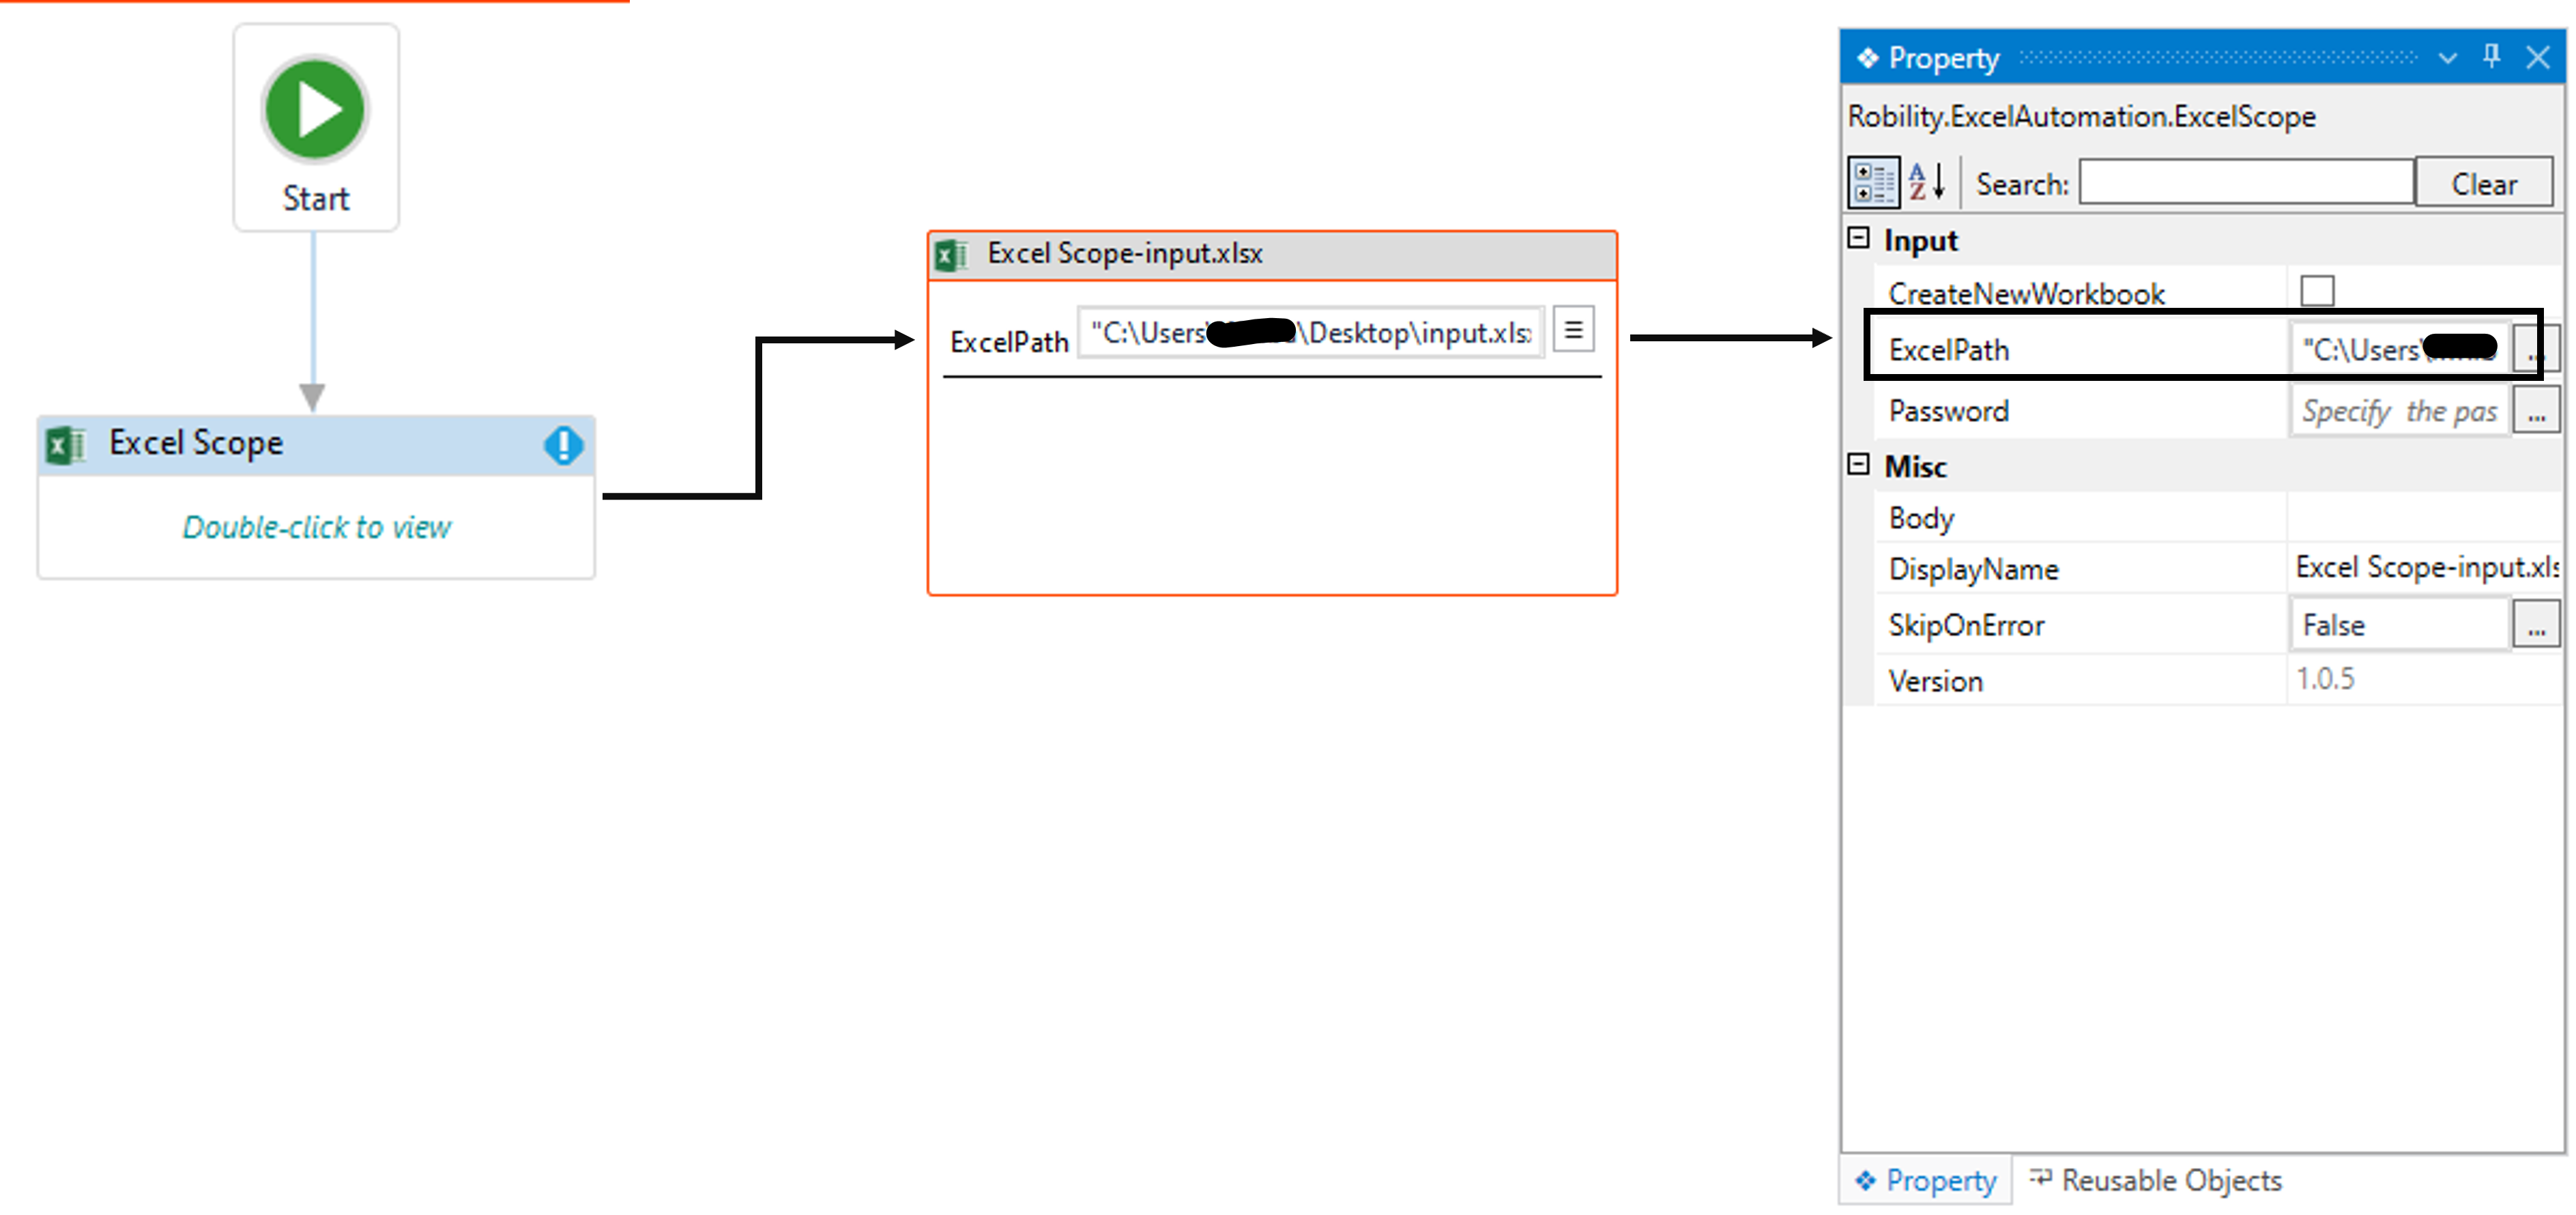
3. Drag and drop the "ExcelScope" activity onto the designer pane and set
it as the “Start Node.”
4. Enter the “filepath” of the excel file or select the “Three line” and choose the
“Excel File” from the system. (Attached the sample excel file).
5. You can further drop the excel activities into the scope and automate the
functions.
6. Refer the other activities to get detailed information.
Use case
The following examples illustrate how to employ 'Excel' automation within the workflow.
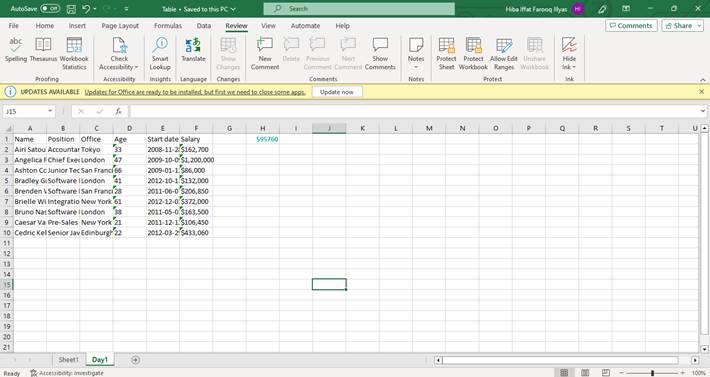
In this scenario, the user is required to retrieve an employee report from the website.
This report encompasses employee particulars like Name, Position, Age, Office, Start
date, and Salary. Following this, the data will be converted into an Excel file and then
shared with the manager.
After the transformation into an Excel sheet, the user must compute the total salary
amount from the data in the Excel table.
Steps to execute the bot
Follow the below steps to automate the above use case.
1. Launch the designer and create a workflow named “Excel Automation”.
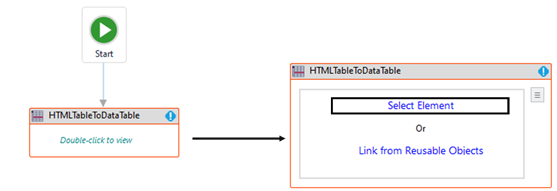
2. Drag and drop the “HTMLtoDataTable” activity from the WebAutomation feature
and set it as start node.
a. It helps to extract the table from the website and converts to “datatable”
datatype for further execution.
b. Here, I am using it to extract the table from the
https://datatables.net/examples/styling/bootstrap4 website and convert it to
datatable.
i. Double click on the activity.
ii. Here, choose the "Select Element" option.
iii. Click here to learn more about “Linking from Reusable Objects.”
iv. Once you have chosen the "Element," the attributes will be stored in the
"Spy" window, along with an "image" of the element.
v. If you wish to add or remove any attributes, you can edit the "Attributes Editor."
In this case, we are not making any changes in the “Editor.”
vi. Once you click on the "Save" button, the elements will be stored in the activity
window.
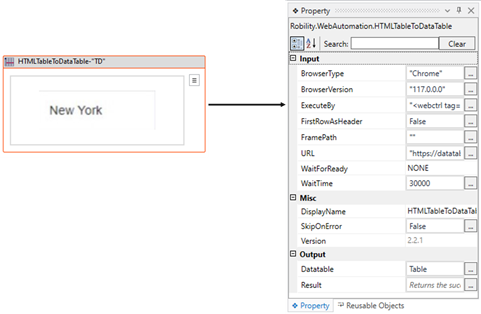
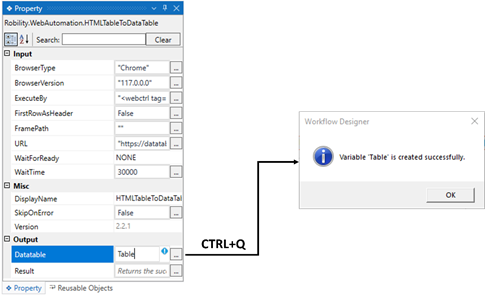
c. Navigate to the “Datatable” in the properties to declare a variable to view the
output in the “Table” format.
i. There are two ways to create a variable-
ii. Method 1 – Click on the "Datatable" property within the "HtmltoDatatable" activity
and enter the variable name. In this case, we are using " Table." Then, press
"Ctrl+Q," which is a shortcut key to create a variable.
iii. Method 2 - Click on the Variables pane and enter the name " Table." Then,
in the "Variable Types" column, select "Browse for Types" from the dropdown
menu.
iv. The .Net window for data types will appear on the screen, enter the type name
as “System.Data.Datatable” and then click on “OK” button.

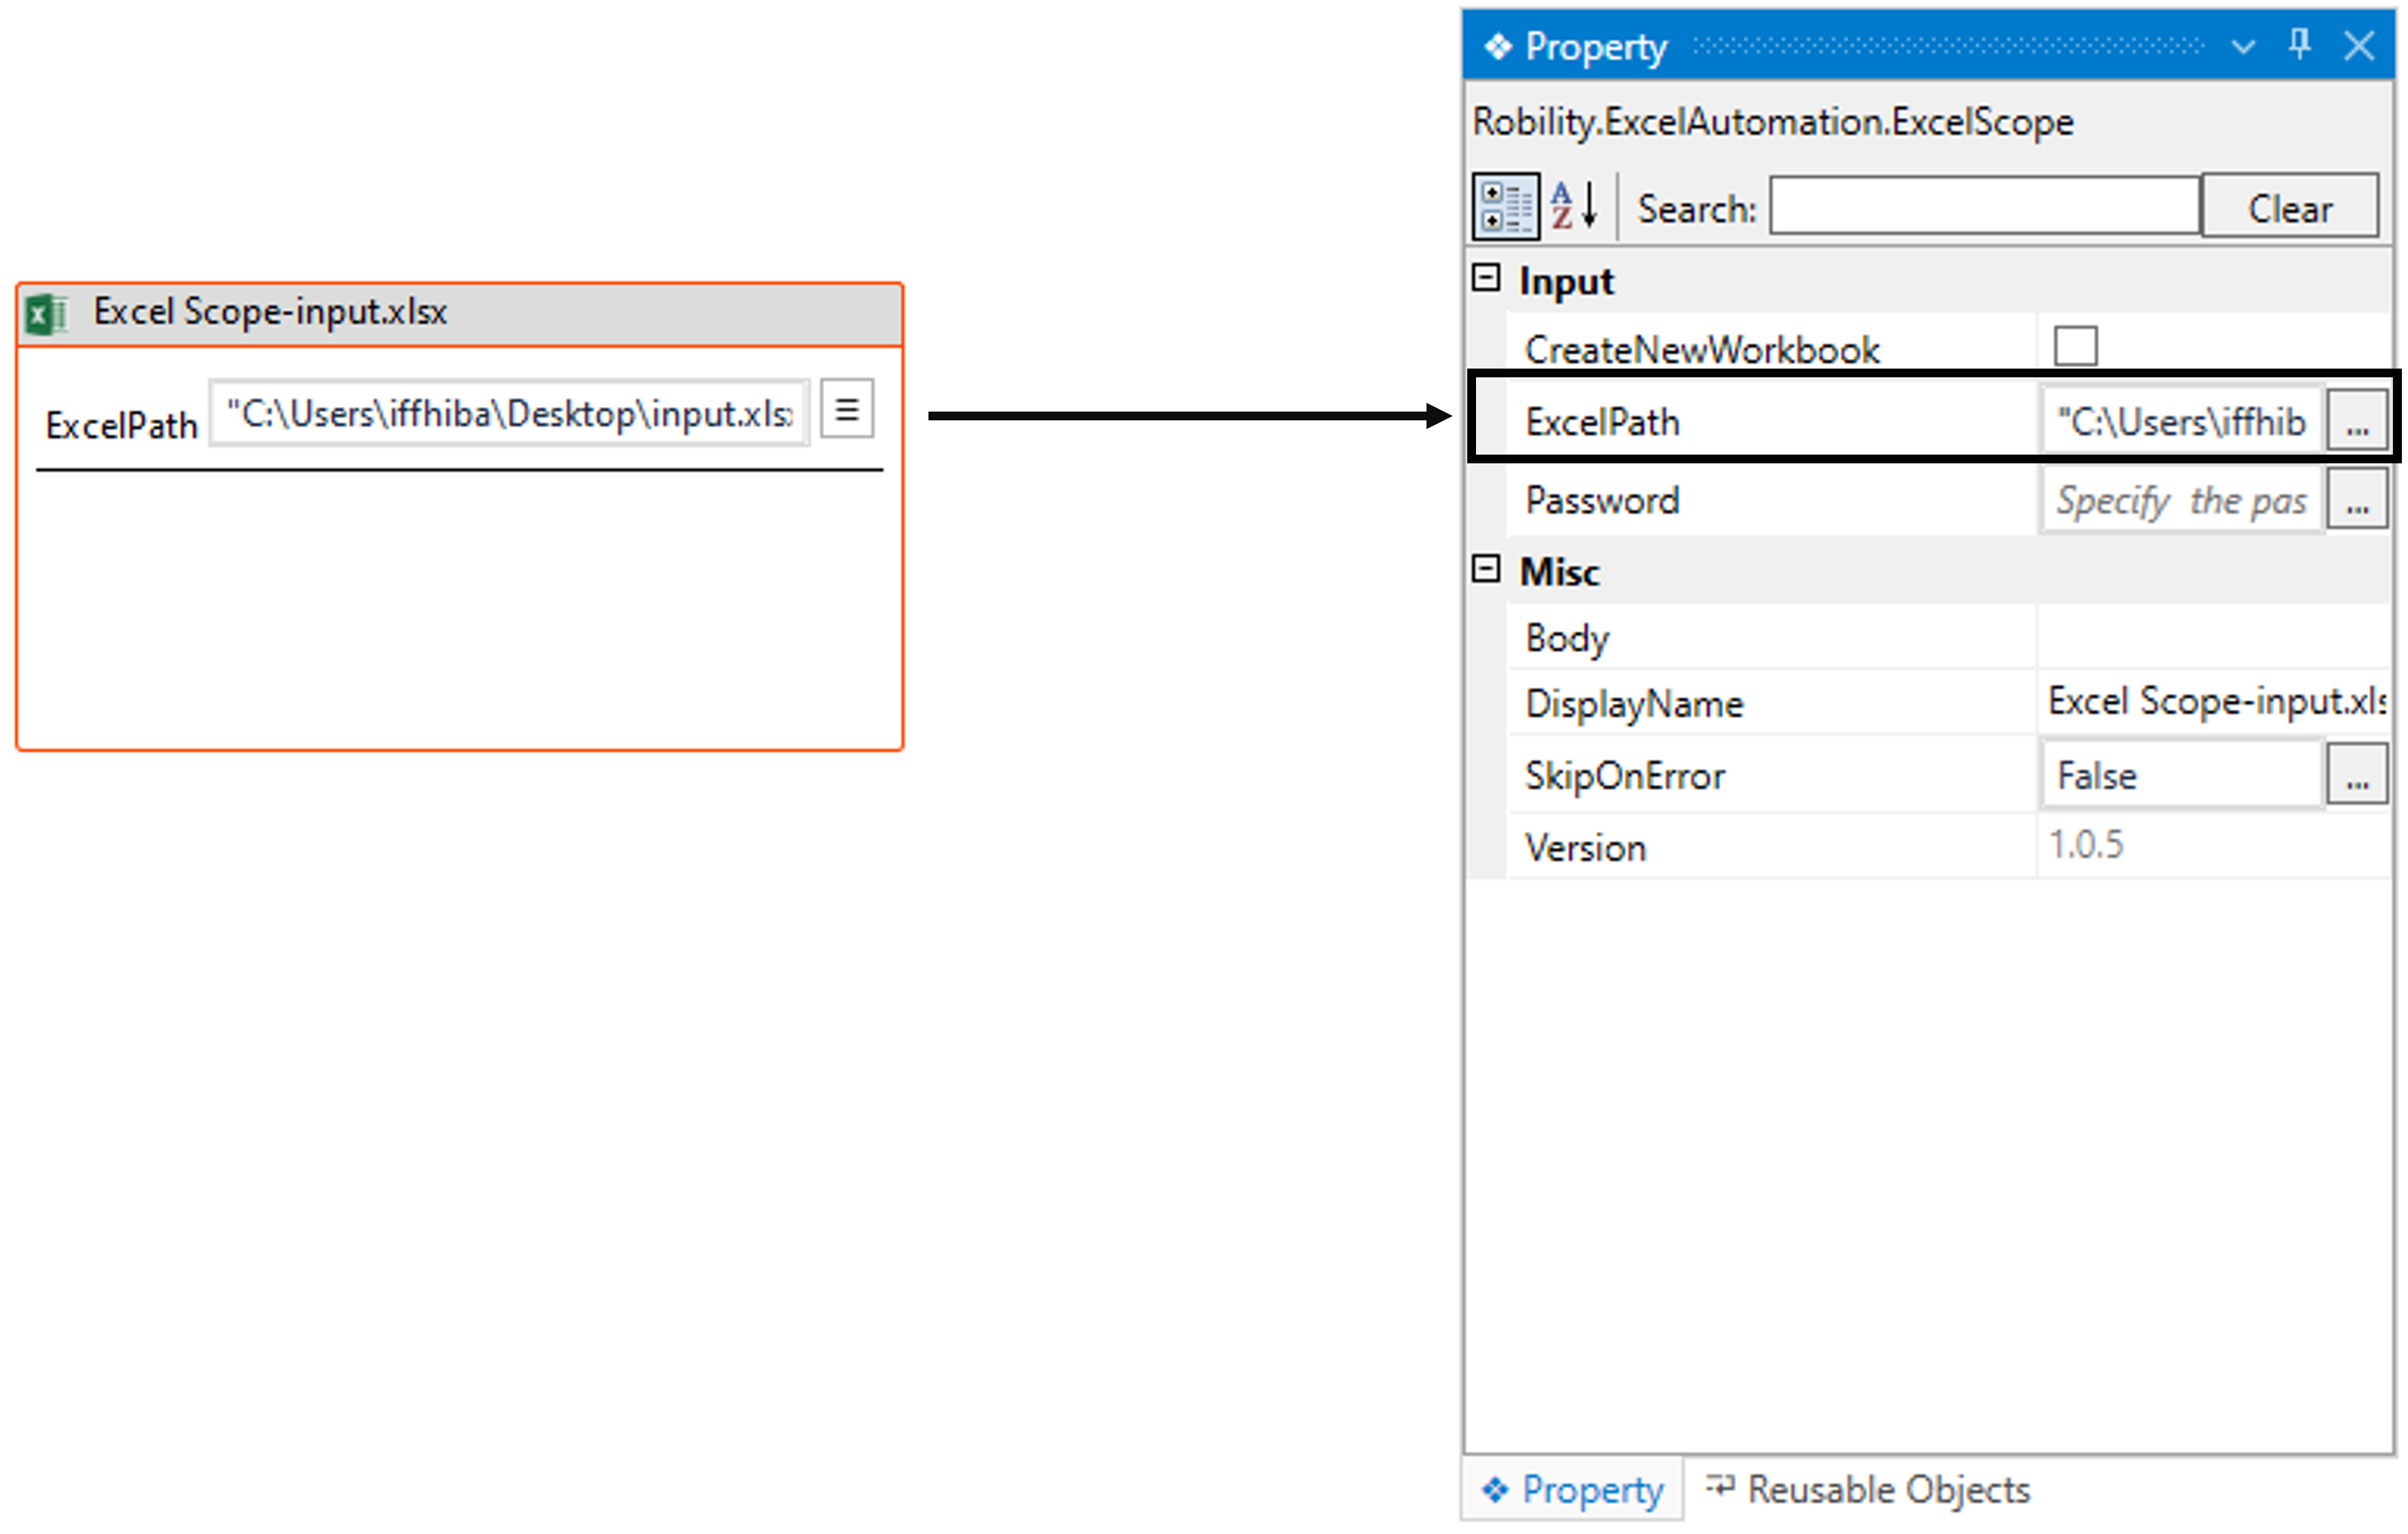
3. Next, place the “ExcelScope” from the “ExcelAutomation” next to the
“HtmltoDatatable” activity.
a. It serves as a scope to automate all other activities within this. It will load
the “Excel” file that has been provided as input.
b. Enter the “filepath” of the excel file or select the “Three dots” and choose
the “Excel File” from the system. (Attached the sample excel file).
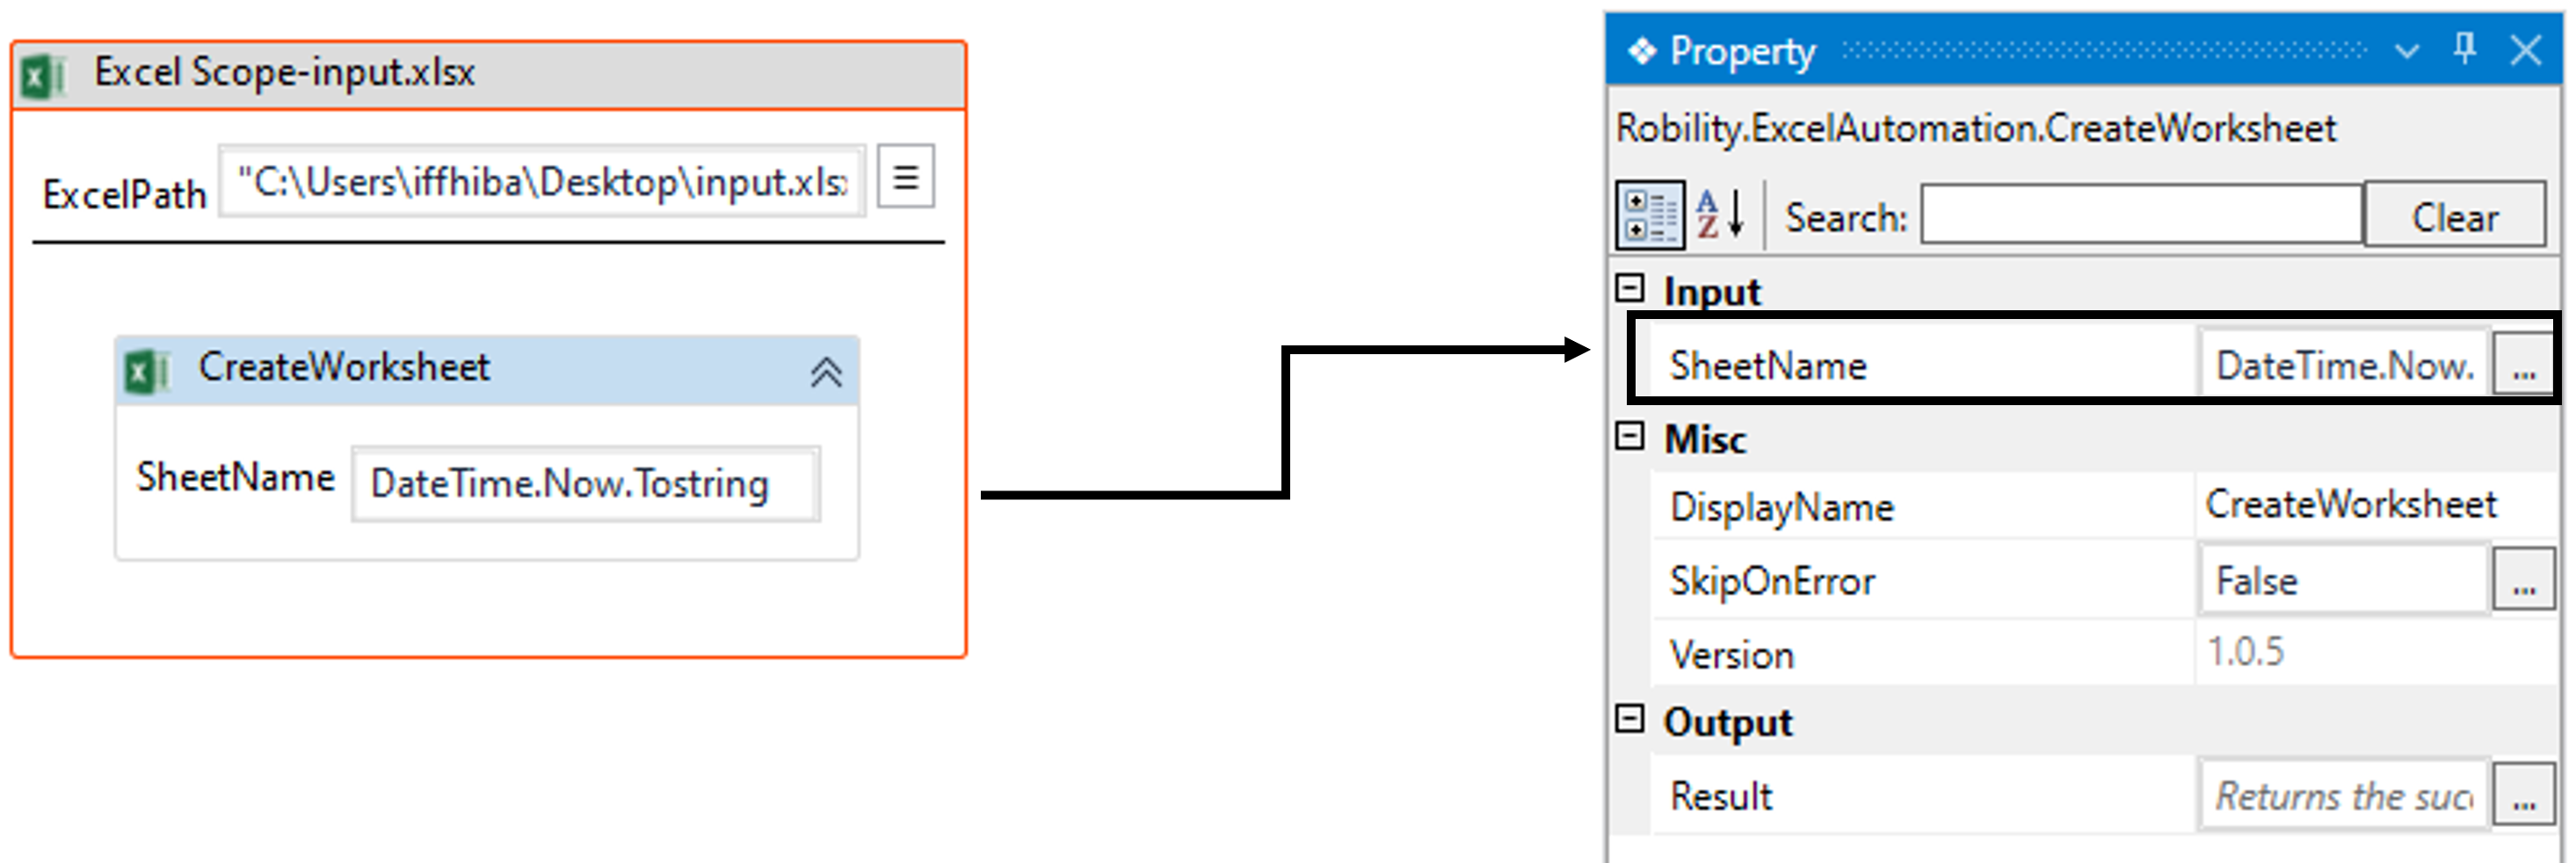
c. Drag and drop the “CreateWorksheet” activity from the Excel Automation
feature.
i. We are using this activity to create a new worksheet for daily records that
will be exracted from the website in the provided “Excel” file.
ii. Double click on the activity and enter the “SheetName” as
“DateTime.Now.ToString”.
iii. This format will help to retrieve the Current date and time from the user’s
machine. The “NOW” is added to get the current time from the user machine.
iv. The “.ToString” is advised to use along with any other data types other
than string format. It converts any data type into string.
4. Add the “WriteRange” activity within the scope next to the “CreateWorksheet”.
a. Here we are using this activity to write the output extracted from the website
in the provided excel sheet.
b. Double click on the activity and enter the “SheetName” as “DateTime.Now.ToString”.
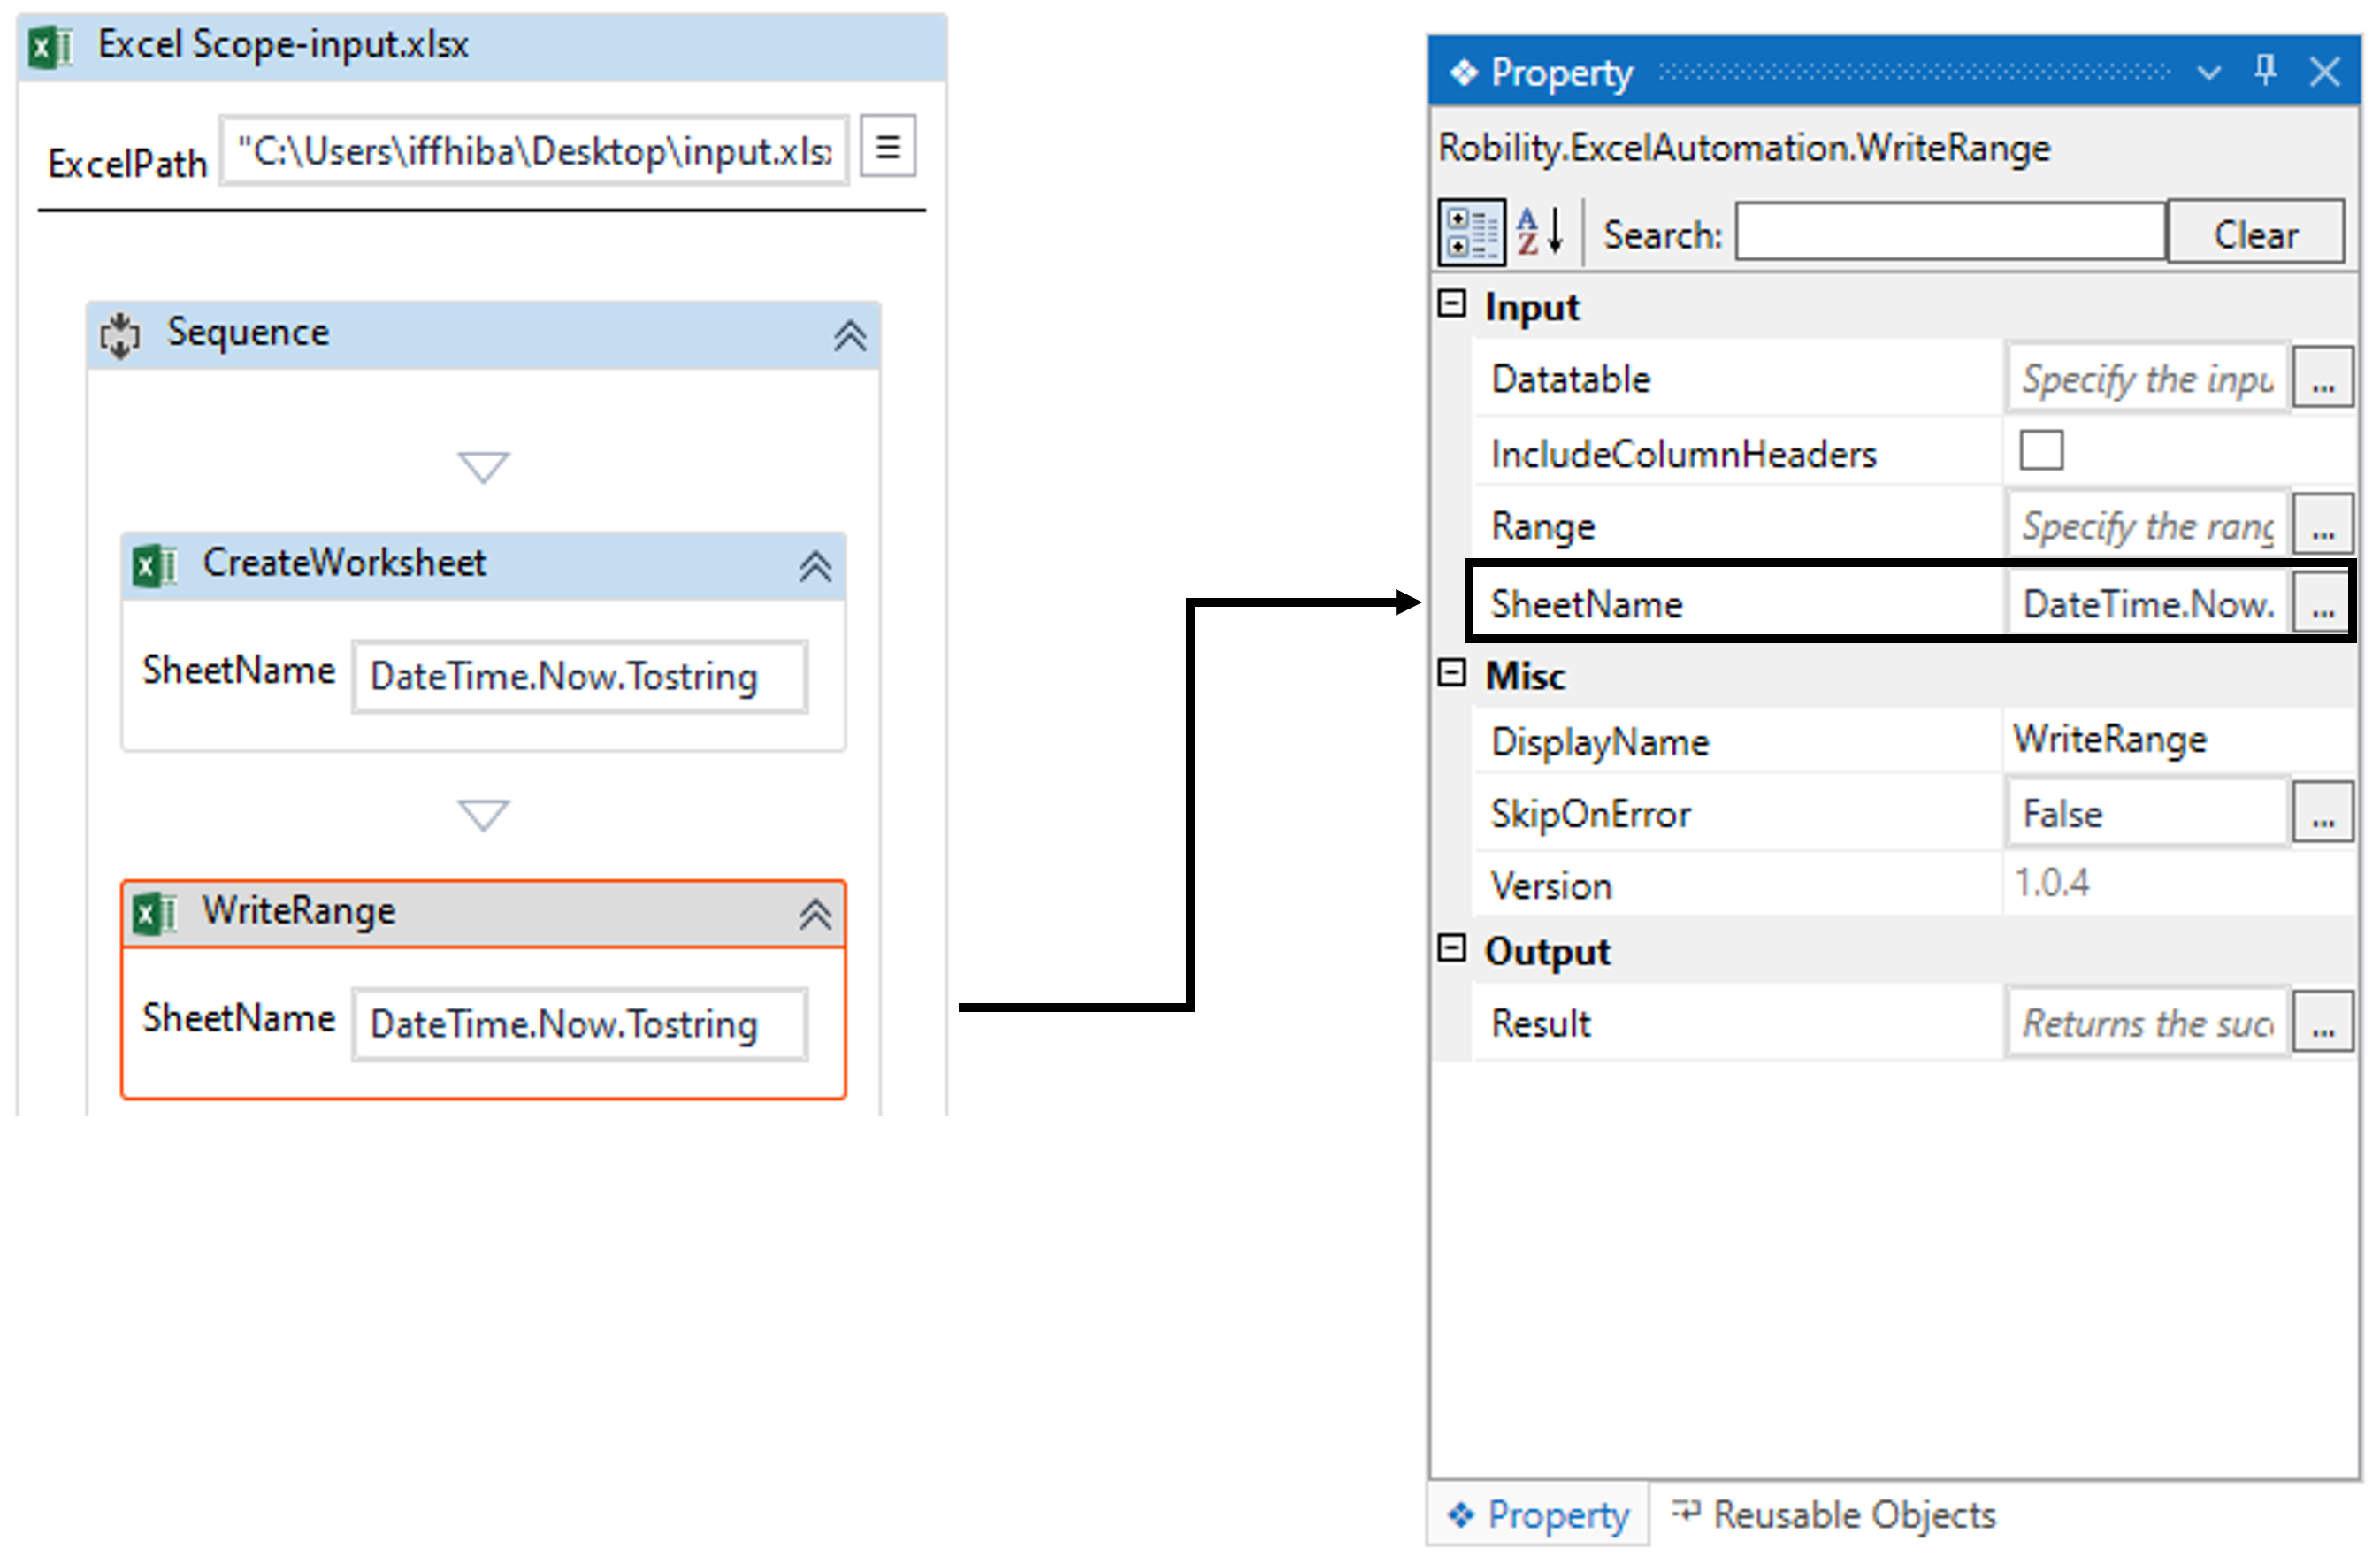
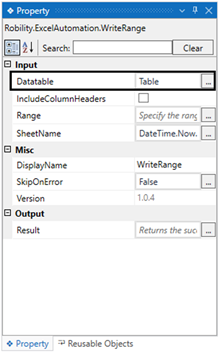
c. Navigate to the “Datatable” in the properties to provide the input datatable
for the activity.
i. Here, provide the value as “Table”.
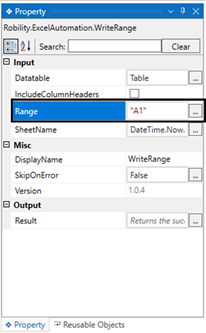
d. Move to the next property, “Range” to provide the range where the
data has to be inputted.
i. Enter the range value as “A1” to start from the beginning.
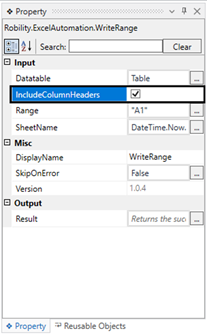
e. Now, Check the “IncludeColumnHeaders” box to write the headers of
the table extracted from the website also.
5. Next, place the “ReadRanges” activity from the Excel Automation
feature within the scope.
a. We are using this activity to read the ranges from the provided “Excel” file
and extract the data to “Datatable” type as output.
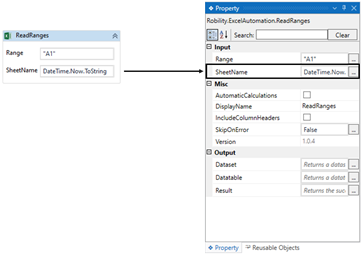
b. Enter the “Range” as “A1” as we are reading the ranges from “A1” to the
end of the data.
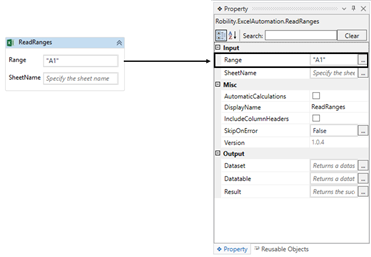
c. Provide the “SheetName” as “DateTime.Now.ToString” as it contains the
data that needs to be read.
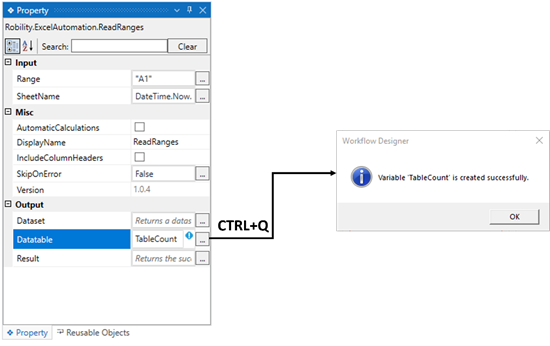
d. Navigate to the properties and create a variable in the “DataTable” field as
“TableCount”. It will convert and extract the read data to store in the variable
“Employee_record”,
6. There are two ways to create a variable-
7. Method 1 – Click on the "Datatable" property within the "ReadRanges" activity
and enter the variable name. In this case, we are using “TableCount." Then, press
"Ctrl+Q," which is a shortcut key to create a variable.
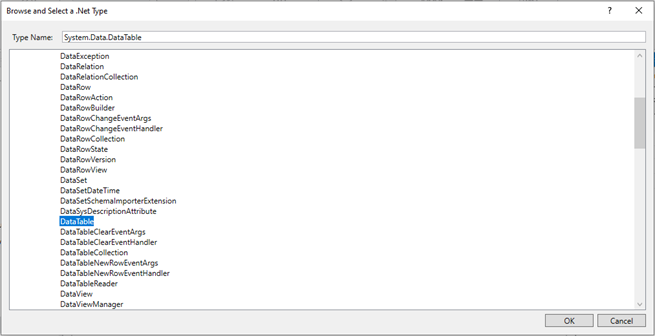
8. Method 2 - Click on the Variables pane and enter the name " TableCount."
Then, in the "Variable Types" column, select "Browse for Types" from the
dropdown menu.
9. The .Net window for data types will appear on the screen, enter the type
name as “System.Data.Datatable” and then click on “OK” button.
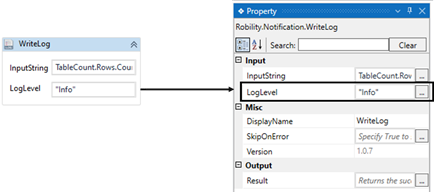
10. Next, place the “Writelog” activity from the “Notification” feature next
to the “ReadRanges” activity.
a. Here we are using this activity to get the count of the rows available
in the excel sheet.
b. Double click on the activity and enter the “InputString” as
“TableCount.Rows.Count.ToString”.
i. The “.ToString” is advised to use along with any other data types other than
string format. It converts any data type into string.
ii. The “Rows.Count” helps the user to get the count of the rows available
in the datatable.
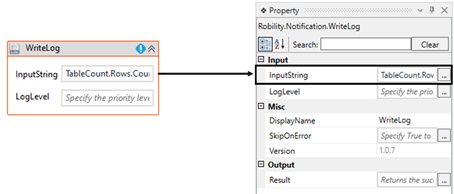
c. Enter the log level as “Info”. Click here to get more information on this activity.
11. Next, place the “InsertandDeleteRow” activity within the scope next to the
writelog.
a. Here we are using this activity to delete the last row from the table as it
will not be required in the table.
b. Double click on the activity.
c. Enter the “startingRow” as “TableCount.Rows.Count”.
i. This will help to remove the last row from the table. For e.g., if the count of
the table is “11”, the “11th” row will be deleted.
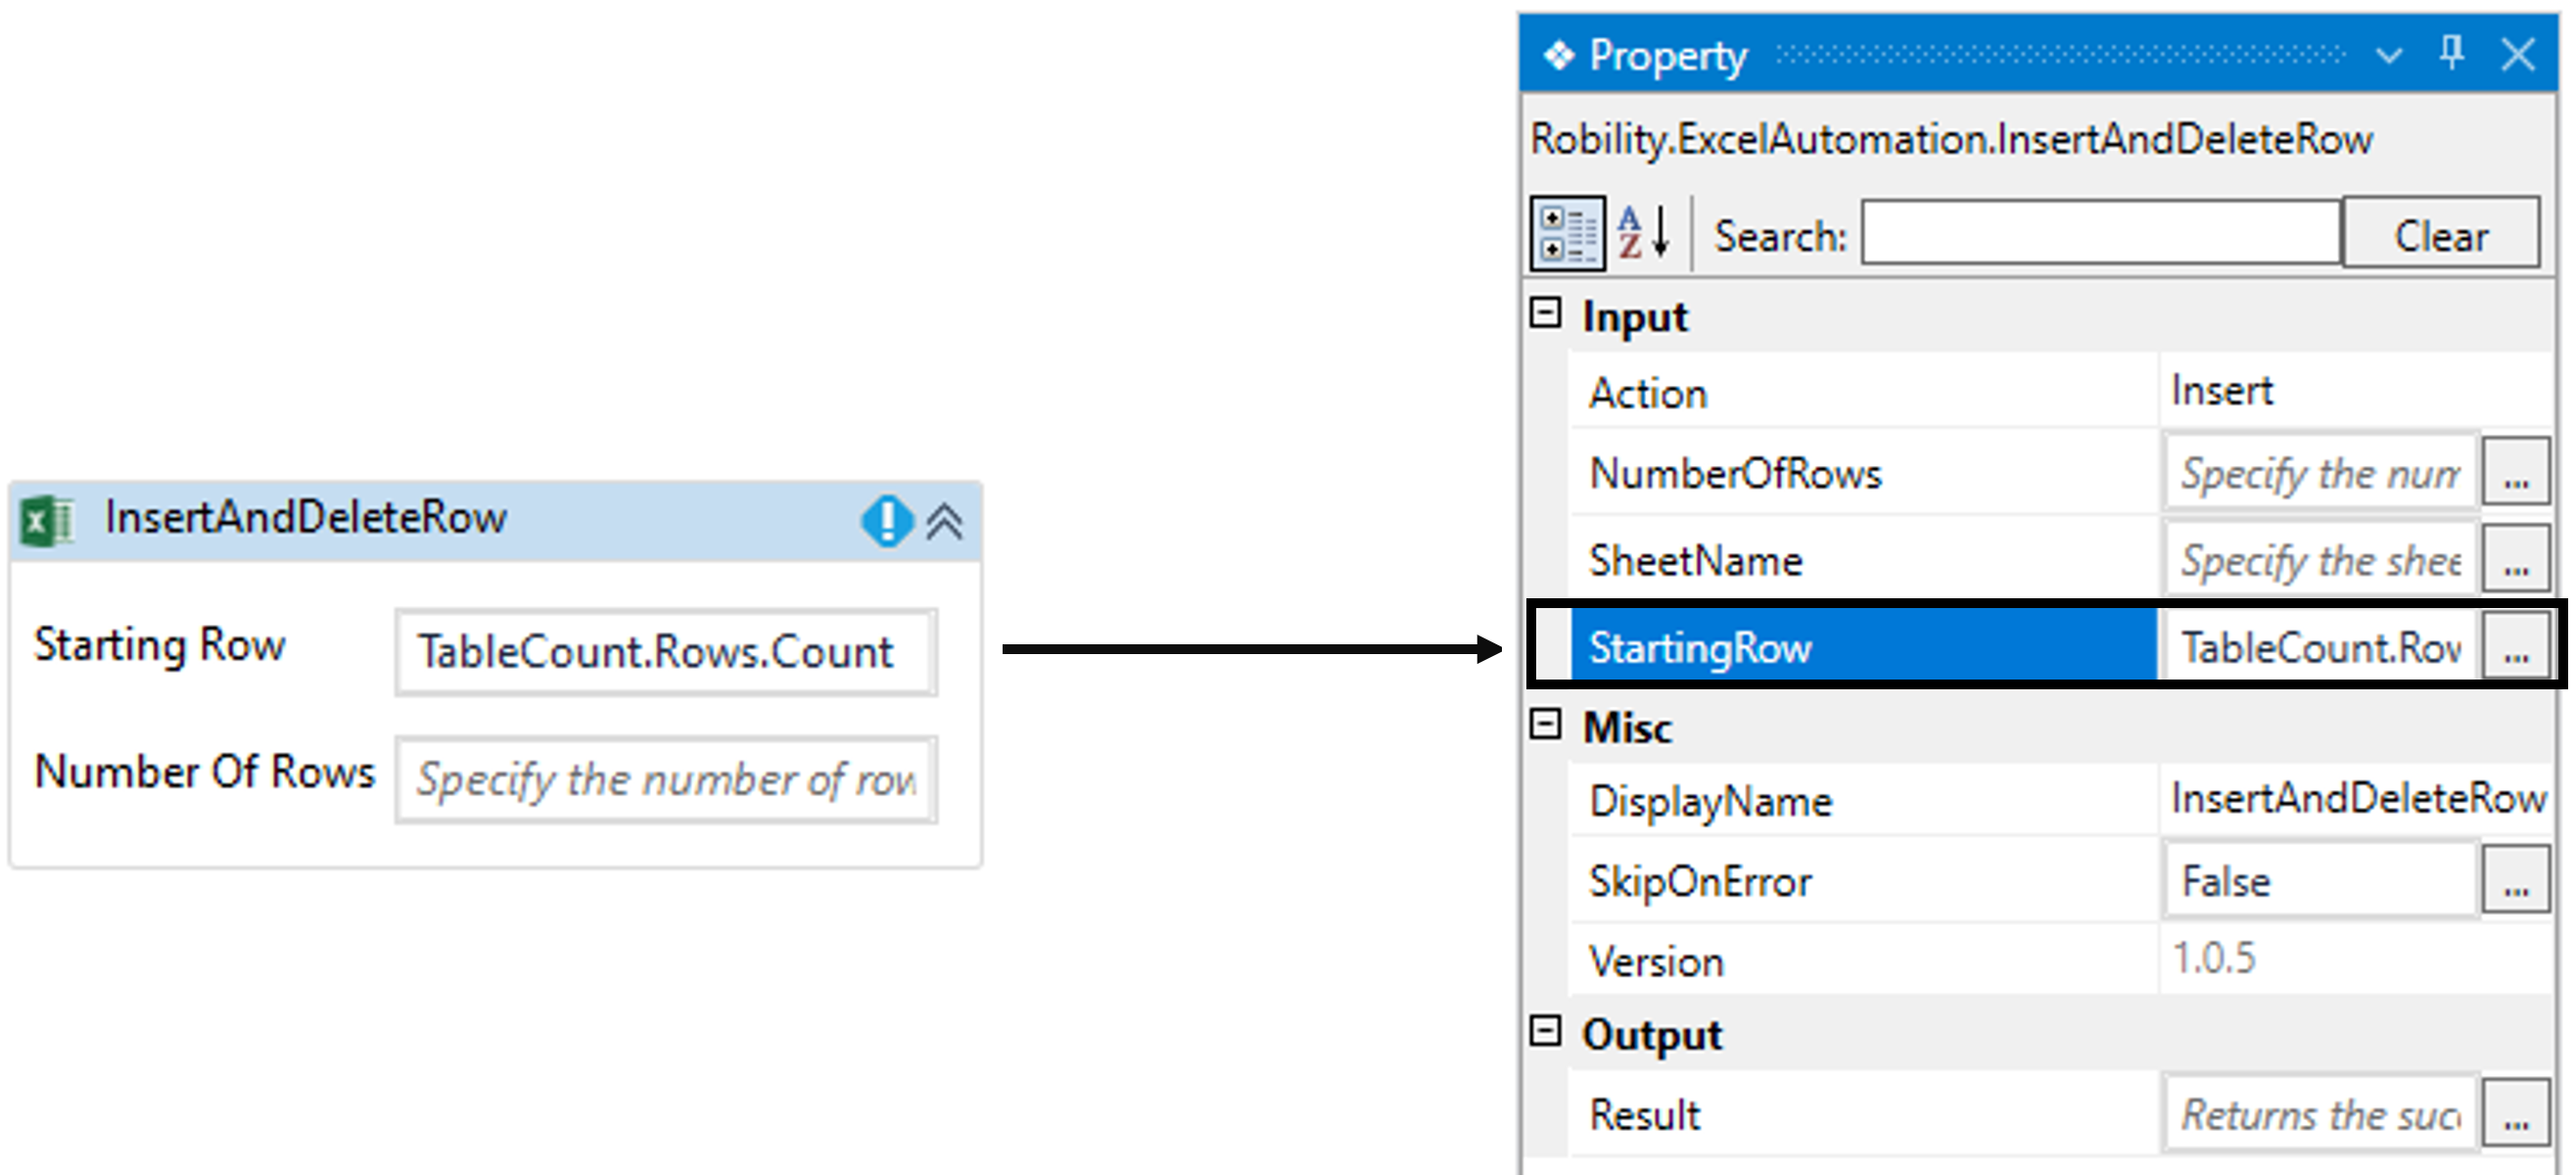
ii. Provide the number of rows as “1” to delete only one row from the excel sheet.
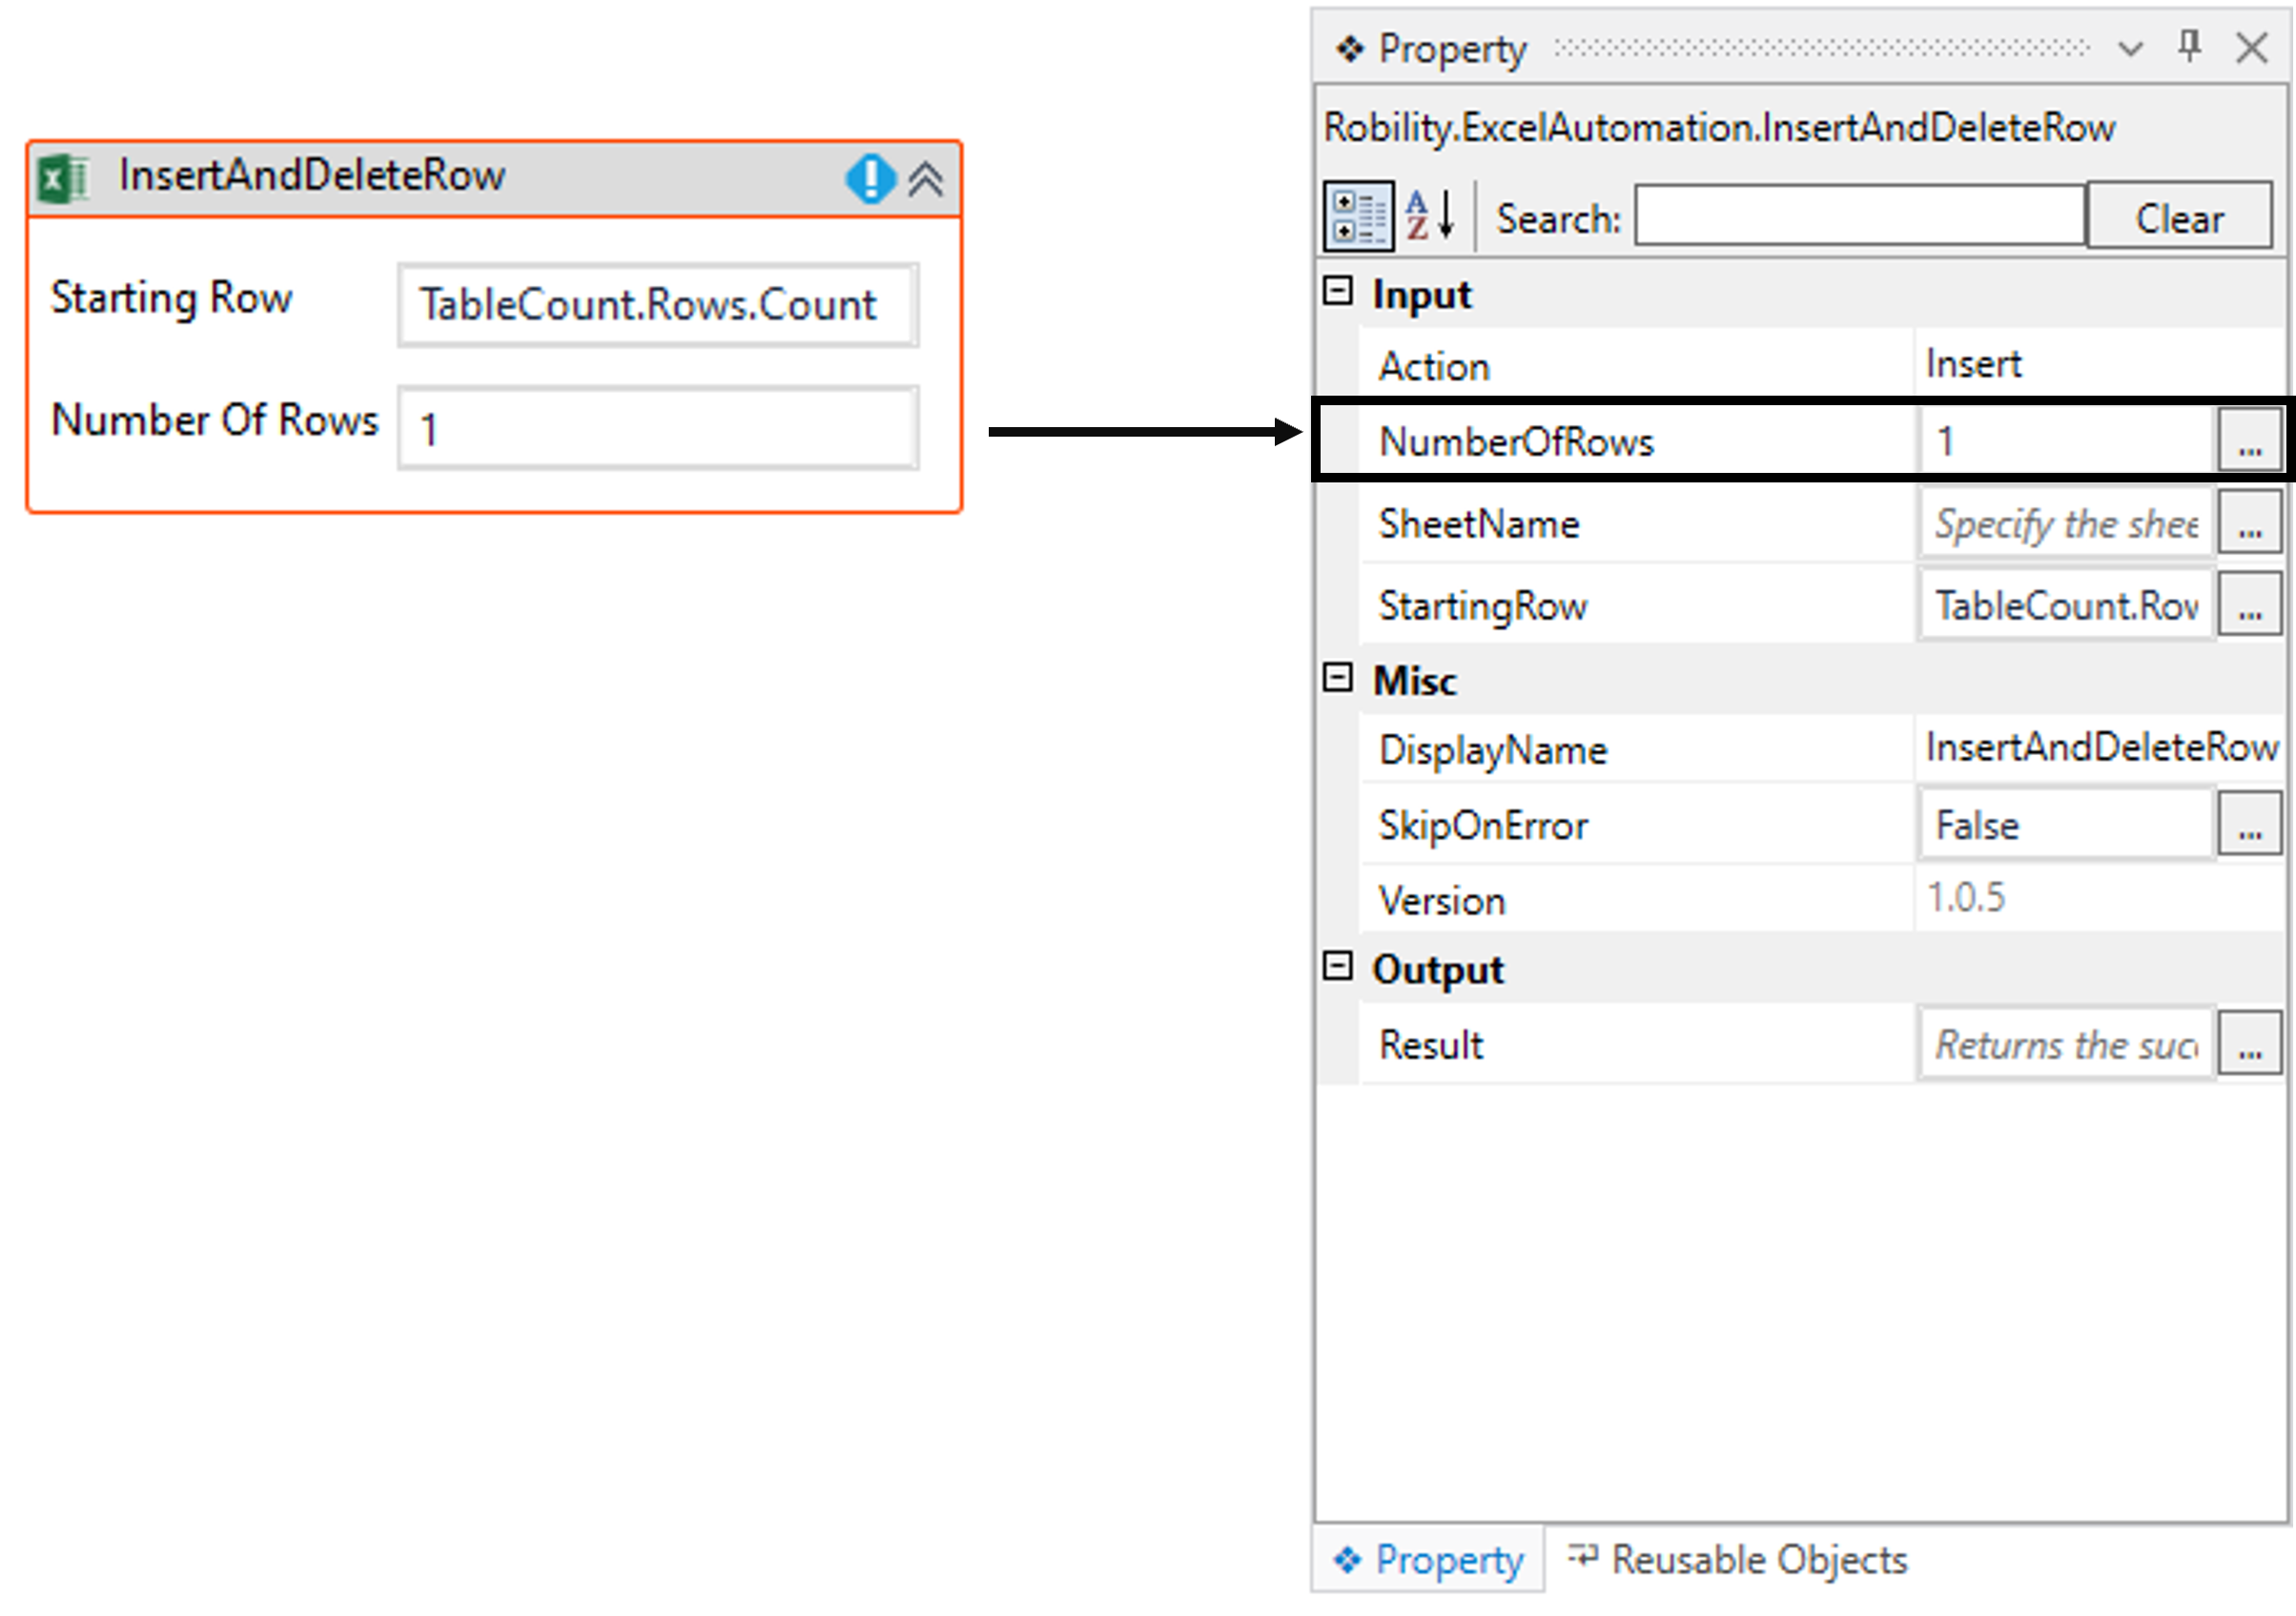
iii. Navigate to the “Action” in the properties and choose the “Delete” from
the drop-down.

iv. Enter the sheet name as “DateTim.Now.ToString”.

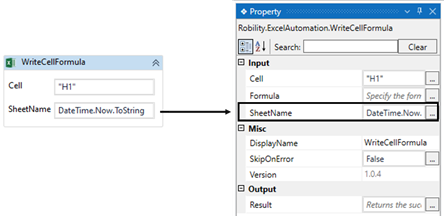
12. Now, add the “WriteCellFormula” activity next to the “InsertandDeleteRow” activity.
a. Here we are using this activity to calculate the total salary from the “Salary” column.
b. Enter the “CellName” as “H1” as we are writing the total here.
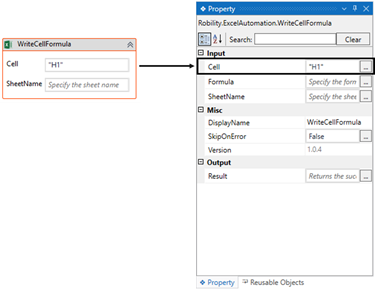
c. Enter the sheet name as “DateTim.Now.ToString”.
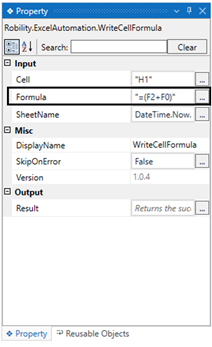
d. Navigate to the “Formula” in the properties to provide the formula to calculate.
i. Here we are providing the formula as “=(F2+F10)”.
ii. This will help to add the values from “F2” to F10” and provide the total in the
specified cell.
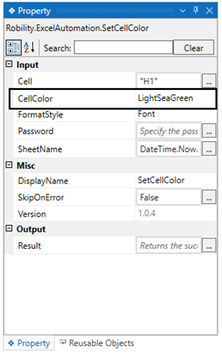
13. Next, drag and drop the “SetCellColor” activity next to the WriteCellFormula”
within the scope.
a. Here we are using this activity to highlight the total amount that has been
calculated from the “Salary” column.
b. Double click on the activity and provide the “Cell” value as “H1” where the
total amount is located in the sheet.
c. Enter the “CellName” as “H1” as we are writing the total here.
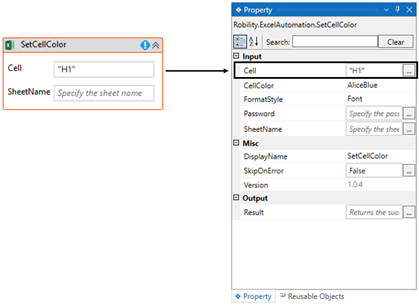
d. Enter the sheet name as “DateTim.Now.ToString”.
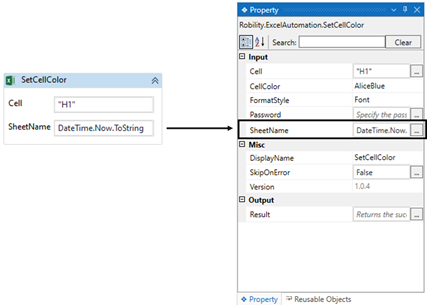
e. Navigate to the “CellColor” drop-down to choose the color.
i. Here we are choosing the color name as “LightSeaGreen”.
14. Atlast, add the “SecureWorkbook” activity next to the “SetCellColor”
activity within the scope.
a. Here we are using this activity to secure the excel sheet for further
processing and to protect the data.
b. Double click on the activity.
c. In the “Password” field, enter your specific password here. Here we are
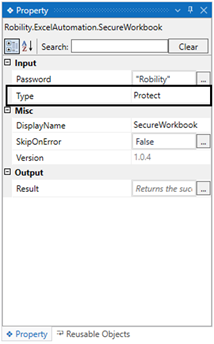
using the password as “ROBILITY”.
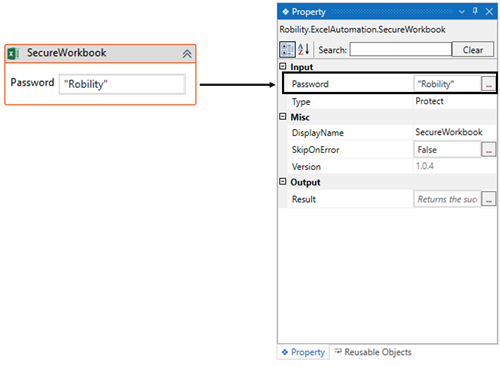
d. Move to the next property, “Type” and choose the value as “Protect” as we
are securing the worksheet here.
15. Now, save the workflow and execute the bot.
16. It will extract the table from the website and writes it in the excel sheet and
then further calculates the total amount after clearing the last row from the table.
(Below is the sample of the output of the activity.)