Web automation helps the user to automate any tasks on a webpage. To begin the
automation process, we need to start spying the elements with which the activity has
to be performed. This is when the Robility Spy plays a major role.
How does the Robility spy work?
1. Robility spy has various components needed to choose an element on a webpage
that makes it easier and simpler to automate.
2. Select an element required to spy on a webpage.
3. Each element has different HTML tags attached to it and the Robility spy helps us to
choose the required HTML tag(attribute) for the specified element.
4. When we click on the element, the default attributes are chosen automatically. This
usually works in most scenarios.
a. In scenarios, where the activity does not operate as expected, we can
change the default attributes chosen and play around with different
attribute selections.
b. When the website is dynamic, we do not recommend to chosen
“innertext” as it will throw an error that the “Element is not found”
because the text inside an element keeps changing dynamically.
The following are the best practices to choose an attribute for a dynamically
changed webpage. Below are few examples.
I. When we choose a table in a webpage, we can use the tag,
tabrow,tabcol
II. When we choose a text box in a webpage, and if the webpage
has only one text box, we can choose tag.
III. When we choose a text box in a webpage, and if the webpage
has multiple textboxes, then we can choose name, id, class or
parent id/ parent class with tag, name and id.
Click here to know how dynamically changed element works in workflow.
Technical reference
|
|
|
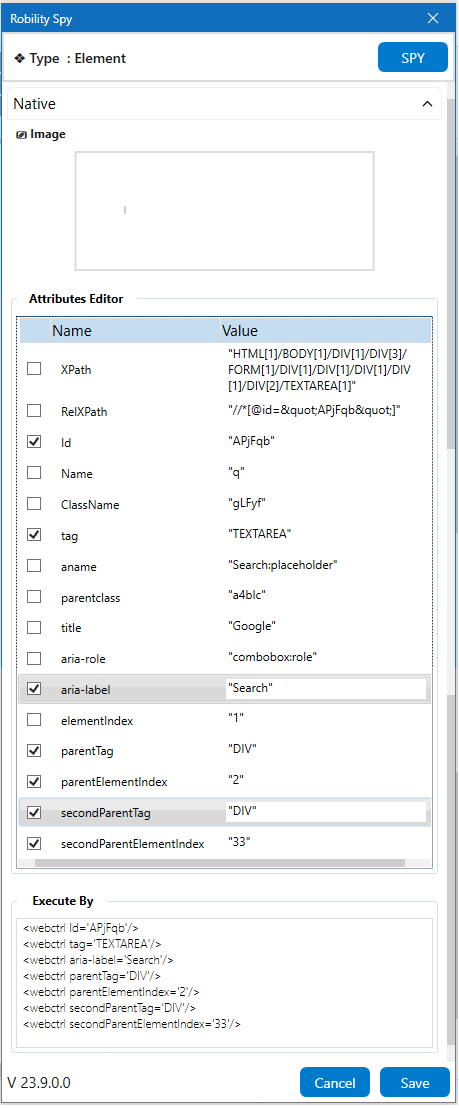
Image: Displays the image of the element that has been detected on the webpage. The user will not be able to edit the image, they have to re-spy the element again to change it. |
|
Attributes Editor |
XPath – This will display the highlighted element's absolute Xpath. · The Xpath won't function if any attributes are changed from the root to the element. · Using this attribute does not need other attributes along with it. · This is helpful while working on a dynamic webpage where the element’s unique attributes are not constant. · Once this attribute is selected, all other attributes will be disabled. |
|
|
RelXPath - The Relative XPath helps to search the element anywhere on the webpage. · This works because it identifies the element directly and not from the root. · Using this attribute will disable all the attributes except XPath. · Though XPath will be enabled, we can choose either XPath or RelXpath and not both the attributes together. |
||
|
ClassName – The class name of the element will be available here. This can be chosen along with the other attributes. |
||
|
Tag- The tag name of the highlighted element such as input tag, anchor tag or button tag will be available. This will be selected as default attribute. You can select/ deselect it as per your requirement. |
||
|
InnerText – The Inner text of the highlighted element will be available here. You can select/deselect as per your requirement. |
||
|
ParentClass – The Parent Class of the highlighted element will be available here. This will be selected as default attribute. You can select/deselect it as per your requirement. |
||
|
Title- The title of the webpage will be available here. You can select/deselect as per your requirement. |
||
|
Href- The Href attribute is used to specify the URL of the page that the link goes to.You can select/deselect based on your requirement. |
||
|
Aria-Role- The Aria-role of the highlighted element to be treated on the website will be available here. If the selected element is a button, it will be treated as button. You can select/deselect based on your requirement. |
||
|
ElementIndex – The index position of the highlighted element will be available here. You can select/deselect based on your requirement. |
||
|
ParentTag - The parent tag returns the parent element of the spied element. You can select/deselect based on your requirement. |
||
|
ParentElementIndex - The index position of the parent tag highlighted element will be available here. You can select/deselect based on your requirement. |
||
|
SecondParentTag – The second parent tag name of the highlighted element will be available here. You can select/deselect based on your requirement. |
||
|
SecondParentElementIndex - The index position of the second parent tag highlighted element will be available here. You can select/deselect based on your requirement. |
||
|
ExecuteBy |
This area displays the element values and its attributes that has been chosen from the Attributes editor. Any changes made in the attribute’s editor field will be reflected here. This field cannot be edited, only changes will be reflected. |