
This activity assists the user in interacting with images, elements, files, icons, or
applications by clicking on specified target elements using the provided image.
Technical Reference
|
|
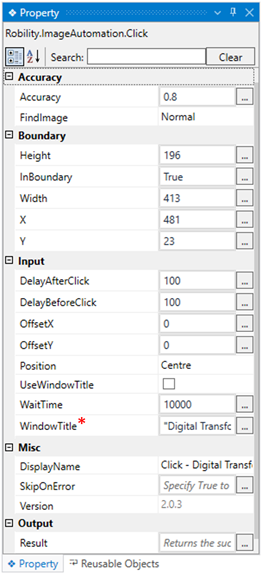
ACCURACY |
Accuracy: This parameter helps the user find the similarity between the images that need to be identified. The accuracy range starts from 0 and ends at 1. The highest accuracy achievable is 0.8. This parameter accepts values of the 'Double' data type. |
|
FindImage: Indicates to find the image based on the accuracy provided. Choose from the drop down, Dynamic - It searches for the image more than the specified accuracy range. |
||
|
Boundary |
Height: It gets automatically filled once the 'Image' has been selected. It indicates the 'Height' of the image snippet. If left blank, it will not be considered. This parameter accepts values of the 'Int32' data type.
You can also adjust the height of the image to be identified during runtime, increasing, or decreasing it.
This field will be automatically filled and required when 'Advanced Automation' is enabled. (Refer the Advanced Automation document.) |
|
|
InBoundary: It gets automatically filled once the 'Image' has been selected. It indicates whether the image snippet is within the boundary or not. If left blank, it will not be considered. This parameter accepts values of the “Boolean” data type.
True: Indicates that the image snippet is within the boundary chosen.
False: Indicates that the image snippet is within the boundary chosen.
This field will be automatically filled and required when 'Advanced Automation' is enabled. (Click here to know about the boundary.) |
||
|
Width: It gets automatically filled once the 'Image' has been selected. It indicates the “Width” of the image snippet. If left blank, it will not be considered. This parameter accepts values of the 'Int32' data type.
You can also adjust the width of the image to be identified during runtime, increasing, or decreasing it.
This field will be automatically filled and required when 'Advanced Automation' is enabled.(Refer the Advanced Automation document.) |
||
|
X: It gets automatically filled once the 'Image' has been selected. It indicates the “horizontal position” of the image snippet from left side of the page. If left blank, it will not be considered. This parameter accepts values of the 'Int32' data type.
You can also adjust the range to be identified during runtime, increasing, or decreasing it.
This field will be automatically filled and required when 'Advanced Automation' is enabled.(Refer the Advanced Automation document.) |
||
|
Y: It gets automatically filled once the 'Image' has been selected. It indicates the “Vertical position” of the image snippet from top of the page. If left blank, it will not be considered. This parameter accepts values of the 'Int32' data type.
You can also adjust the range to be identified during runtime, increasing, or decreasing it.
This field will be automatically filled and required when 'Advanced Automation' is enabled.(Refer the Advanced Automation document.) |
||
|
Input |
DelayAfterClick: It assists the user to add a delay before initiating subsequent activities. |
|
|
DelayBeforeClick: It assists the user in adding a delay before starting the execution of the activities. |
||
|
OffsetX: Indicates the horizontal position of the 'cursor' for performing the 'drag and drop' action on the image snippet. When this option is left blank, the “OffsetX” position will not be considered. It accepts values in the 'Int32' data type. |
||
|
OffsetY: Indicates the vertical position of the 'cursor' for performing the 'drag and drop' action on the image snippet. When this option is left blank, the “OffsetY” position will not be considered. It accepts values in the 'Int32' data type." |
||
|
Position: Indicates to set the “Position” of the image snipped. Select the options from the drop-down, Centre - Choose this option when the “image” is centered within the page. TopRight- Choose this option when the “image” is positioned at “Top Right” within the page. TopLeft – Choose this option when the “image” is positioned at “Top Left” on the page. BottomRight – Choose this option when the “image” is positioned at “Bottom Right” within the page. BottomLeft – Choose this option when the “image” is positioned at “Bottom Left” within the page. |
||
|
UseWindowTitle: It allows the user to perform actions only within the specified 'Window' title when the box is checked. When this option is left unchecked, it will not be considered. |
||
|
WaitTime: It enables the user to introduce a delay before initiating subsequent activities. The delay is specified in milliseconds.
By default, it is set to 10000 milliseconds. Leaving the option blank will result in no delay being applied. |
||
|
WindowTitle: It gets automatically filled once the 'Image' has been captured within the application. It represents the 'title' of the application from which the image has been captured. |
||
|
MISC |
DisplayName: Displays the name of the activity. The activity name can be customized, which aids in troubleshooting. |
|
|
SkipOnError: Specify the "Boolean" value as "True" or "False."
True: Continue executing the workflow regardless of any errors thrown. False: Halt the workflow if it encounters any errors. None: If the option is left blank, the activity will, by default, behave as if "False" were chosen. |
||
|
Version: It indicates the version of the feature being used. |
||
|
OUTPUT |
Result: It provides the ability to view the execution status of the activity. It returns values in "Boolean."
True: Indicates that the activity has been executed successfully without any errors. False: Indicates that the activity has been unsuccessful due to an unexpected error being thrown. |
* Represents mandatory fields to execute the workflow
Here's an example of how the “Click” function works in the workflow –
The following is a simple example that automates on the “Sutherland” website using
“Move, Click, Right Click and Wait” activities on the browser.
Here I have already launched the “Sutherland” website and continuing from the
workflow utilized in the example of “Move” activity.
1. Now, placing the "click" activity next to the "Move" activity in the
designer pane.
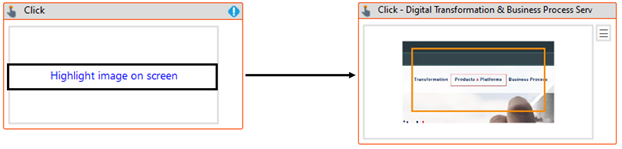
a. In this case, I am using this activity to select the snipped image. Click here
to refer to the move activity.
b. Double-click the activity.
c. Here, choose the "Highlight image on screen" option.
d. Snip the image once the timer goes off that you want to hold; in this case, I am
snipping the “Products x Platforms” option on the webpage.
e. Once you have snipped the image, the image pixels will be stored in the properties
window.
Now, execute the workflow and the bot moves the cursor to the specified image and
clicks on it.
Use Case
The following use cases demonstrate how to use the ‘Image’ automation feature
within the workflow.
In this case, we've developed a straightforward automation bot designed to gather use
r input and subsequently generate an image link from the provided data. Users will be
prompted to input a name, after which the bot will create and store the image link locally.
Subsequently, users can employ the generated image link for their specific requirements.
Steps to execute a bot
Follow the below steps to build the automation steps.
1. Launch the Designer and create a new solution named “Image Generation”.
2. Install the latest “Image Automation” and “Notification” feature from the “Manage Features”.
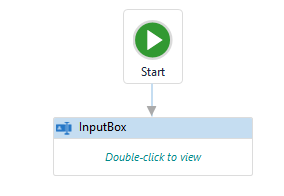
3. Drag and drop the “InputBox” activity to the workflow and set it as start node.
a. It helps to generate a dialog box to get the input from the user during the runtime.
You need to create the input fields as per the requirement.
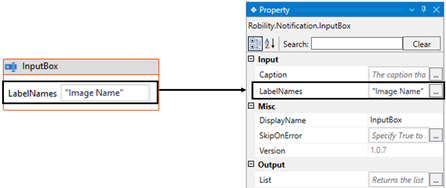
b. Here I am going to create one input field to get the value from the user.
c. Double click on the activity to provide the “label” name to be created.
i. Here I am using the label name as “Image Name”.
ii. Navigating to the “Caption” in the properties of the “InputBox” activity to
specify the title for the input dialog box.
iii. Here I am specifying the caption name as “Image Generator” as the title. It
accepts only “String” datatype.
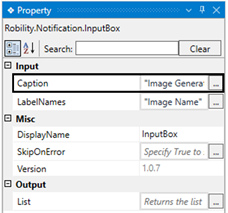
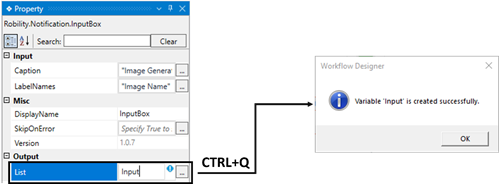
d. Moving to the “List” from the output section of the properties to declare a
variable to view the output of the activity.
i. There are two ways of declaring a variable –
ii. Method 1 – Click on the "List" property within the "InputBox" activity and enter
the variable name. In this case, we are using " Input." Then, press "Ctrl+Q,"
which is a shortcut key to create a variable.
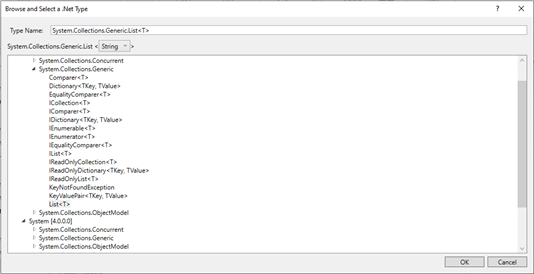
iii. Method 2 - Click on the Variables pane and enter the name "Input ". Then, in
the "Variable Types" column, select "Browse for Types" from the dropdown menu.
iv. The .Net window for data types will appear on the screen, enter the type name
as “System.Collections.Generic.List<System.String>” and then click on “OK” button.
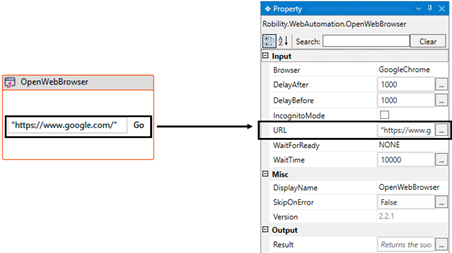
4. Next, place the “OpenWebBrowser” activity from the “WebAutomation” feature
next to the “Inputbox” activity.
a. Here I am using this activity to launch the “Google” website to enter the input
collected from the user.
b. Double click on the activity and here I am providing the URL as
“https://www.google.com/”.
5. Moving to the next activity, now place the “SetText” activity from the
“WebAutomation” feature and place it next to the “OpenWebBrowser”
activity.
a. Here, we are using this activity to enter the text on the website from the
input collected from the user during the runtime.
b. Double-click the activity.
c. Here we are choosing the "Select Element" option.
a. Navigate to the website and select the element where we need to pass/set
the value. Here, I am selecting the element from the “Google search bar” area.
b. Once you have chosen the "Element," the attributes will be stored in the "Spy"
window, along with an "image" of the element.
c. If you wish to add or remove any attributes, you can edit the "Attributes Editor."
In this case, we are not making any changes in the “Editor.”
d. Once you click on the "Save" button, the elements will be stored in the activity
window.
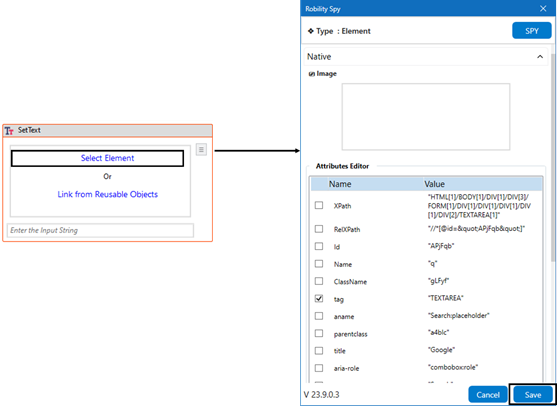
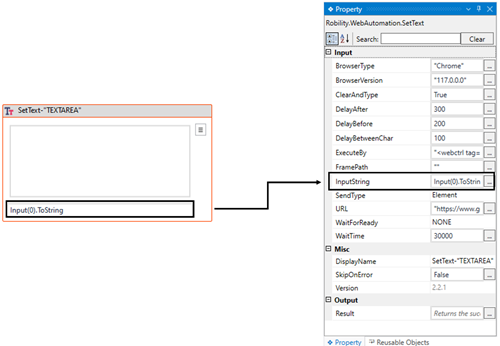
e. Set the value to be entered in the specified element under the "Text" parameter.
Here, I am setting the value as “Input(0).To String”.
ii. Here, we are mentioning the value as (0) as the “Input” variable is in “list” datatype
and it helps to retrieve the first word from the list.
iii. The index count from the list starts from “0”.
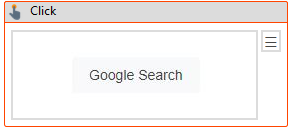
6. Next, placing the "Click” activity from “Image Automation” next to Set text
activity.
a. In this case, we are using this activity to click on the “Search” button once the
text has been entered.
b. Double click on the activity.
c. Here we are choosing the "Highlight image on screen" option.
f. You will be navigated to the Webpage, once the timer goes off, select the element
where we need to click. Here, I am selecting the image as “Google search”
button area.
g. Once you detect the image, it will be stored in the activity window.
7. Next, placing the “Vanish” activity from “Image Automation” next to the “Click”
activity.
a. It helps to find out if the image has vanished from the screen and returns the output in
Boolean value as “True”.
b. Here I am using this activity to find out if the “Google Search” button has vanished or
there is any discrepancies.
c. Double click on the activity.
d. Here we are choosing the "Highlight image on screen" option.
h. You will be navigated to the Webpage, once the timer goes off, select the element
where we need to click. Here, I am selecting the image as “Google search” button area.
i. Once you detect the image, it will be stored in the activity window.

e. Now, navigating to the “Result” in the output property to declare a variable to see the output.
i. There are two ways to create a variable –
ii. Method 1 – Click on the "Result" property within the "Vanish" activity and enter the
variable name. In this case, we are using "Image_Vanished." Then, press "Ctrl+Q,"
which is a shortcut key to create a variable.
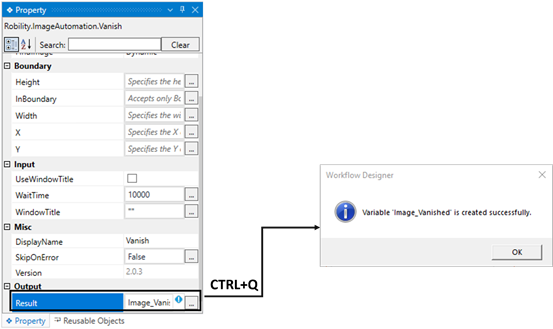
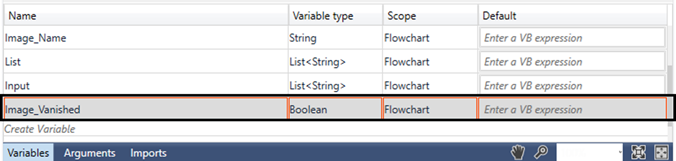
iii. Method 2 - Click on the Variables pane and enter the name "Image_Vanished ".
Then, in the "Variable Types" column, select "Boolean" from the dropdown menu.
8. Next, place the “Flow Decision” activity from the “FlowChart” feature.
a. It helps to validate and move to the next step based on the output from the
Vanish activity.
b. In this case, I am providing the condition as “Image_Vanished” to validate the
next steps.
c. To move onto the next steps, pull an arrow from the left-hand side of the decision
box to set the activity when the result is “True” .
d. Add the “RightClick” activity from “ImageAutomation” feature.
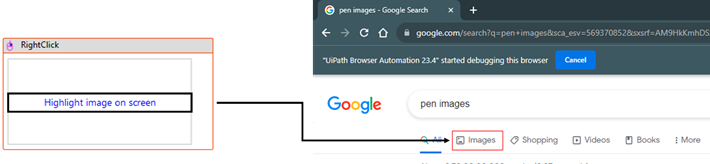
i. Here I am using this activity to right click on the “Images” link to save the image link.
ii. Double click on the activity.
iii. Here we are choosing the "Highlight image on screen" option.
iv. You will be navigated to the Webpage, once the timer goes off, select the element
where we need to click. Here, I am selecting the image as “Images” button area.
v. Once you detect the image, it will be stored in the activity window.
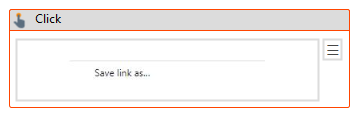
e. Now, Add another “Click” activity and place it next to the “Wait” activity.
i. After right clicking on the image link, the context menu will appear on the screen.
To click on the “Save link” button, in this case we are click activity.
ii. Refer the above steps to detect the image.
f. Place the ‘Wait” activity from the Image Automation next to the Right click
activity.
i. It helps to add a delay during the runtime. Here I am using this activity to add a
wait time of “10 seconds” before moving to the next action.
ii. Double click on the activity.
iii. Here we are choosing the "Highlight image on screen" option.
iv. You will be navigated to the Webpage, once the timer goes off, select the element
where we need to click. Here, I am selecting the image as “Whole google page”.
v. Once you detect the image, it will be stored in the activity window.
vi. Navigate to the “WaitTime” in the properties and enter the time as “10000” seconds.
It accepts values in milliseconds.
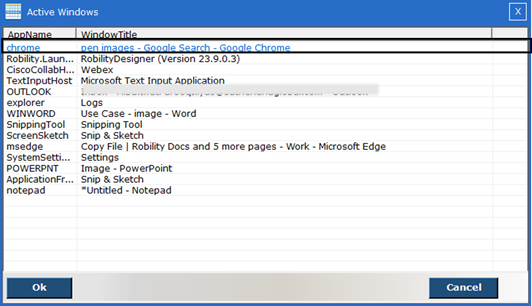
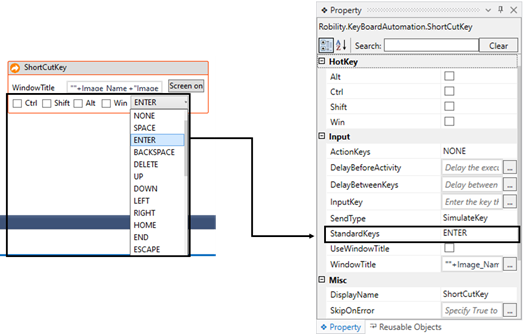
g. Now, placing the “ShortcutKey” activity from “KeyBoard Automation” feature next
to the “Wait” activity.
i. In this case, we are using the “Enter” key option to save the link when the
“File Explorer” dialog box opens.
ii. Double click on the activity.
iii. Click on the “Screen on” option to select the active windows from the desktop.
Here we are selecting the window title as “Google Chrome” from the list.
iv. Moving to the “StandardKeys” option and choose the “Enter” from the drop-down.
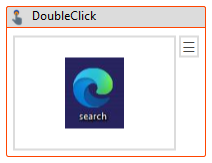
9. Now to view the image link saved in the local, use “Double Click” activity.
a. Double click on the activity.
b. Here we are choosing the "Highlight image on screen" option.
c. You will be navigated to the Webpage, once the timer goes off, select the element
where we need to click. Here, I am selecting the image link from the local.
d. Once you detect the image, it will be stored in the activity window.
10. Now, save and execute the workflow.
11. The bot will execute and collects the input from the user to generate the image link.