This activity enables users to invoke 'External DLLs' in their workflow. These Dynamic
Link Libraries contain reusable code and functions that extend the functionality of
the workflow. By using this activity, users can seamlessly integrate external libraries,
allowing them to leverage existing code and perform a wide range of operations
within their automation processes.
Prerequisites
The following are the prerequisites for the “InvokeDLL” activity.
1. It supports only public classes: The "InvokeDLL" activity is designed to work
with public classes within a DLL (Dynamic Link Library). Public classes are
accessible and can be used by external code, such as the workflow that invokes
the DLL.
2. Private classes and methods are not supported: Private classes in a DLL,
which are not accessible from external code, cannot be used with the "InvokeDLL"
activity. This limitation ensures that only publicly accessible functionality can be
invoked. Similarly, the "InvokeDLL" activity does not support invoking private
methods within a class. It is intended for the invocation of public methods or
functions exposed by a class.
3. Constructor overloading is not supported: Constructor overloading refers
to having multiple constructors with different parameter lists in a class. The
"InvokeDLL" activity does not support this feature. It typically expects a default
constructor or a constructor with specific parameters that match its input
requirements.
4. Class inheritance is not supported: Class inheritance allows one class to
inherit properties and methods from another class. The "InvokeDLL" activity
does not support invoking methods from inherited classes. It works directly with
the specified class without considering its inheritance hierarchy.
Technical Reference
|
|
INPUT |
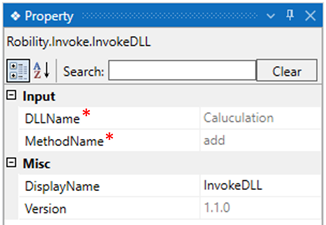
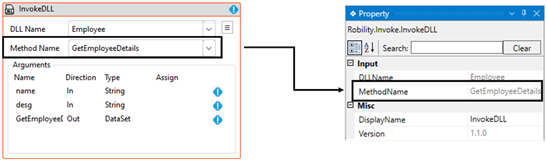
DLLName: This field will be automatically populated when the 'DLL Name' is selected within the activity from the DLL that has been added to the solution. It displays the name of the DLL that the activity has invoked. |
|
MethodName: This field will be automatically populated when the "Method Name" is selected within the activity from the DLL that has been added to the solution. It displays the name of the method that the activity has invoked. |
||
|
MISC |
DisplayName: Displays the name of the activity. The activity name can be customized, which aids in troubleshooting. |
|
|
Version: It indicates the version of the feature being used. |
* Represents mandatory fields to execute the workflow
The 'Invoke DLL' activity includes an option to reset the method, allowing users to
reset the activity when switching back to the previous version.
Why do we need to reset the DLL?
· If you have updated the DLL with a new version or have made changes to its code,
you might want to reload or reinitialize it to ensure that your automation uses the
latest changes.
· If you are dynamically loading DLLs at runtime, you might choose to reload or
reset them based on certain conditions or user inputs to switch between different
DLLs or versions.
How to reset the activity?
1. Open an existing solution where the invoke DLL activity has been used.
2. Double click on the activity and choose the “Three lines” adjacent to the
“DLL Name” option.
3. Choose the “Reset” option from the context menu.
4. Now, the activity will be reset, and you can add another DLL name to the
solution.

How to edit the arguments?
The “InvokeDLL” activity allows the user to edit the provided arguments whenever
there is a need to change the variables or the input values.
Steps to edit the arguments:
1. Open an existing solution where the invoke DLL activity has been used.
2. Double click on the activity and choose the “Three lines” adjacent to the
“DLL Name” option.
3. Choose the “Edit Arguments” option from the context menu.
4. Now, the arguments panel will appear on the screen, here you can change
or provide the input values.
5. Then, click on “Ok” button.

Use Case
The company uses an External DLL to extract the “Employee” details from the
website. The External DLL here used is a sample DLL with constructor parameters.
This method requires two input values for automation. The output of the DLL
will provide the input values in a dataset format.
Here I have already added the DLL onto the solution. Click here to know how
to add the DLLs.
Steps to execute a bot
1. Create a solution named “DLLDOC” or open an existing solution.
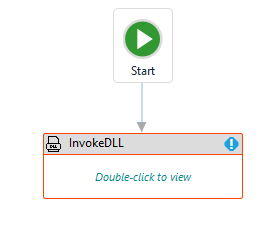
2. Drag and drop the “Invoke DLL” activity from the “Invoke” feature to the
workflow and set it as start node.
a. It is used to invoke the method from external DLLs that contains non-static
and static methods. Here we are extracting the “EmployeeDetails” from the DLL.
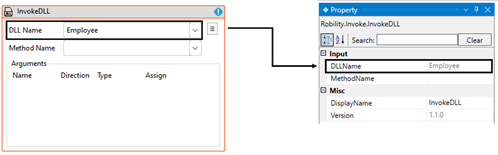
b. Double click on the activity.
i. First, we need to choose the “DLL Name” from the drop-down. In this case,
I am choosing the “Employee” option.
c. Moving to the next field, “Method” to choose the method that are available
in the DLL.
i. In this case, the invoked DLL contains three methods, and I am using the
“Employee details” from the drop-down.
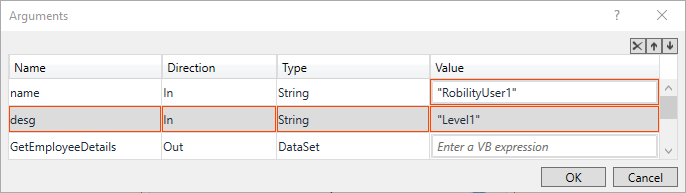
d. Once we choose the “Method” name, the arguments that are available for the
DLL will be populated on the screen.
i. Here, we need to provide two input values to the DLL and one “Out” argument
to view the output.
ii. I am providing the “name” as “RobilityUser1” in the value against it.
iii. Next, providing the “Design” as “LEVEL1” against it.
e. Next, we are going to declare a variable to view the output in dataset format.
f. There are two ways to declare a variable in dataset format, click here.
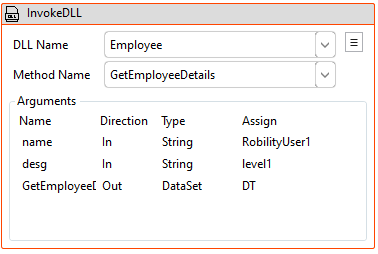
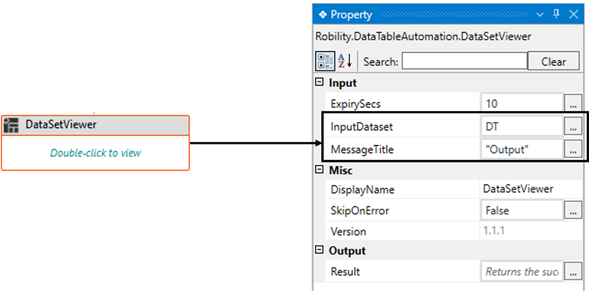
3. Now, place the “DataSetViewer” activity next to the “InvokeDll”
activity.
a. It helps to view the “dataset” variables in a table format. Here, the
Invoked DLL returns the output in “Dataset” datatype.
b. Navigate to the “InputDataset” property to provide the variable that
stores the dataset values. Here it is as “DT”.
c. Now, provide a title for the table as “OUTPUT”.
4. Now, execute the workflow in debug mode.
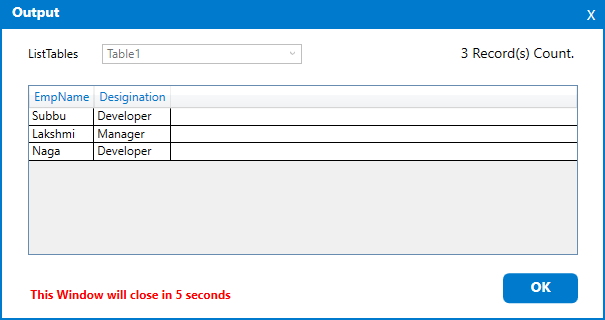
The output of activity will be returned as the provided employee details in
a dataset format. Below is a sample of the output.