This activity serves to invoke a sub-workflow within the main workflow, facilitating
the transfer of arguments between workflows. It plays a crucial role in orchestrating
and streamlining process execution.
Technical Reference
|
|
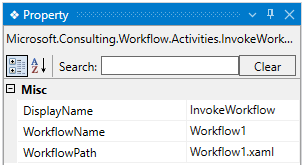
MISC |
DisplayName: Displays the name of the activity. The activity name can be customized, which aids in troubleshooting. |
|
Workflow name : This parameter is automatically filled once the 'Workflow' has been invoked into the solution. It specifies the 'Name' of the invoked workflow. |
||
|
Workflow path: This parameter is automatically filled when the 'Workflow' is invoked in the solution. It specifies the 'Path' of the invoked workflow. |

How to import and invoke workflows from zipped
folder?
The zipped folders obtained from the Robility Manager will contain encrypted files
that will need decryption to extract the files within the folder. To decrypt and utilize
the workflows in the zipped folder, follow the steps below:
1. Open the existing solution/ template and navigate to the “Open” option.
2. Select the “Publish Package” option.
a. It helps to publish and extract the encrypted workflows from the encrypted
folders into a new solution.
3. Choose the appropriate zipped folder from the system folder path and click
on “OK” button.
4. Now, the “Designer will be restarted and opens the extracted folder as a
new solution.
5. You need to switch back to the solution/template where you need to invoke
the workflow.
6. Click on the “Solution Explorer” panel.
a. Right click on the “Solution” name on the top of the panel.
b. Choose the “Import workflows” option to select and import the workflow from
extracted folder.
c. Now, the workflow will be imported inside your required solution/ template.
7. Further, you can use “InvokeWorkflows” activity to use the workflow.
Refer below in the documentation to get more details.
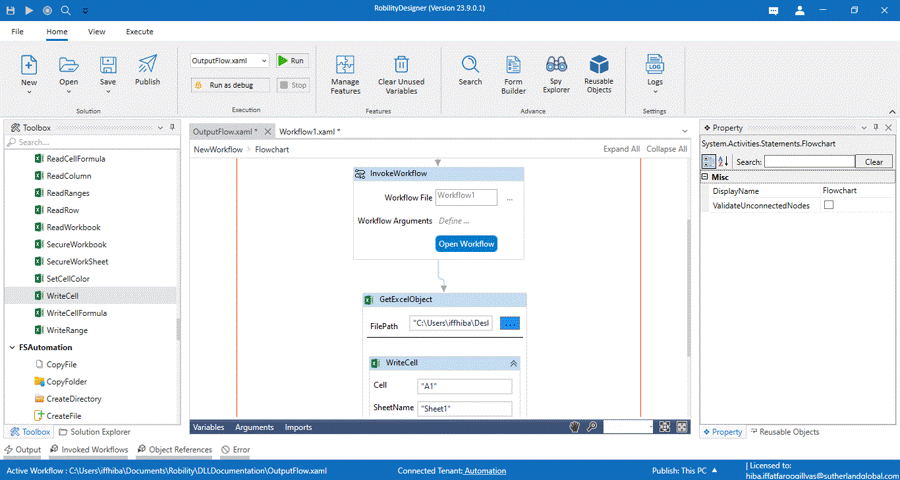
Here’s an example of how “InvokeWorkflow” activity is used in the workflow –
In the following example, I will invoke the workflow used in the 'InvokeMethod'
documentation. For detailed information, please refer to the documentation.
Once we have obtained the output of the activity, I will use 'ExcelAutomation' to
write the output to an Excel sheet. The sample Excel sheet used here has been
attached.
Steps to execute a bot
1. Open the existing solution “DLLDOC” that is used in the “InvokeMethod”
documentation.
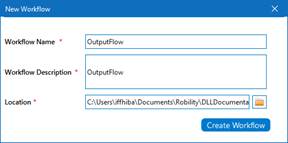
2. Create a new workflow named “Outputflow”.
3. Drag and drop the “InvokeWorkflow” activity to the flowchart and set it as
start node.
a. It helps to invoke workflows within the same solution. Here I am invoking the
workflow as “Workflow1” from the same solution.
b. This workflow contains the “InvokeMethod” activity. Click here to refer the
workflow.
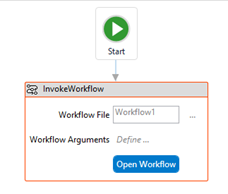
c. The Invoked workflow will perform the “Add” method and provide the output.
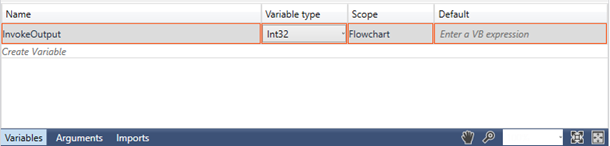
d. Now, to view the output from the workflow, we need to declare a variable.
i. Here I am using the variable name as “InvokeOutput”.
ii. Navigate to the “Variables” panel,
iii. Specify the name as “InvokeOutput” and choose the “Datatype” as
“Int32” as the “Output” will be in numbers.
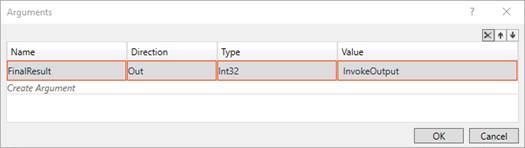
e. Next, I am going to set the variable in the “Workflow Arguments” to view the
output.
f. Navigate to the “Workflow Arguments” in the activity, it defines the arguments
created in the invoked workflow.
i. Click on the “Define” button and the “Arguments Panel” will appear on the
screen.
ii. Here, we could see the “FinalResult” argument defined in the Invoked workflow.
(Refer the “InvokeMethod” activity).
iii. Enter the value as “InvokeOutput” against it to view the output of the method in
the Main workflow.
4. Now, place the “GetExcelObject” from “ExcelAutomation” feature next to the
“InvokeWorkflow” activity.
a. It serves as a scope to automate all other activities within this. It will load the
“Excel” file that has been provided as input.
b. Enter the “filepath” of the excel file or select the “Three dots” and choose the
“Excel File” from the system. (Attached the sample excel file).
i. Drag and drop the “WriteCell” activity from the Excel Automation feature.
ii. We are using this activity to write the output extracted from the “InvokeWorkflow”
activity.
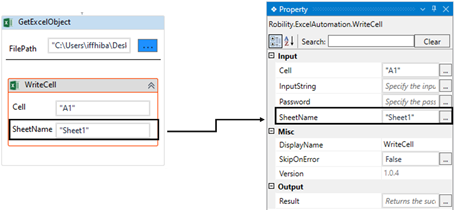
iii. Enter the “Cell” as “A1” to write the output in the specified cell in the excel
sheet.
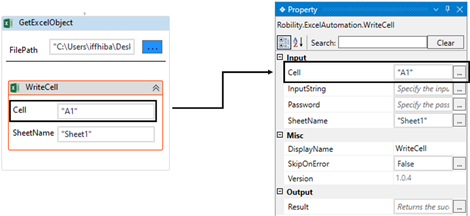
iv. Specify the sheet name as 'Sheet1' where the input is required.
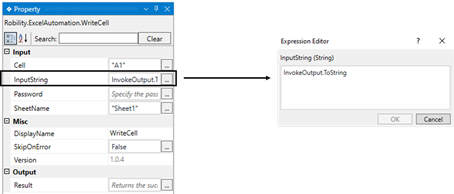
v. Now, go to the 'InputString' property and provide the variable that stores
the input value. This field only accepts 'String' data type.
vi. In this case, I'm using the variable as “InvokeOutput.ToString”.
vii. The “.ToString” extension is advised to use along with any other data
types other than string format. It converts any data type into string.
5. Now, execute the workflow.
The bot will execute the 'Invoked Workflow' and write the output to the Excel
sheet. Below is a sample of the workflow's output.