
The following use case demonstrates how we can use the FS automation feature. The zipped folder is
present in the desktop. We are going to unzip the folder, rename a file, copy it to the original location
in the documents folder and then delete the directory from the desktop.
Here, we have utilized the following activities in the workflow. Now let’s dive into the steps.
Steps to build a workflow:
1. Create a new solution named “FSusecase2”.
2. Drag and drop an “Exist” activity to the workflow. Here we are going to see if the directory is present in
the desktop and then proceed to the next activity.
a. Choose the mode as File.
b. Specify the path of the file for which the exist status has to be found.
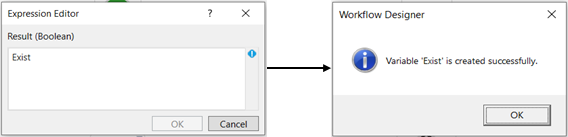
c. There are two methods to create a variable.
Method 1 – Click on the “Result” property within the “Exist” activity and enter the variable
name. In this case, I have used the name "Exist" Then, press "Ctrl+Q," which is a shortcut
key to create a variable.
d. Method 2 - Click on the Variable pane and enter the name "Exist." Then, click on the
"DataTypes" column and select "Boolean."

![]()
Based on the result of the exist status, we proceed to the next activity. Here, we are going to drop two
different set of activities. One set when the exist status is true and the other set when the exist status is
false.
3. Drag and drop a “FlowDecision” activity to the workflow. This is used in connection with the “DirectoryExist”
activity. Based on the result in the previous activity, there should be a choice that has to be made for the
workflow to execute.
a. In the condition, specify the variable “Exist” mentioned in the Exist activity.
b. Based on the result we have to make a choice.
c. If the condition is True, we follow the steps below
i. Drag and drop an “Unzip” activity below the True statement of the FlowDecision
activity.
ii. Navigate to the property section and give the path of the file which has to be unzipped
in the ZipFilePath.
iii. Enter the path where the file has to be saved in the SavePath.
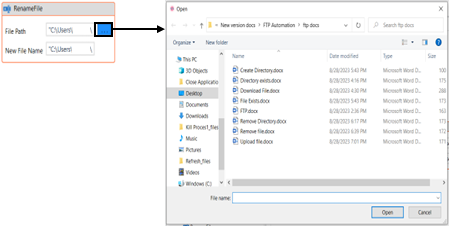
d. Drag a “Rename file” activity to the workflow.
i. Double click on the activity.
ii. Specify the name of the file to be renamed from the Unzipped folder. Here, we are
going to rename the file “Exist ActivityFS autmation” to “Exist”. We have to mention the
from and to file names in the respective boxes with the entire path.
Now, let’s copy the renamed file to a folder inside the “Documents” folder.
e. Drag a “Copy File” activity to the workflow.
i. Double click on the activity.
ii. Enter the path of the file from which the file has to be copied.
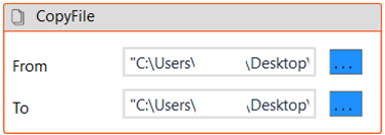
iii. Enter the path of the file to which the file has to be copied.
Once the renamed file has been copied, we are going to delete the directory in the desktop.
f. Drag a “Delete File” activity to the workflow.
i. Double click on the activity.
ii. Specify the name of the directory to be deleted with its path.
g. If the condition is False, follow the below steps to construct the workflow.
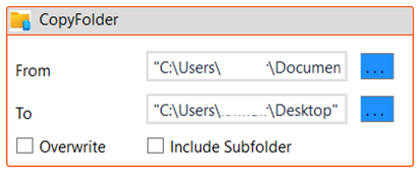
i. Drag a “Copy Folder” activity to the workflow.
ii. Double click on the activity.
iii. Specify the path from which the folder has to be copied along with the folder name.
iv. Specify the path to which the folder has to be copied.
h. Drag a “Delete Directory” activity to the workflow.
i. Double click on the activity.
ii. Specify the name of the folder “FSTest” to be deleted from the Documents Folder.
i. Then connect this to the “Rename File” activity under the “True” section. Refer point 3(d).
4. Execute the workflow.
The bot executes the workflow, finds out if the zipped file exists in the desktop. As the zipped file
exists in the desktop, it unzips it to a file named “FS” and then renames a file “Exist ActivityFS
automation” to “Exist” and copies the same file to the folder “FSAutomation” and deletes the entire
directory “FS” from the desktop.