
The following use case demonstrates the utilization of the FS automation feature. We create
a directory with several files in it. In this scenario, we will be checking the sizes of the files
within that directory. If the size is "0," the file is deleted; otherwise, it is compressed into a zip
file. Here we have utilized the following activities to construct the workflow.
Steps to build a workflow
1. Create a solution “FSUsecase”.
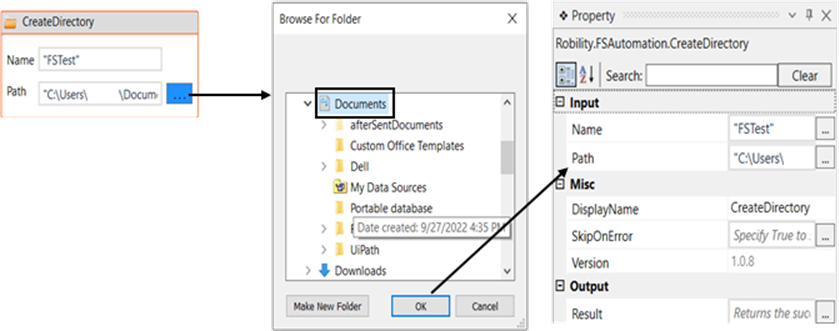
2. Drag and drop a “Create directory” activity to the workflow.
a. Double click on the activity.
b. Give a name for the directory to be created. Here I am giving the name “FSTest.”
c. Choose a path using the three dots as to where the directory has to be created.
Here I am creating the directory in the documents folder of the system.
3. Now to copy a folder into the directory, drag and drop a “Copy folder” activity to the workflow.
We are using this activity, to copy the files from our system to the directory created using this
activity. In case, any folder is deleted, we can use this as a backup.
a. Double click on the activity.
b. Mention the “For” path of the folder to be copied.
c. Mention the “To” path as to where the folder has to be pasted.
Here I am copying the folder “Docs” from the folder “FSAutomation” to the newly
created directory “FSTest”.
Next, we have to get the information of the folder that we have copied to the directory. We do this
because we need the details of the files present in this folder with which the next activity will be
performed.
Before we enter the path o+f the folder for which we need the information, lets hardcode the folder
path in the variable section and assign a variable “Path” to the folder path.

4. To get the folder information, drag and drop a “Get Folder Information” activity to the workflow.
a. Enter the folder path as “Path” which is a variable to which the folder path is
assigned.
b. Navigate to the Files section in the output box, as we need to extract the files in the
folder.
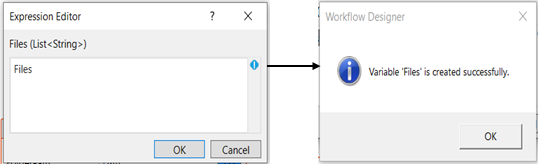
c. Create a “List of string” variable to store the list of files . Here I have assigned the
variable “Files.”
d. There are two ways to create this variable.
i. Method 1 – Click on the “Files” property within the “GetFolderInformation”
activity and enter the variable name. In this case, I have used the name "Files."
Then, press "Ctrl+Q," which is a shortcut key to create a variable.
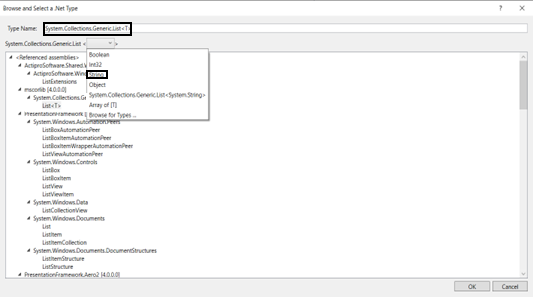
ii. Method 2 - Click on the Variable pane and enter the name "Files." Then, click
on the "DataTypes" column and select "Browse for types."
1. The .NET types window will open. Enter the "TypeName" as
"List of <T>" and choose "System.Collections.Generic.List of <T>,"
and the choose “String” from the drop down.
Now, we have to get the file information for each file available in the folder. With the file information,
we will extract the size and proceed to the next activity. For this we have to use the “Get File
Information” activity.
5. Here we are using a “Foreach” activity as we have to the get the file information for each file in the
folder.
a. Drag and drop a “Foreach” activity to the workflow.
b. Since we have to find the information for each item in the “Files”, we use this variable
in the “ForEach” activity.

6. Now, into the Foreach activity, let’s drag and drop a “GetFileInformation” activity.
a. Since there are lot of files in the folder and we need the information of each file from
the folder, we have to use the following syntax Path + "\"+Item
Here the Path is the variable, which has the folder path, then we add a “\” and then
we enter “Item” which has the name of each file in the folder
b. Since we need the size of the file, we must enter a variable in the size box of the property
section. Here we enter the variable as “Size.”(then press CTRL+Q)
Once we get the file information, based on the size of the file, we are going to perform certain actions.
Here if the size of the file is “0”, we will delete the file and all other files apart from that will be zipped into
a folder. To perform this action,
7. Drag and drop an “If” activity below the “GetFileInformation” activity within the ForEach activity.
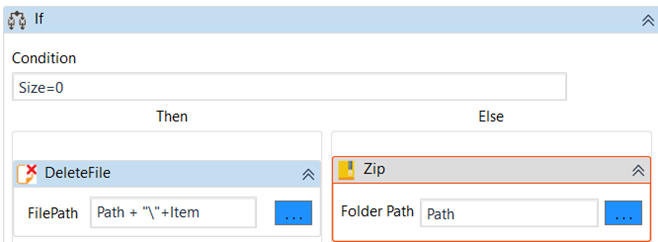
a. Give the condition for the “If” activity as “Size = 0.”
b. Drag and drop a “Delete File” activity to the “Then” section, which means, if the file
size is “0”, the file should be deleted.
i. Enter the File path as Path + "\"+Item. Here the Path is the variable, which
has the folder path, then we add a “\” and then we enter “Item” which has the
name of the file with size “0” based on the condition given.
c. Drag and drop a “Zip” activity to the “Else” section, which means, any file size apart from
“0” in the folder should be zipped.
i. Here we should mention the file list as “Files” and the folder path as “Path” which
helps to move all the files apart from the size “0” to a folder and zip it.
ii. Here, we should mention a save path with a name and path, where the zipped
folder will be saved.
Now, let’s execute the workflow.
The bot creates a directory named “FSTest” in the “Documents” folder of the system. It then copies
the folder “Docs” from the folder “FSAutomation” to the newly created directory “FSTest”.
Then it gets the file information from the folder and then gets the size of each file from the folder. The
two files “Test1” and “Test2” for which the size is “0” is deleted and the other files in the folder are
zipped and saved in a folder named “FS” in the desktop.