
To use the Form Recognizer custom model, you provide your own training data to the
Train Custom Model operation, so that the model can train the same to your
industry-specific forms. This section demonstrates how to train a model with your own
data. A trained model can output structured data that includes the key/value relationships
in the original form document.
Technical Reference
|
|
INPUT |
IncludeSubFolders: Specify if the input should include the sub folders. |
|
Prefix: Add the folder name and subfolder name in which the training data is uploaded. |
||
|
SourceUrl: Specify the SAS URL generated. Refer below on how to generate the same. |
||
|
MISC |
Display Name: Displays the name of the activity. You can also customize the activity name to help troubleshoot issues faster. This name will be used for logging purposes. |
|
|
SkipOnError: It specifies whether to continue executing the workflow even if it throws an error. This supports only Boolean value “True or False”. By default, it is set to “False.” True: Continues the workflow to the next step False: Stops the workflow and throws an error. |
||
|
Version: It specifies the version of the AzureAIFormRecogniser feature in use |
||
|
OUTPUT |
ModelLocation: This is not a mandatory field. However, to view the model location we must declare a variable here. |
|
|
Result: Declare a variable here to validate the activity. It accepts only Boolean value. This is not a mandatory field. |
||
|
StatusCode: This is not a mandatory field. However, to view the status of the trained model, we must declare a variable here. |
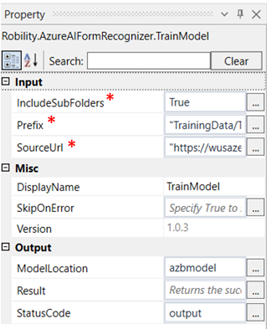
*Mandatory field to execute the workflow

Creating a SAS URL
To create a SAS URL, follow the steps below:
1.Open the Microsoft Azure Storage explorer
2.Click on the connections on the left-hand side and do the following steps.
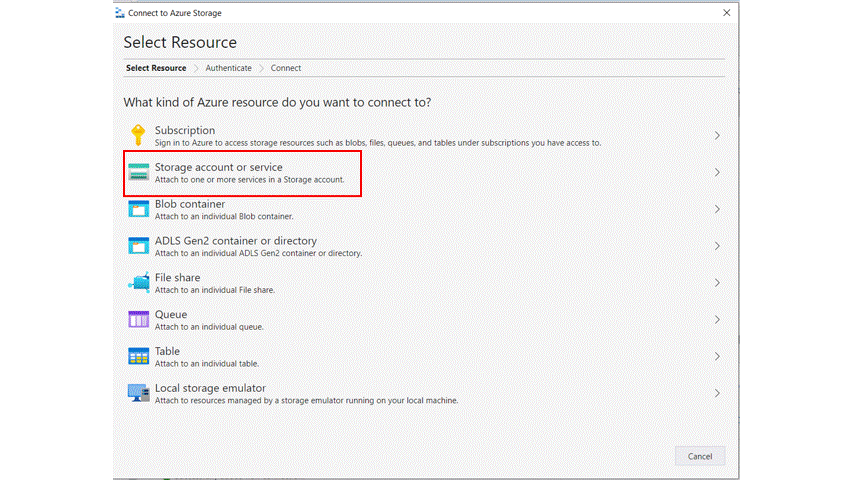
3.Once you click on get shared access signature, there is an account key that
is displayed which is the source URL in the Input segment.
Use Case
The following steps illustrates on how we are going to use the train model activity
to get the URL that is required to get the model ID in which the custom forms are
trained. Here we are going to upload the data to be trained in a container named
“azb”. The data is inside the trained data folder and train subfolder.
Steps to execute the bot
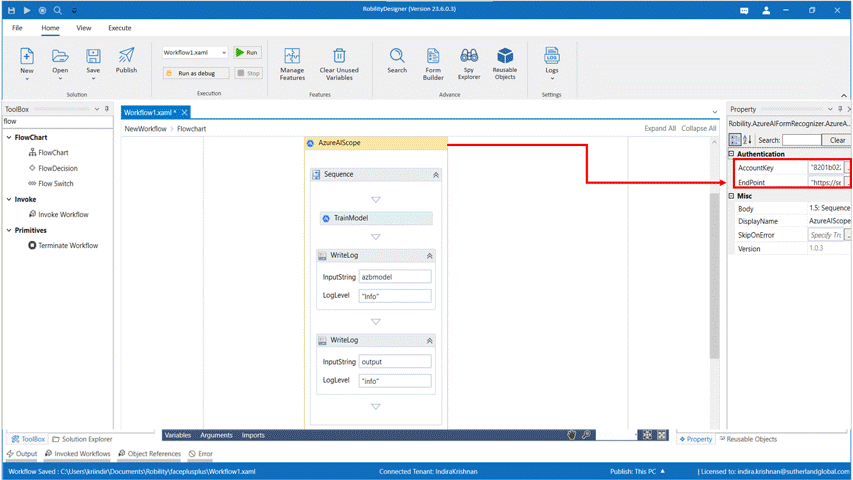
1. Drag and drop an Azure AI scope activity to the workflow.
2. Enter the details of the account key and end point.
3. Drag and drop a Train model activity into the Azure AI Scope.
4. Click on train model.
5. Give true in the include sub folders box as we want the bot to take the files from all
the subfolders too.
6. In the Prefix enter the name of the folder and subfolder within double quotes. This
can be seen in the container “azb” in which the files have been uploaded. Here
it is “TrainingData/Train”.
7. In the Source URL enter the SAS URL which is generated above.
8. Declare a variable in the Modellocation and StatusCode to view the URL of the
model location and the status if it is created or not in the output box. Here its
azbmodel and output respectively.
9. Drag and drop two write log activities here, to view the output of Model location
and Status Code.
10. Enter the variable as required and execute the activity. The output of the model
location and status can be seen in the output box. To get a detailed view of the
result, click on Home-Logs-Open Logs and open the required file.
The bot executes the activity and gives the model location and the status
of the activity.
This model location is used in the Get Model Info activity to get the Model
ID which is used in the Analyse Custom forms activity.