
This activity helps the user to navigate an application easily and execute the
command corresponding to the hotkey. Many applications have shortcuts that
help a human perform vital tasks like Save, Print, Close, etc., instead of having
to navigate the menus/toolbar of the application, you can add ShortcutKey activity
to your workflow to replicate the key combinations that are required.
Technical Reference
|
|
HOTKEY |
Alt: Check this box to combine “Alt” with the input key specified to perform the action. By default, the box will be unchecked. When left blank, it will not be considered. |
|
Ctrl: Check this box to combine “Ctrl” with the input key specified to perform the action. By default, the box will be unchecked. When left blank, it will not be considered. |
||
|
Shift: Check this box to combine “Shift” with the input key specified to perform the action. By default, the box will be unchecked. When left blank, it will not be considered. |
||
|
Win: Check this box to combine “Win” with the input key specified to perform the action. By default, the box will be unchecked. When left blank, it will not be considered. |
||
|
INPUT |
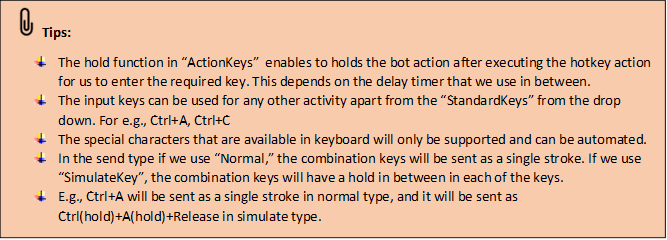
Actionkeys: Indicates to choose the dropdown value based on what pattern the text must be applied in the application. None: It will not consider to provide the action to the keys specified. Hold: It enables a pause time after executing the hotkey action to proceed. Release: It releases the bot to execute the next action in the workflow. |
|
|
DelayBeforeActivity: It assists the user to add a delay before initiating subsequent activities. |
||
|
DelayBetweenKeys: It assists the user to add a delay between the keys in milliseconds.
The delay duration here is in milliseconds. By default, it is set to "0" milliseconds. |
||
|
InputString: Specify the text to be passed or set in the specified window.
You have the option to either hardcode the values in the “String” variable or pass the values as “String” datatype.
This parameter accepts values in “String” datatype. |
||
|
SendType: Indicates to choose the dropdown value based on what pattern the text must be entered in the application. SimulateKey: Enables to performs the keys with a hold in between the action. Normal: Enables to perform the actions naturally. |
||
|
StandardKeys: This parameter provides a list of Standard keyboard actions that can be employed on the application and combined with the Hotkeys. Choose the list from the drop-down. |
||
|
WindowTitle: This parameter specifies to choose the applications from the list of active applications to where the text needs to be inputted.
You have the option to either hardcode the values in the “String” variable or pass the values as “String” datatype.
This parameter accepts values in “String” datatype. |
||
|
MISC |
DisplayName: Displays the name of the activity. The activity name can be customized, which aids in troubleshooting. |
|
|
SkipOnError: Specify the "Boolean" value as "True" or "False."
True: Continue executing the workflow regardless of any errors thrown. False: Halt the workflow if it encounters any errors. None: If the option is left blank, the activity will, by default, behave as if "False" were chosen. |
||
|
Version: It indicates the version of the feature being used. |
||
|
WaitTime: It enables the user to introduce a delay before initiating subsequent activities. The delay is specified in milliseconds.
By default, it is set to zero milliseconds. Leaving the option blank will result in no delay being applied. |
||
|
OUTPUT |
Result: It provides the ability to view the execution status of the activity. It returns values in "Boolean."
True: Indicates that the activity has been executed successfully without any errors. False: Indicates that the activity has been unsuccessful due to an unexpected error being thrown. |
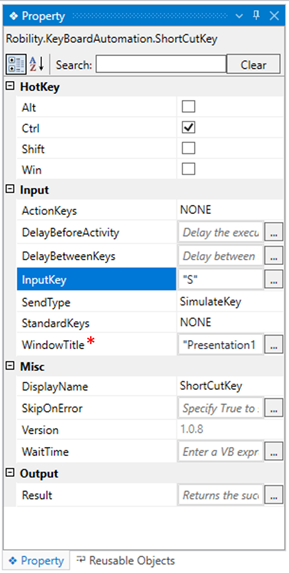
* Represents mandatory fields to execute the workflow.
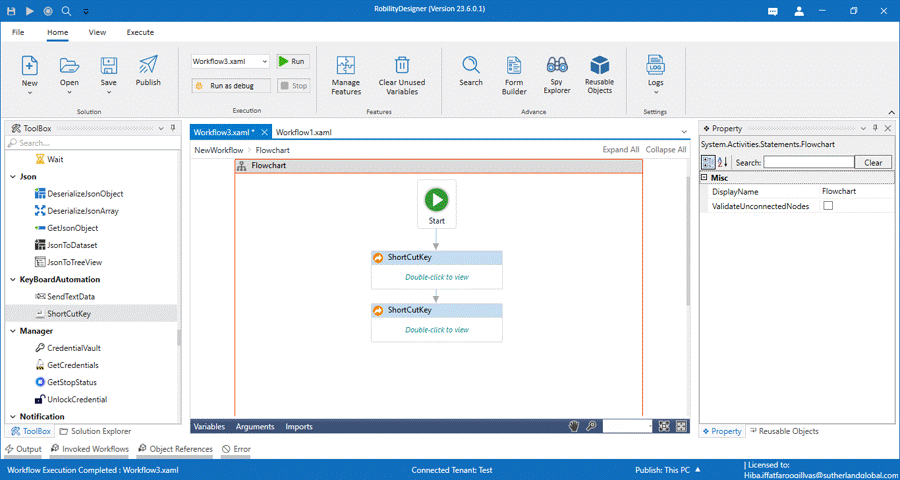
Here’s an example of how the “ShortcutKey” activity works -
The following example illustrates how we are going to use Shortcut Key activity
to automate the function of inserting a chart by selecting all the data in Microsoft
excel. Here we are going to use the keys “CTRL+ A “ and “ALT+F1” with the
keyboard automation functionality to automate the functions.
The active window dialog box displays only the applications that are active on
the desktop. Thus, in the following example, we have already launched the
Excel sheet on the desktop with sample data in it.
1. Open a Designer and create a workflow.
2. Drag and drop a shortcut key activity to the workflow.
3. Double click on the activity
4. Now, click on the “screen on” option to choose Excel from the active
windows dialog box.
5. Then, Check the “Ctrl” box.
6. Navigate to the properties and enter the input string as “A” within the
double quotes.

7. Next, add another Shortcut key below the previous one and double
click on the activity.
8. Use the screen on option to choose the Same Excel from the active
windows dialog box.
9. Now, check on the “ALT” box and choose “F1” from the drop-down list.
10. Now, execute the workflow.
The Bot executes the workflow and automates the function by
selecting the all the data and then inserts a chart into Excel.