
This activity refers to a specific set of activities executed within the "Pick" activity.
Each trigger in the Pick activity is linked to a Pick Branch, defining a series of
actions to be performed when the trigger condition is met. It can be used only
inside the “Pick” activity.
Technical Reference
|
|
MISC |
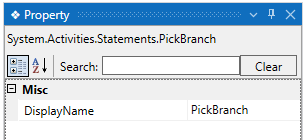
Display Name: Displays the name of the activity. The activity name can be customized, which aids in troubleshooting. |
What are Triggers and Action?
Triggers:
A trigger is a specified condition that, when evaluated as true, initiates the execution
of a particular Pick Branch within the Pick activity.
Triggers in the Pick activity are designed to monitor and respond to changes in
conditions, events, or variables. Each trigger is associated with a specific Pick Branch,
and the first trigger that becomes true will activate its corresponding branch.
Action:
An action refers to a set of sequential activities or steps defined within a Pick Branch.
These activities outline the specific actions or operations to be performed when the
associated trigger condition is met.
Actions inside a Pick Branch define the workflow logic that should be executed in
response to the triggering event. They can include tasks such as data processing,
user interface interactions, logging, or any other operation required to handle the
specific scenario associated with the trigger.
Use Case:
The following use cases illustrate how to use the "Pick" and "PickBranch" activities within
the workflow.
In this particular use case, we are given an Excel file as input. This Excel file contains a list
of employee details for individuals working in various branches of the same project.
Our task is to cross-verify the "Position" of each employee using the information provided
in the Excel sheet. Following this verification, the gathered information will be transformed
into an HTML file, which will then be distributed to the respective employees.
To automate these concurrently, we would require the following activities “ Pick, PickBranch,
ExcelScope, ReadRanges, ForEach, DatatabletoHtmlfile”.
Please find the excel sheet attached at the bottom of the page.
Steps to execute the bot:
1. Launch the designer and create a workflow named “Automation”.
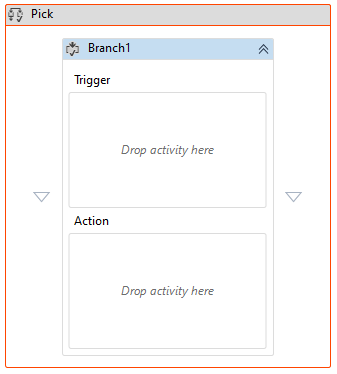
2. Drag and drop the “Pick” activity from the ControlFlow feature.
a. It serves as a scope activity to automate all other pick branch activities within this. It will
enable to load the “First” trigger from the first pick branch activity.
b. Drag and drop the “PickBranch” activity into the body of pick activity.
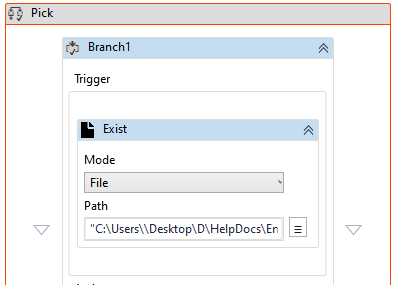
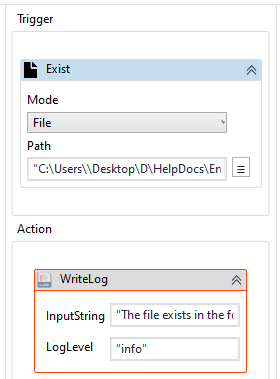
3. Now, in the “Trigger” block, drag and drop the “Exists” activity from the
“FS Automation” feature.
a. Here, this activity is used to check whether the input excel file exists or not in
the specified path.
b. Choose the mode as “File”.
c. Enter the “filepath” of the excel file or select the “Three dots” and choose the
“Excel File” from the system. (Attached the sample excel file).
d. Navigate to the properties and create a variable in the “Result” field as
“Exists”. It will return the Boolean status of the file.
i. There are two ways to create a variable-
ii. Method 1 – Click on the "Result" property within the "Exists" activity and enter the
variable name. In this case, we are using “Exists." Then, press "Ctrl+Q," which is a
shortcut key to create a variable.
iii. Method 2 - Click on the Variables pane and enter the name " Exists." Then, in
the "Variable Types" column, select "Boolean" from the dropdown menu.
4. Moving to the “Action” block, add the “WriteLog” activity from the “Notification”
feature.
a. Enter the “InputString” as “Exists.ToString” to write the output of the exists activity
and to proceed further.
b. The “.ToString” is advised to use along with any other data types other than string
format. It converts any data type into string.
c. Enter the log level as “Info”.
Second Pick branch:
5. Now, drag and drop another “PickBranch” activity adjacent to the first one.
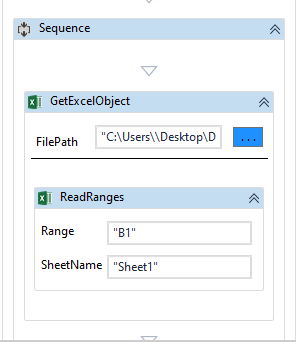
6. Drag and drop the “Get Excel Object” activity from the Excel Automation
feature.
a. It serves as a scope to automate all other activities within this. It will load
the “Excel” file that has been provided as input.
b. Enter the “filepath” of the excel file or select the “Three dots” and choose
the “Excel File” from the system. (Attached the sample excel file).
c. Drag and drop the “ReadRanges” activity from the Excel Automation feature.
i. We are using this activity to read the ranges from the provided “Excel” file
and extract the data to “Datatable” type as output.
ii. Enter the “Range” as “B1” as we are reading the ranges from the second
column where the position of the employees are situated.
iii. Provide the “SheetName” as “Sheet1” as it contains the data that needs
to be read.
iv. Navigate to the properties and create a variable in the “DataTable” field
as “Employee_record”. It will convert and extract the read data to store
in the variable “Employee_record”,
v. There are two ways to create a variable-
vi. Method 1 – Click on the "Datatable" property within the "ReadRanges"
activity and enter the variable name. In this case, we are using
" Employee_position." Then, press "Ctrl+Q," which is a shortcut key to
create a variable.
vii. Method 2 - Click on the Variables pane and enter the name
"Employee_position." Then, in the "Variable Types" column, select
"Browse for Types" from the dropdown menu.
viii. The .Net window for data types will appear on the screen, enter the
type name as “System.Data.Datatable” and then click on “OK” button.
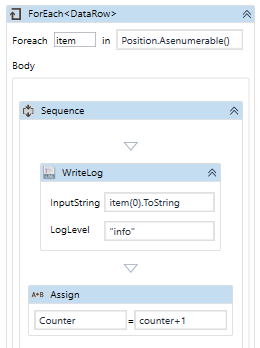
7. Now, moving to the “Action” block, here we are going to iterate the
values from the “Datatable” extracted from the “ReadRanges” activity.
a. Drag and drop the “ForEach” activity into the scope.
b. Place the “For each” activity to iterate each data row from the
“Employee_position” variable for further process.
c. Enter "Employee_position.Asenumerable()" as the input value here,
in which is where we have stored the data rows.
d. The values from " Employee_position" have been assigned to the "Item."
e. Select "System.Data.Datarow" as the "TypeArgument" since it's a list of
data rows values in the table.
f. Now, place the “Writelog” activity inside the “ForEach” activity to write
the output.
g. Enter the “inputstring” as “Item(0). Tostring”.
h. To increment the values in the datatable and iterate within it, we are adding
“Assign” variable with “Counter” values in it.
Third Pick branch:
8. Now, drag and drop another “PickBranch” activity adjacent to the second one.
9. Place the “DatatabletoHtmlfile” activity in the “Trigger” block.
a. It helps to convert the datatable to the html file format.
b. In this case, we are going to convert the datatable “Employee_position” to
Html file.
c. Navigate to the properties and enter the “AuthorName” as “FinalData” to
create the name for the html file.
d. Enter the “InputDatatable” as “Employee_position” in the field.
e. Provide the file path to store the “htmlfile” in the local system and add
“\FinalData” along with the filepath.
10. Now, moving to the “Action” block, place the “Writelog” activity.
a. Here, enter the “inputstring” as “The flow has been completed”.
b. Provide the log level as “info”.
11. Now, execute the workflow.
12. Once the flow has been executed, double click on the “htmlfile” stored in
provided filepath to view on the browser.