
This activity assists users in adding a new transaction to the specified queue
name in their project during runtime. The added transaction will be visible on
the “SmartInteract” page in the “Robility Manager”.
When to use “Add Transaction”
After configuring the project, we require transactions to initiate and complete the
intended automation process. You can add transactions either manually or
through an activity. To learn how to add transactions to the Interact project, please
refer the documentation example for guidance. The transactions are nothing, but
a field and it values against for which each BatchID and URN will be created.
Technical Reference
|
|
INPUT |
Attachments: This parameter indicates to provide the “FieldName” of the Attachment if any created in the Interact. This field name can be extracted from “SmartInteract” in Manager. Refer the below document.
You can either hardcode the values in “String” datatype or can enter the values in “String”.
When left blank, it will not be considered.
This parameter accepts values in “String” datatype. |
|
InputParameters: This parameter helps you to provide the “inputs” that are required to pass against the fields in the Project during the execution. This parameter accepts collection of argument types. Refer the below documentation to pass the values. |
||
|
Json: To create transactions, you should provide the “Json” string to the Project. The sample “JsonString” can be extracted from “SmartInteract” in Manager. It will incorporate with the values passed in the “InputParameters” field and creates a transaction.
This parameter accepts values in “String” datatype.
You can either hardcode the values in “String” datatype or can enter the values in “String”.
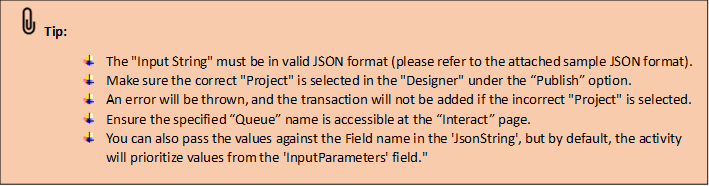
The “InputString” must be in “Json” format. (Refer the tips below). |
||
|
QueueName: Indicates to provide the “Queue” name from the “Project” against which the “transaction” needs to be added.
This parameter accepts values “String” datatype. |
||
|
MISC |
DisplayName: Displays the name of the activity. The activity name can be customized, which aids in troubleshooting. |
|
|
SkipOnError: Specify the "Boolean" value as "True" or "False." True: Continue executing the workflow regardless of any errors thrown. False: Halt the workflow if it encounters any errors. None: If the option is left blank, the activity will, by default, behave as if "False" were chosen. |
||
|
Version: It indicates the version of the feature being used. |
||
|
OUTPUT |
BatchId: It helps to extract the “BatchId” of the created transaction as output. It returns in the values in “String” datatype. |
|
|
ResponseValue: It helps to view the response as “status” from the service for created transaction. It returns in the values in “String” datatype. |
||
|
Result: It provides the ability to view the execution status of the activity. It returns values in "Boolean."
True: Indicates that the activity has been executed successfully without any errors. False: Indicates that the activity has been unsuccessful due to an unexpected error being thrown. |
||
|
URN: It helps to extract the “URN” of the created transaction as output. It returns in the values in “String” datatype. |
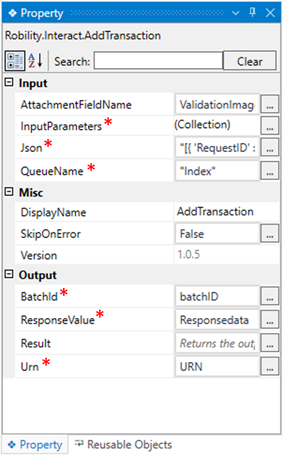
* Represents mandatory fields to execute the workflow
How to configure the “Interact” key to the
Designer
After configuring the project details on the “RobilityManager” for the transactions,
the “Interact key” for the respective project will be configured.
(Click here to get detailed information on how to configure the project.)
Follow the below steps to find the “Interact key” in the Designer.
1. Launch the Designer and create a solution named as “Interact Automation”.
a. To access the "Interact Key," select the corresponding project from the "Publish"
section located at the bottom of the Designer. This selection should align with the
project for which the “SmartInteract” has been configured. The default setting for the
publish option is "This PC" (as demonstrated in the GIF below).
b. Upon selecting the project, the “key” will be integrated into the solution explorer,
appearing as the "Interact key" within the "Resource" category.
2. The presence of the "Interact key" within the "Designer" interface is contingent
upon the configuration of the "SmartInteract" for the specific project. It will only be
visible when the project aligns with this “Interact” configuration.
3. Click on the “Solution explorer” to view the “Interact key” in the resource.
4. The “Interact” key is the essential part here for the automation, which eliminates
the need of the “Project name, Process and Username” to configure the details
into the “queues”.
5. Each “Interact key” generated will be unique for each project configured in the
“SmartInteract”.
Json Format in Input String
The input string can either be hardcoded or you can input the “String” variable
that contains the “Json” format. The sample Json format will be available in the
“Interact” page under “Project configuration” menu. You will find the json string in
“Queues” step against the queue name.
Where to find the Json string?
The Sample Json string customized according to your field names can be extracted
from the “Interact page”. Follow the below steps to know:
1. Login to the “Robility Manager” and navigate to your project that configured Interact.
2. Click on the “SmartInteract” option.
3. Navigate to the “Project Configuration” menu and go the “Queues” step.
a. On the right-hand side, you can see the “Queues” name configured.
b. You can find the “JsonString” copy against the queue names.
c. Copy it and save it to your local or you can input as value to a variable.

How to upload the “Attachments” to the Json
format?
To upload the attachments such as image, word, excel, pdf etc., to your project
in “Interact”, you need to configure a field with either “File Upload” or “Picture
box” field type to add the attachments to the transaction. Ensure that these
fields are accessible against the queues that the transactions are being added.
Follow the below steps,
1. Login to the “Smart Interact” page.
2. Create a field to upload the attachments.
3. Now, navigate to the “Queues” step and create the queues to process your
transactions.
4. Once configured, provide the field access to the “queue” against which you need
to upload the attachment.
a. Now, on the right-hand side, you can find the “Attachments” column enabled
against the queue name.
b. Copy it and save the field name to pass it in the activity .
c. Click here to know how the “Attachments” is passed in the activity.
Click here to see how the activity is utilized in the workflow.