
In the following example, I am going to add the transactions to the “Project” configured
by assigning values to each field separately.
I have already configured a sample project on the “SmartInteract” page. The Automation
project contains server details which will be automated to generate a web server.
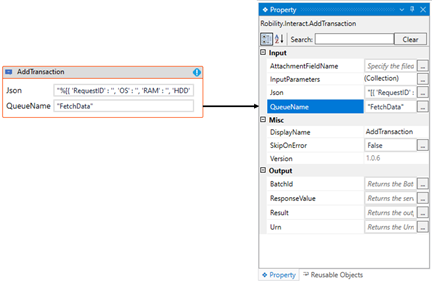
Here I am using the “Add transaction” activity here to add a value for the transaction
to the queue name as “FetchData”.
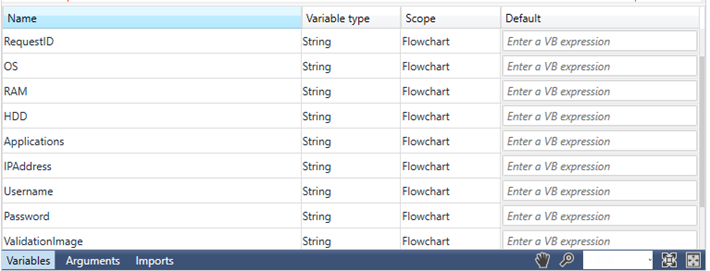
The fields configured against my project are “RequestID , OS , RAM, HDD, Applications,
IP Address, Username, Password, and ValidationImage” and the queues configured are
“FetchData & Completed”.
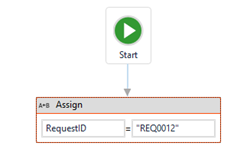
Here, I am going to assign the value to each field with “Assign” activity.
1. Create a solution for building a workflow or open an existing solution.
2. Install the "Interact" feature from the "Manage Features" menu.
3. Before building the workflow, I have created 5 variables such as “RequestID”,
“OS”, “RAM”, “HDD”, “Applications”, “IPAddress”, “Username”, “Password” and
“ValidationImage” in “String” datatype manually.
4. Drag and drop the “Sequence” activity to the workflow and double click on it.
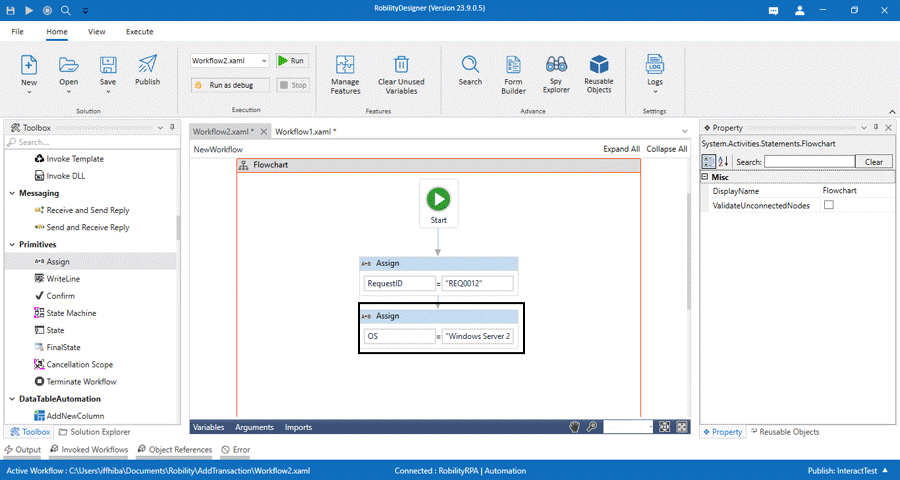
5. Now, I am placing the nine “Assign” activities from the “ControlFlow” feature to the workflow.
a. Here I am using this activity to assign value to each variable created above.
b. In this activity, providing the “TO” value as “RequestID” and value as “REQ0012”.
c. Moving to the next, providing the “To” value as “OS” and value as “Windows
Server 2012”.
d. Moving to the next, providing the “To” value as “RAM” and value as “16 GB”.
e. Moving to the next, providing the “To” value as “HDD” and value as “500 GB”.
f. Moving to the next, providing the “To” value as “Applications” and value as
“ PuTTY, MS Teams.”
g. Moving to the next, providing the “To” value as “IP Address” and value as
“123:456:789.”
h. Moving to the next, providing the “To” value as “Username” and value as
“User123.”
i. Moving to the next, providing the “To” value as “Password” and value as
“dhekjbshgt23”
j. Moving to the next, providing the “To” value as “ValidationImage” and value
as “C:\Users\ \Pictures\Camera Roll”.
6. Next, placing the “Add Transaction” activity next to the assign activity.
a. Now, I am using this activity to add a transaction to the project in Interact.
b. Double click on the activity to enter the details.
i. In the “Json” field, I am entering the sample “Json” string copied from
the “Interact” page. Refer the steps above on where to find the json string.
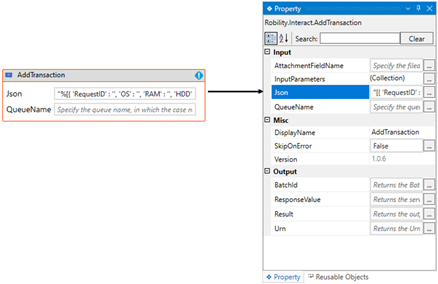
ii. Moving to the “QueueName” field, I am mentioning the name as “Fetchdata”
where I have configured to add the transactions in the “Interact”.
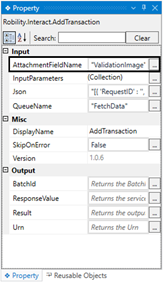
c. Now, navigating to the “AttachmentFieldName” in the properties to provide
the field name.
i. Here, I am pasting the “AttachmentFieldName” copied from the “Interact”
as “Documents”. Refer the steps above on where to find the attachments
in Interact.
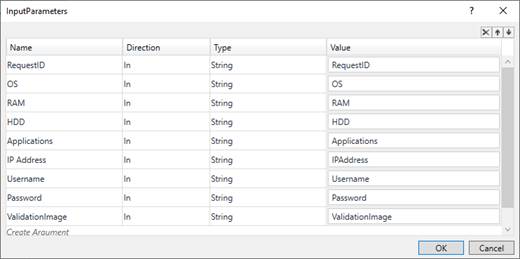
d. Moving to the “InputParameters” to pass the input variables to the field.
e. Click on the three dots to open the “Arguments panel”.
i. Here you have to manually create the Field name and pass the variable
against it.
ii. Click on the “CreateArgument” option and providing the name as
“RequestID”.
iii. Now, I am providing the variable “RequestID” variable as value here.

iv. So, I have continued the same steps for other eight fields also and
click on “OK” button.
f. Now, moving to the “BatchID” in the output properties to declare a
variable to get batch Id as return.
i. There are two ways to create a variable-
ii. Method 1 – Click on the "BatchID" property within the "AddTransaction"
activity and enter the variable name. In this case, we are using “BatchID."
Then, press "Ctrl+Q," which is a shortcut key to create a variable.

iii. Method 2 - Click on the Variables pane and enter the name " BatchID." Then,
in the "Variable Types" column, select "String" from the dropdown menu.
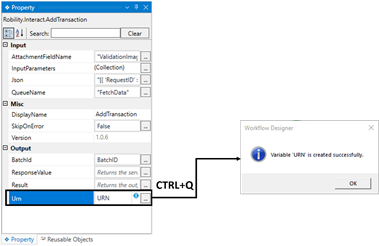
g. Now, moving to the “URN” in the output properties to declare a variable to
get URN value as return.
i. There are two ways to create a variable-
ii. Method 1 – Click on the "URN" property within the "AddTransaction" activity
and enter the variable name. In this case, we are using “BatchID." Then, press
"Ctrl+Q," which is a shortcut key to create a variable.
iii. Method 2 - Click on the Variables pane and enter the name " URN_Value."
Then, in the "Variable Types" column, select "String" from the dropdown menu.
7. Now, add a “WriteLine” activity next to the “AddTransaction” activity.
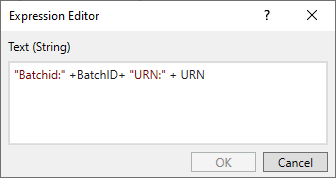
a. Providing the text as “BatchID:” +BatchID+ “URN:” +URN in the box.
b. It will print both the “BatchID” as well as “URN” in the output window.
8. Now, execute the bot.

The bot will execute the workflow and create the transaction on the “interact” in the
Project. Further, it will print the “BatchID” and “URN” of the created transaction in
the output window.