Scheduling is the action of assigning resources to perform tasks. In the Robility manager
we have the scheduler which is utilized to schedule the bots into a project in five different
ways. The following are the five different ways to schedule a bot.
1. Daily Schedulers
2. Daily Multiple Schedulers
3. Weekly Schedulers
4. Weekly Multiple Schedulers
5. Monthly Schedulers
Let's take a closer look at each part to understand how each scheduler type works.
How to navigate to the scheduler section?
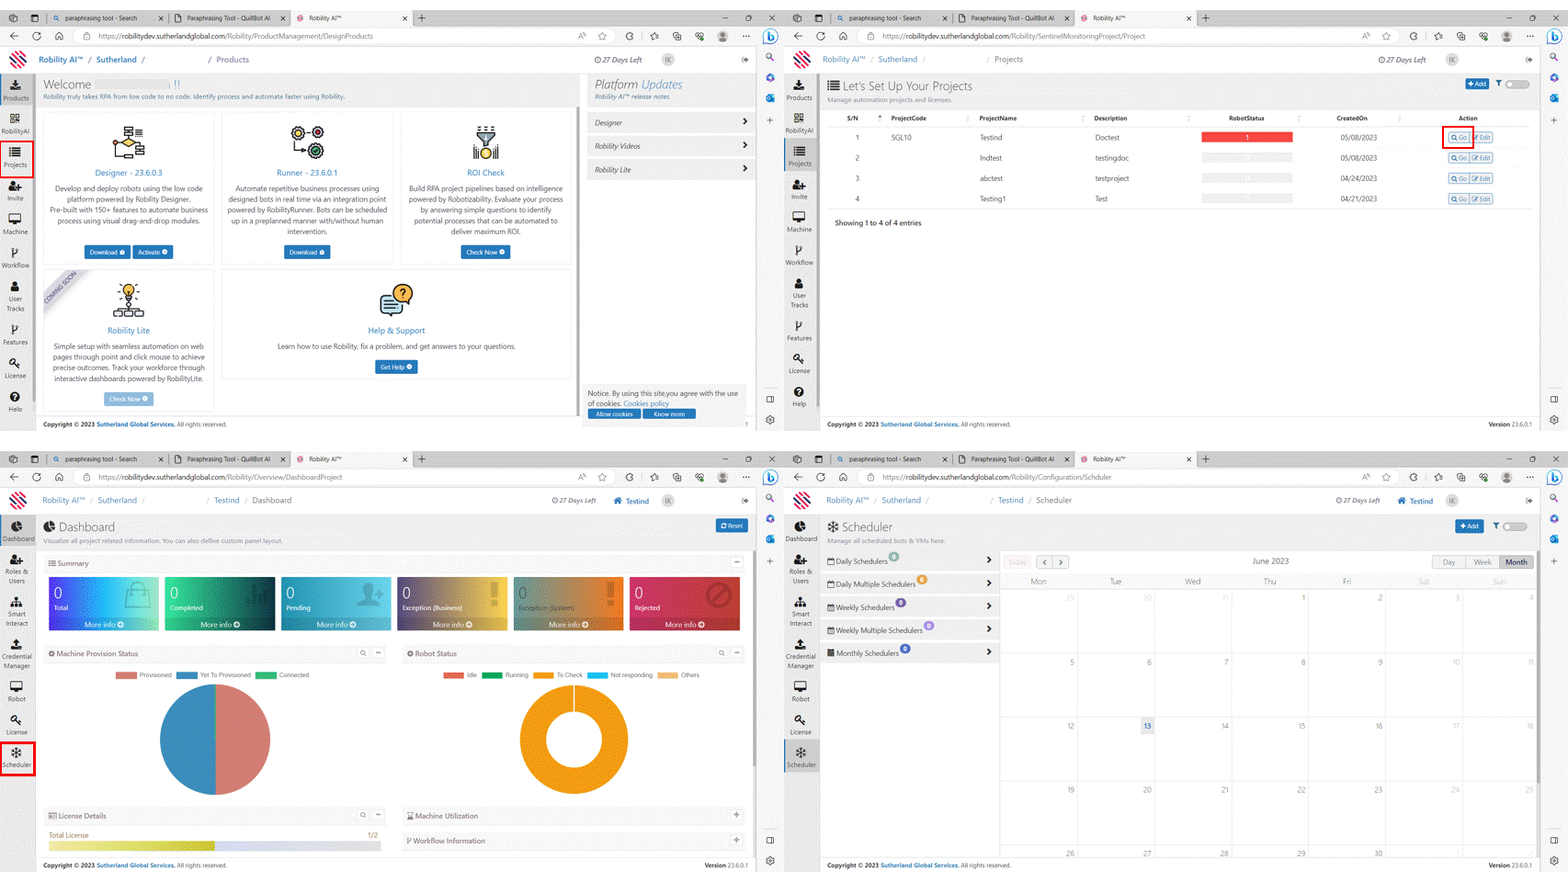
To navigate to the Scheduler section, follow the below steps.
1. Login to Robility manager.
2. Click on Projects from the left side menu bar.
3. Once the project screen is open, click on Go against the project in which you wish to
schedule a bot.
4. Once the specific project is open, click on scheduler from the left side menu bar.
5. Now we can see the different types of schedulers available on this screen.
Daily Schedulers
The daily scheduler is selected when we wanted to schedule a bot to a machine
daily. Additionally, it can be used to ensure th at tasks are completed on time and
without any human intervention.
How to schedule a bot using the daily
scheduler?
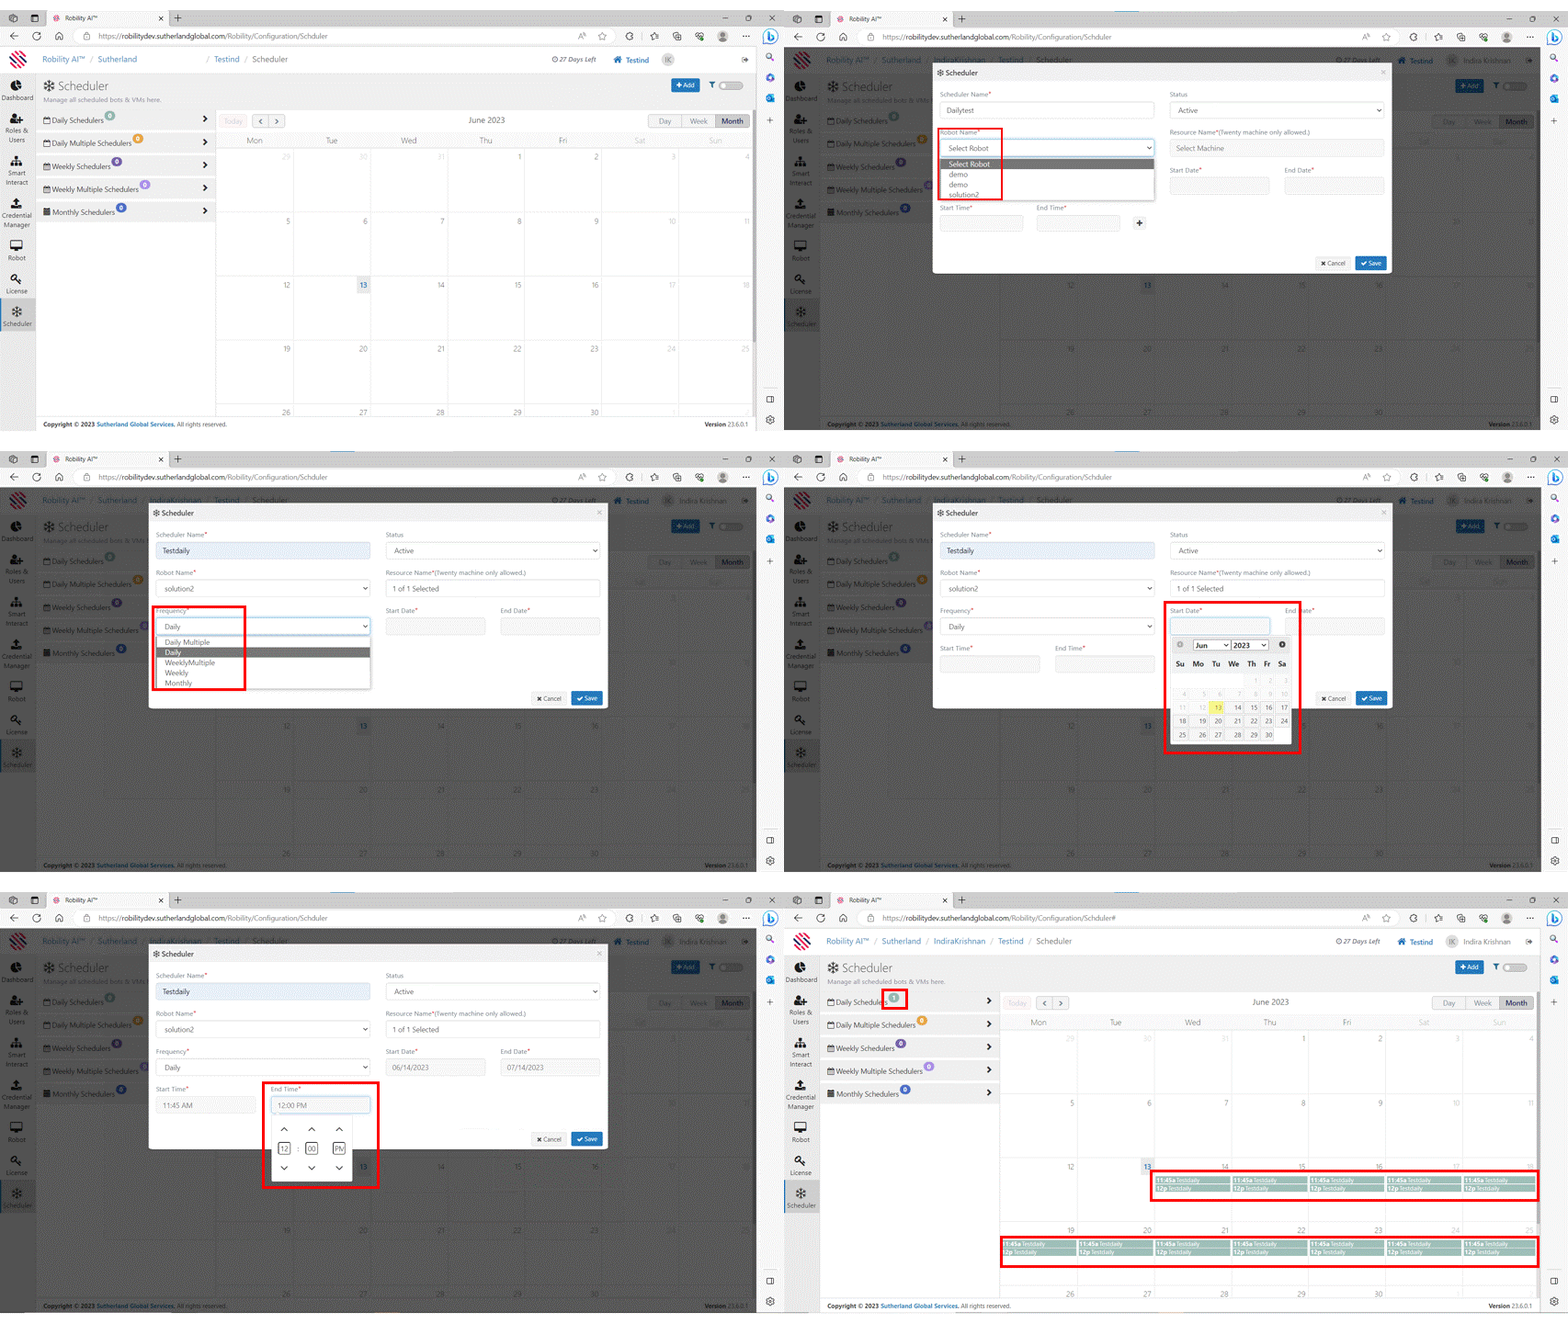
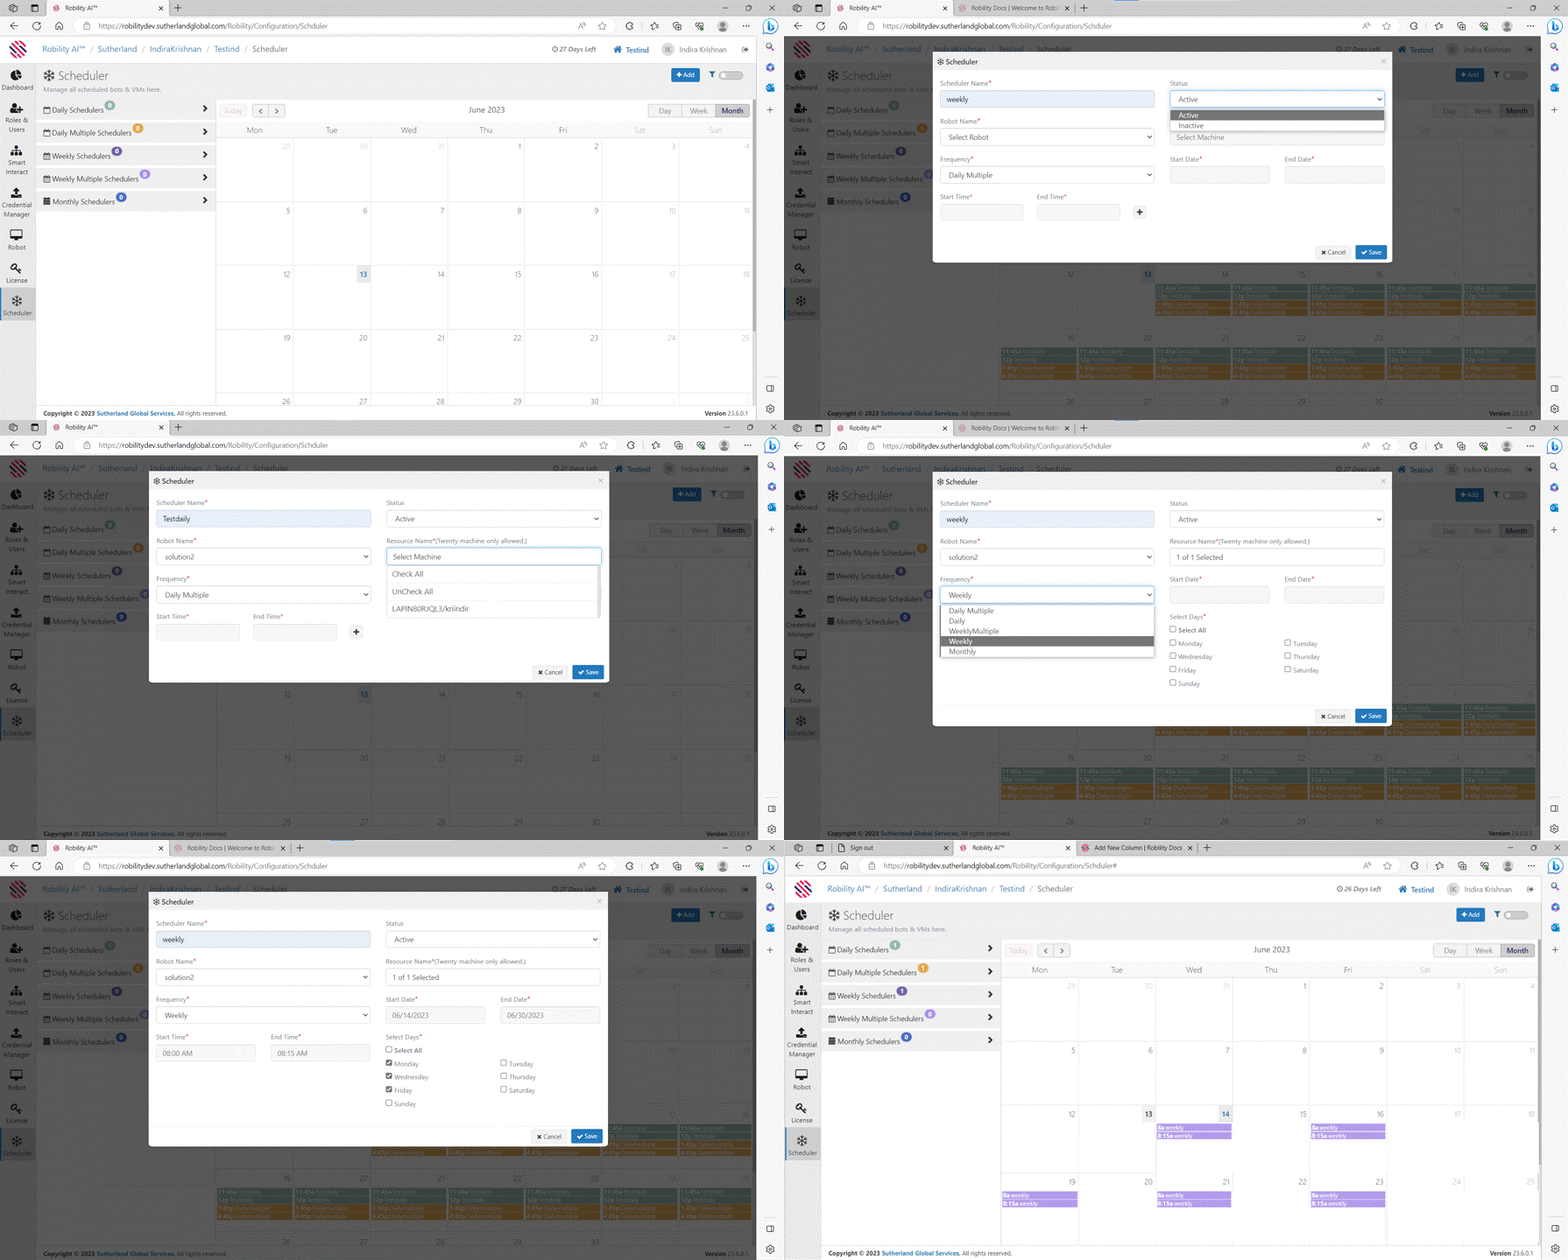
1. Click on add from the main screen.
2. A scheduler screen pops up.
3. Fill all the required details in this screen.
4. Once we choose daily, we need to enter the start date and end date. By default,
both the dates are set to the same day and if we wish to change it, we can do
so using the drop down.
5. Enter the start time and end time for the bot to run and click on save to run the
bot daily.
Once we click on save , the bot is scheduled to run daily at the specified time
till the specified date.
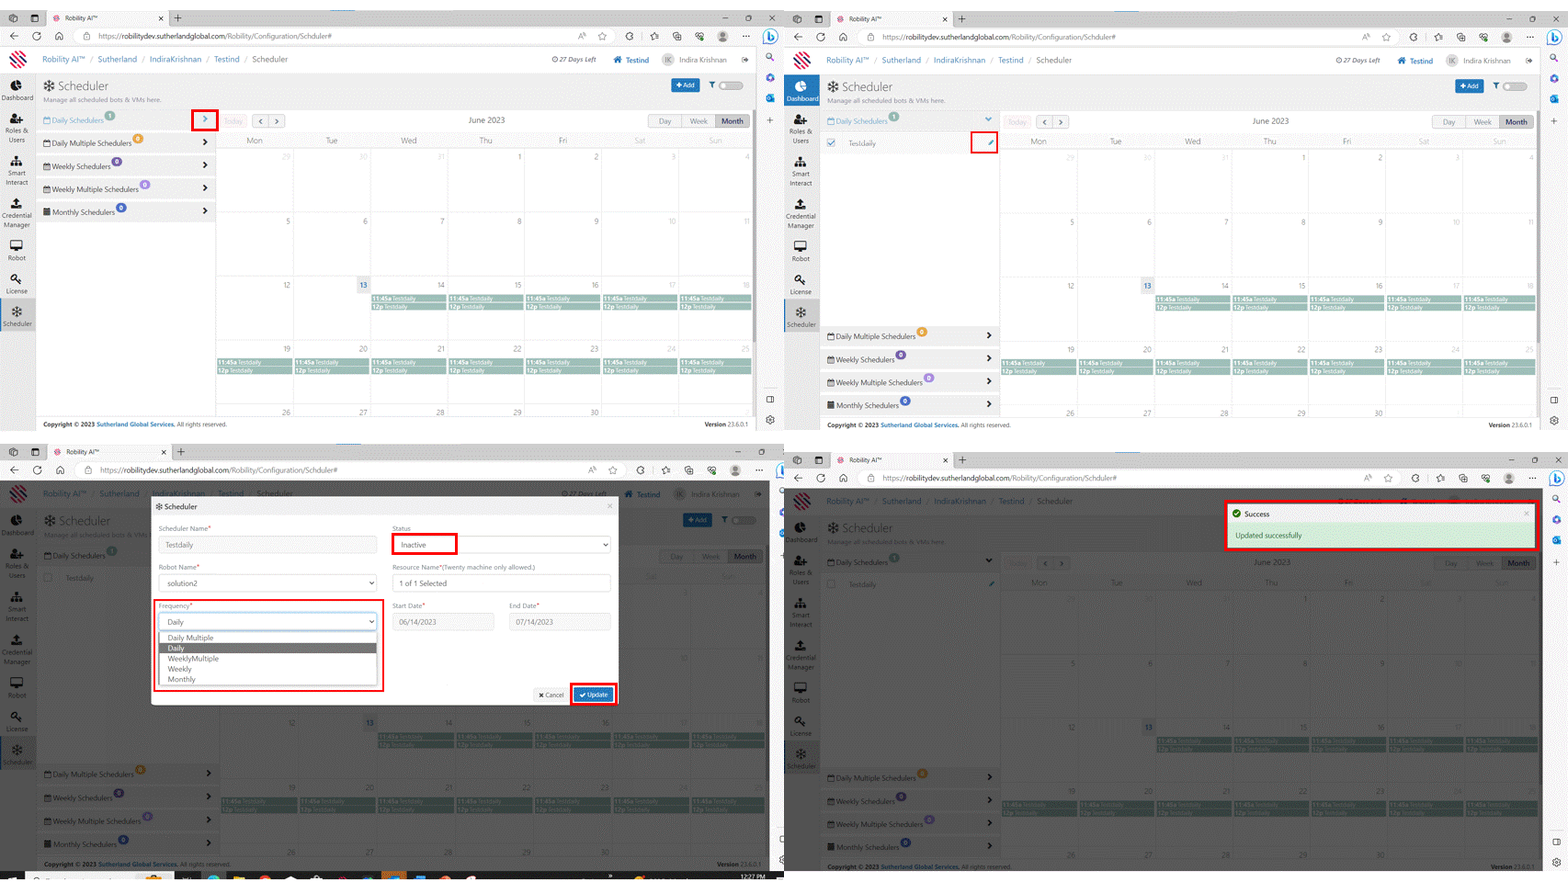
Refer the gif below to see how a bot can be made inactive.
Daily Multiple schedulers
The daily multiple scheduler is selected when we want to schedule the bot multiple times
in a day. It is suitable for tasks that require to be done multiple times a day. The bot can
be scheduled to run at specific intervals or at different times of the day.
How to schedule a bot using the daily multiple
scheduler?
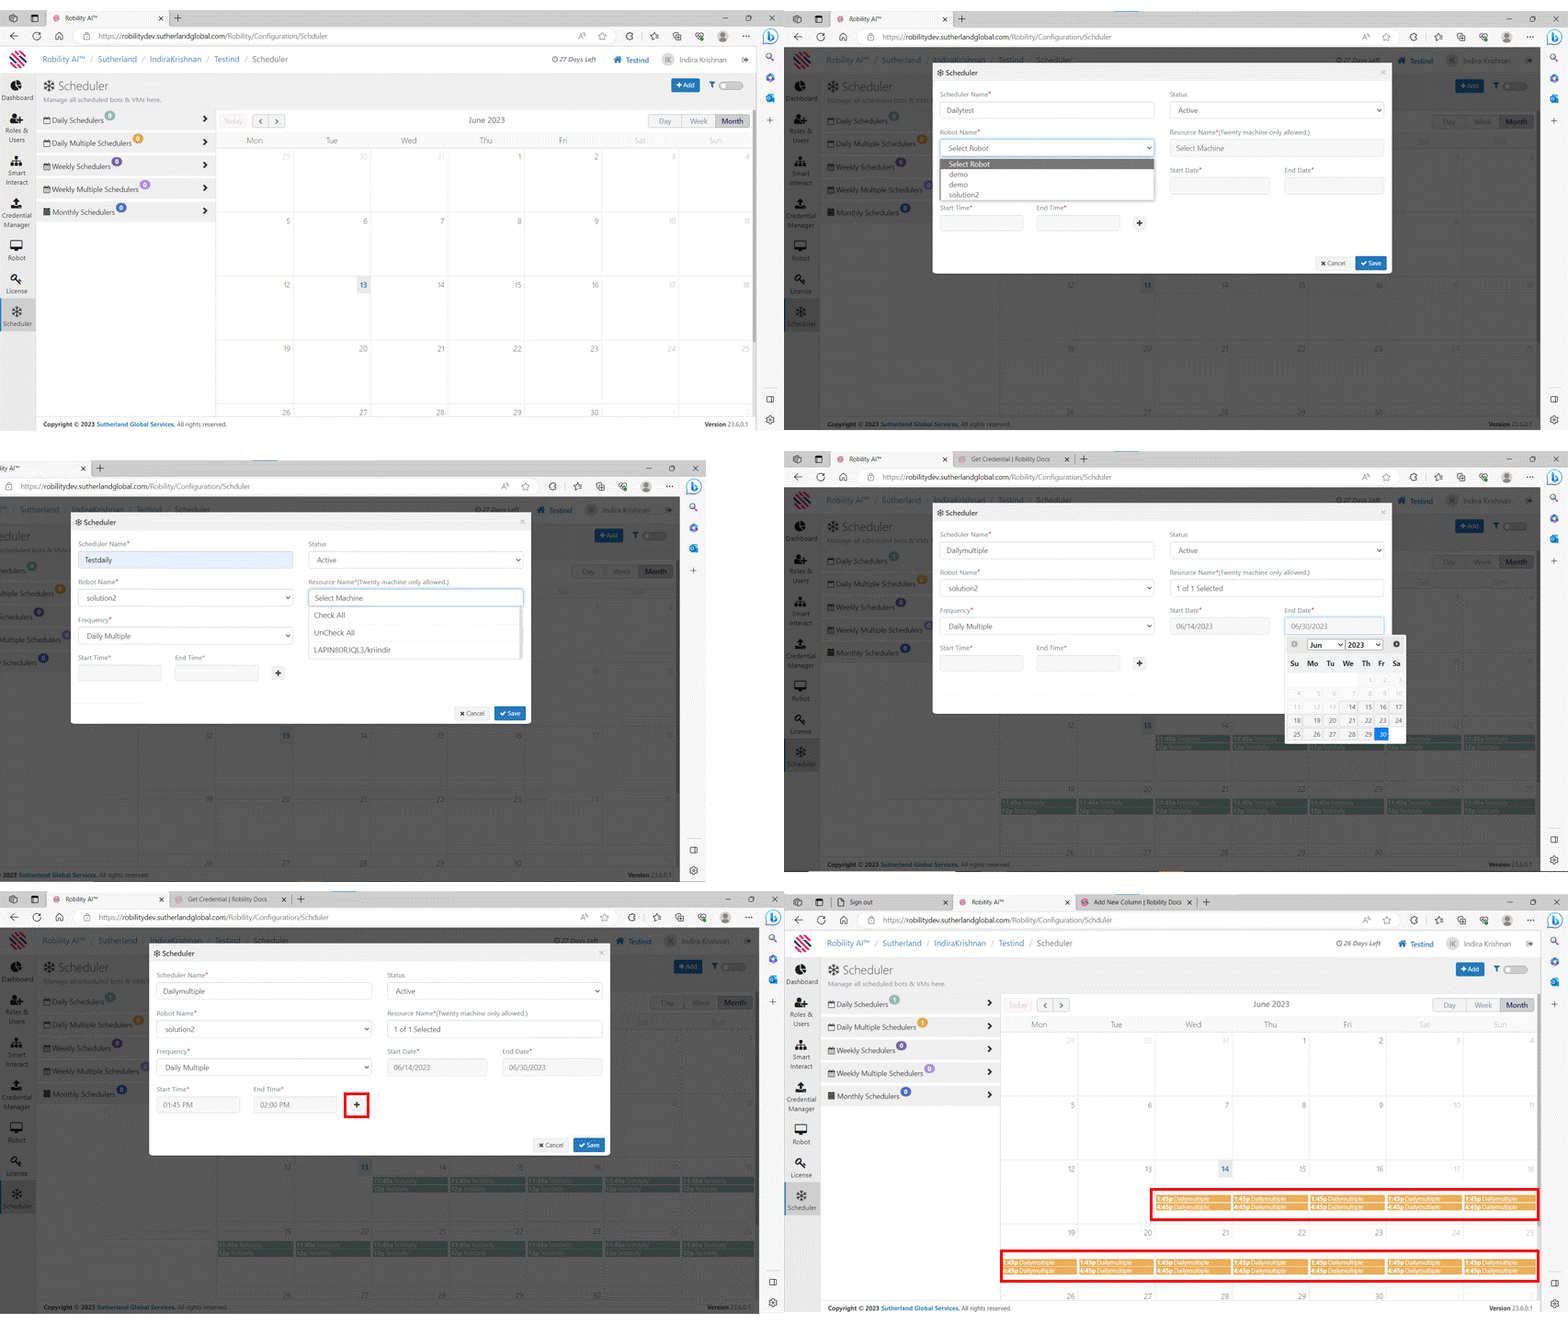
1. Click on add from the main screen.
2. A scheduler screen pops up.
3. Fill all the required details in this screen.
4. Once we choose daily multiple, we need to enter the start date and end date.
When we choose the start date, the end date is automatically set to the same day,
which we can edit it to any date using the drop down.
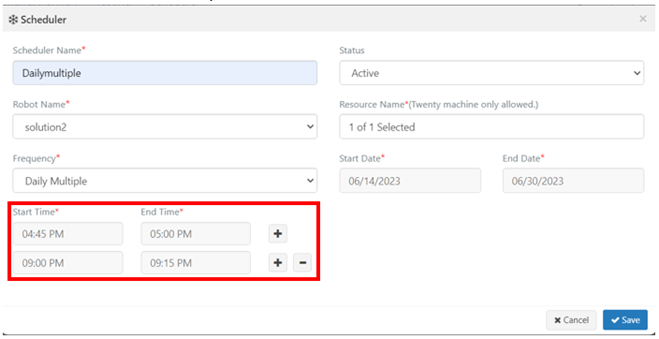
5. Enter the start time and end time and then click on the add symbol next to it and
enter another time for the bot run on the same day. We can schedule the bot to
run on the same day multiple times. Here we are going to set two different times
for the bot to run as in the above image.
6. Click on save and the bot will run multiple times in a day.
Weekly schedulers
The weekly scheduler is selected when we want to schedule a bot multiple times
in a week. It will run the bot on the same day every week at the same time. We can
choose the days in which the bot has to run. This option allows for an automated
process that can be used to carry out a certain task at regular intervals.
How to schedule a bot using weekly scheduler?
1. Click on add from the main screen.
2. A scheduler screen pops up.
3. Fill all the required details in the screen.
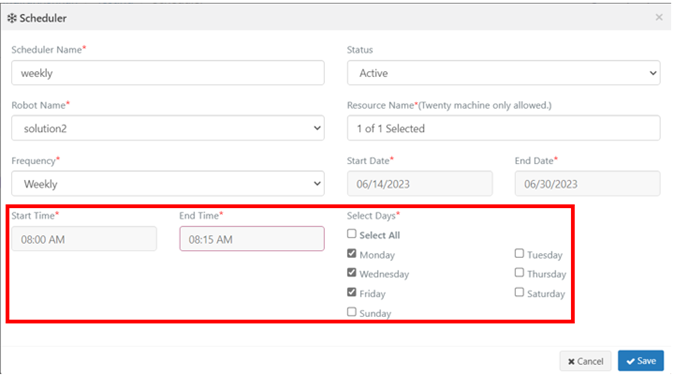
4. Once we choose weekly, we need to enter start date and end date.
5. Enter the start time and end time.
6. Then we have to choose the days when the bot has to run. Here we choose
Monday, Wednesday and Friday.
7. Click on save and the bot will run on the specified days at the specified time.
Weekly Multiple Schedulers
The weekly multiple scheduler is selected when we want to schedule a bot multipletimes in a week and on multiple times of the selected day. The scheduler allows
users to select the days and times for the bot to run. Additionally, it can also be
used to schedule one-time tasks.
How to schedule a bot using weekly multiple
scheduler?
1. Click on add from the main screen.
2. A scheduler screen pops up.
3. Fill all the required details on the screen.
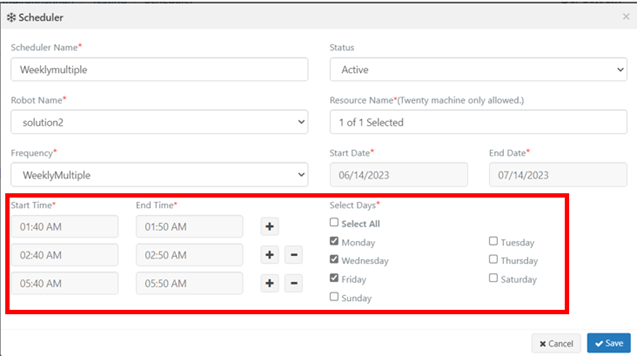
4. Once we choose weekly multiple, we need to enter the start date and end date.
5. Select the start time and end time. Also click on the add button next to it and
enter different times for the bot to run.
6. Choose the weekdays when the bot has to run.
7. Click on save and the bot will run on the selected days and specified times.
Monthly Scheduler
The monthly scheduler is selected when we want to schedule the bot only for a
The scheduler can be configured to run on specific days of the month at the same
time.
How to schedule a bot using monthly
scheduler?
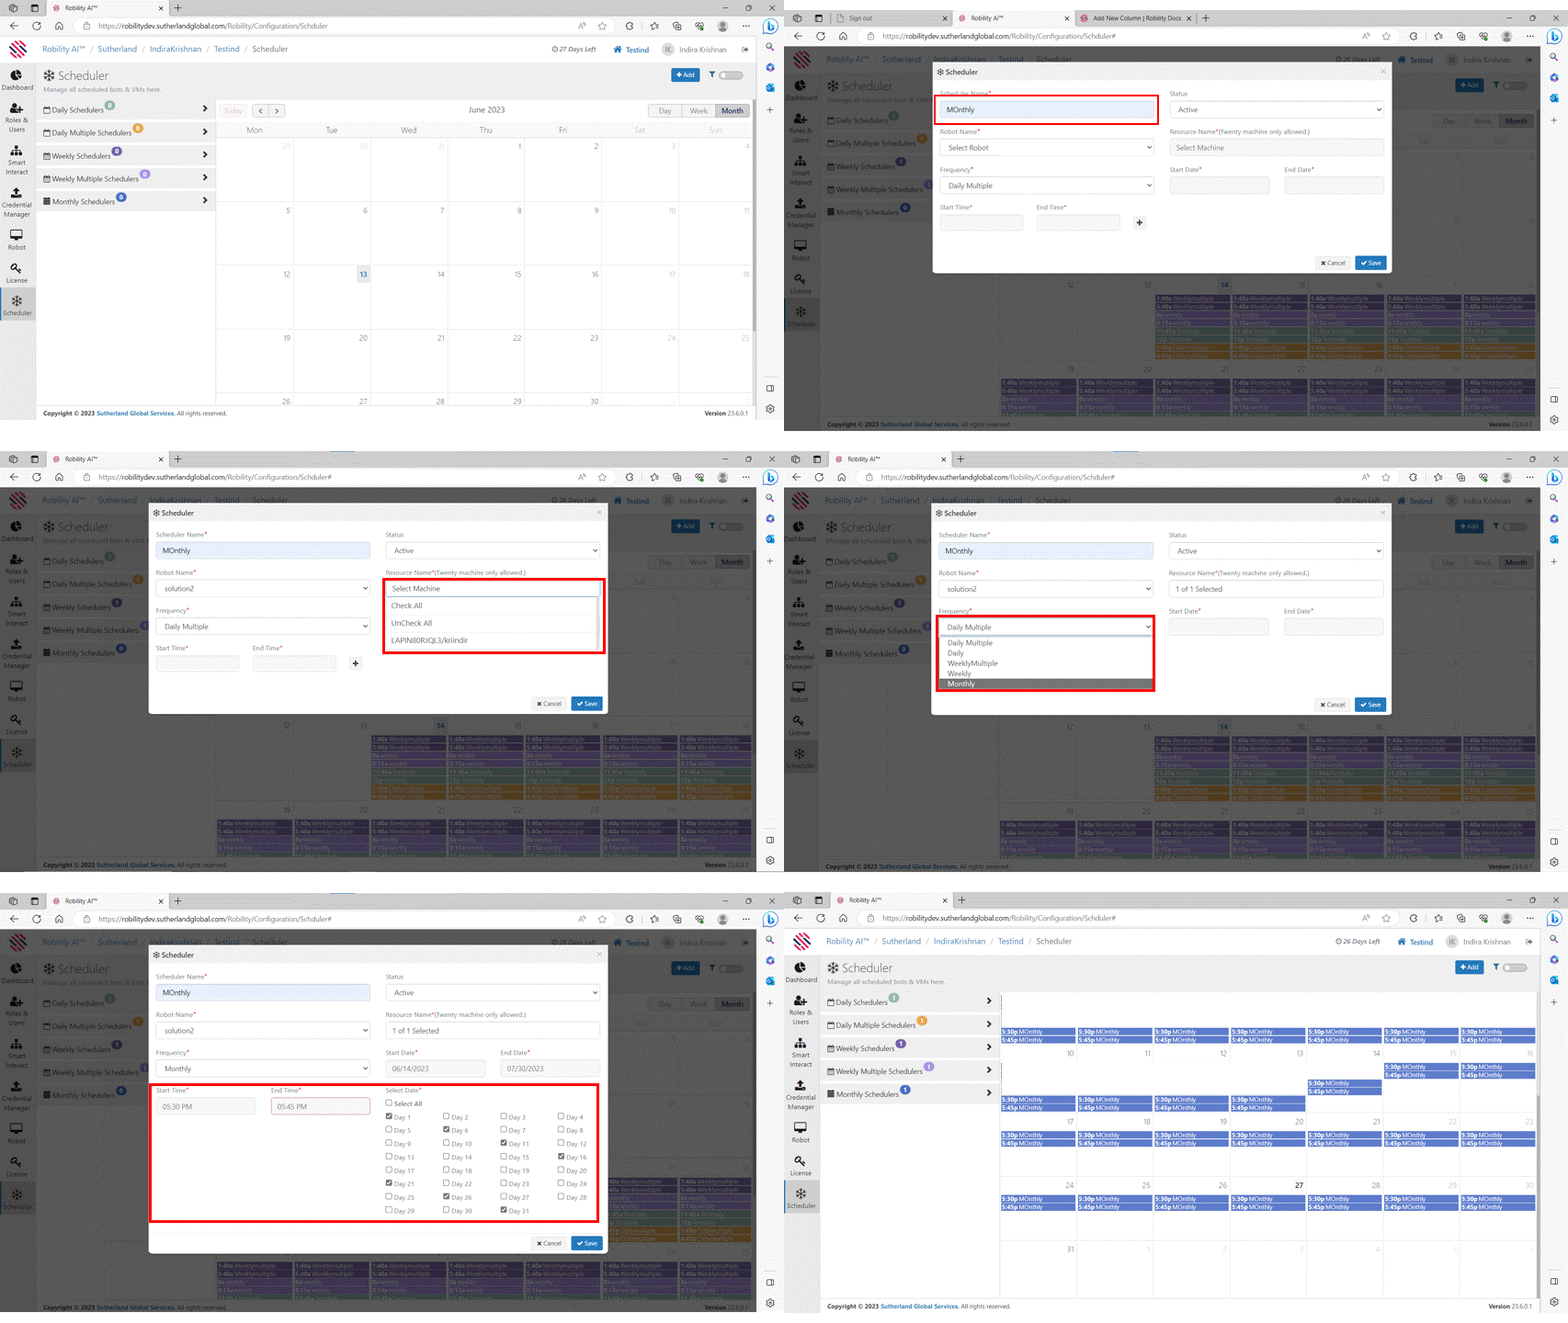
1. Click on add from the main screen.
2. A scheduler screen pops up.
3. Fill all the required details on the screen.
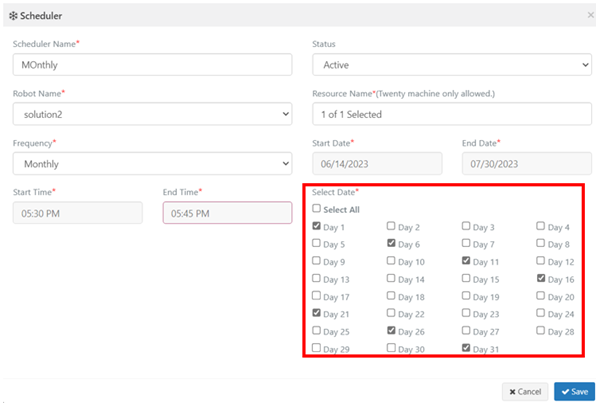
4. Once we choose monthly, we need to enter the start date and end date.
5. Select the start time and end time.
6. Choose in which days of the month the bot has to run.
7. Click on save and the bot will run on the selected days at the specified time.

