
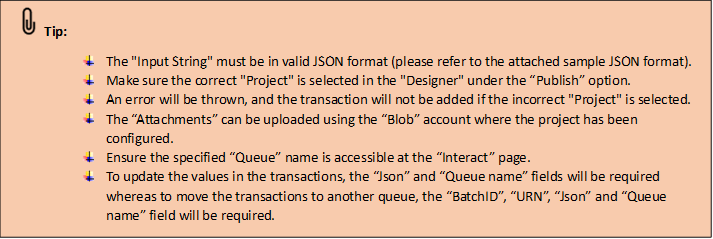
This activity helps the user to update the existing transactions to update the fields.
It can also be used to move the transactions from one to another queue. It accepts
the input values of the “Json” format extracted as output in the “Get Transaction”
activity as it requires the “Batch ID, URN and Queue” of the existing transaction
to be updated.
Pre-Requisites
1. The Input “Json” provided here should contain the “BatchID, URN” of the
existing transaction.
2. It accepts only the output extracted from the “Get Transaction” activity as
input in the "JsonData" field here.
3. You can update the existing field values by either hardcoding the values
or providing the variables. (Refer below in the document to get a detailed
understanding.)
Technical Reference
|
|
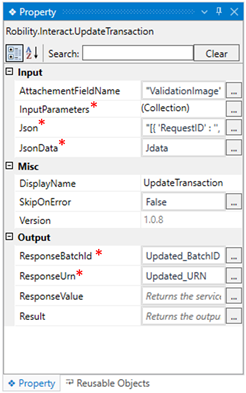
INPUT |
AttachmentFieldName: This parameter indicates to provide the “FieldName” of the Attachment if any created in the Interact. This field name can be extracted from “SmartInteract” in Manager. Refer the below document.
You can either hardcode the values in “String” datatype or can enter the values in “String”.
When left blank, it will not be considered.
This parameter accepts values in “String” datatype. |
|
InputParameters: This parameter helps you to provide the “inputs” that are required to filter and extract specific values against the transactions in the Project during the execution.
This parameter accepts collection of argument types.
Refer the below documentation to pass the values. |
||
|
Json: To update transactions, you should provide the “Json” string to the Project. The sample “JsonString” can be extracted from “SmartInteract” in Manager. It will incorporate with the values passed in the “InputParameters” field and creates a transaction.
This parameter accepts values in “String” datatype.
You can either hardcode the values in “String” datatype or can enter the values in “String”.
The “InputString” must be in “Json” format. (Refer the tips below). |
||
|
JsonData: This parameter indicates to provide the
It accepts values in only “String” datatype, or you can input the “String” variable that contains the “Json” values.
The “InputString” must contain the “Json” format. (Refer the tips below). |
||
|
MISC |
DisplayName: Displays the name of the activity. The activity name can be customized, which aids in troubleshooting. |
|
|
SkipOnError: Specify the "Boolean" value as "True" or "False." True: Continue executing the workflow regardless of any errors thrown. False: Halt the workflow if it encounters any errors. None: If the option is left blank, the activity will, by default, behave as if "False" were chosen. |
||
|
Version: It indicates the version of the feature being used. |
||
|
OUTPUT |
ResponseBatchId: It helps to extract the “BatchId” of the updated transaction as output. It returns in the values in “String” datatype. |
|
|
ResponseURN: It helps to extract the “URN” of the updated transaction as output. It returns in the values in “String” datatype. |
||
|
ResponseValue: It helps to view the response as “status” from the service for updated transaction. It returns in the values in “String” datatype. |
||
|
Result: It provides the ability to view the execution status of the activity. It returns values in "Boolean."
True: Indicates that the activity has been executed successfully without any errors. False: Indicates that the activity has been unsuccessful due to an unexpected error being thrown. |
* Represents mandatory fields to execute the workflow
How to replace and update the existing values
in the transactions?
As the “Update Transaction” activity requires the “BatchID, URN and Queue” of
the existing transaction, you can only use the output from the “Get Transaction”
activity.
But there’s always another solution with our Automation. To update the existing
values in the fields against the queue, follow the below steps,
1. Let’s continue from the “Get Transaction” activity example.
a. Here I have received the “Json” value as output from the activity stored
in the variable “JsonValue.”
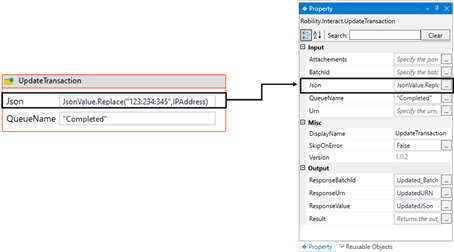
2. Now, place the “Update Transaction” activity to the workflow.
3. Double click on the activity and provide the “JsonValue” variable in the
“JsonString” property.
4. To replace the existing values, enter the syntax as “JsonValue.Replace
(Old String value, New string value)”
a. This syntax helps the user to replace the “Old string value” to the
specified “New String value” in the Json string.
b. Here, I am specifying as “JsonValue.Replace(“123:234:345",IPAddress,)”.
c. In my string, I am replacing the “123:234:345” to a string variable “IPAddress”
that contains the updated value in it.
5. To replace, one or more values in the Json string variable, you can use the
same syntax as “JsonValue.Replace(Old String value, New string value).
Replace(Old String value, New string value).”
6. To get detailed information on how it works, refer the below example.
Example
Here’s an example of how the “Update Transaction” activity works –
In the following example, I am continuing from the “Example 2” from the “Add Transaction”
activity. To get a detailed understanding, click here. Here I am using the
“Update Transaction” activity to update the extracted transaction details and move
them from one queue to another queue.
Here I am updating the “IP Address, Username, and Password” fields in the
transactions.
Steps to execute a bot
1. Create a solution for building a workflow or open an existing solution.
2. Place the "Update Transaction" activity next to the “Writeline” activity.
a. It helps to update the transactions and move from one queue to another
specified queue.
3. Double click on the activity to provide the details.
a. The first field is “Json”, here I am entering the sample “Json” string copied
from the “Interact” page.
b. Moving to the next field, “JsonData” – Here I am specifying the “Json string”
extracted as output in the “Get transaction” activity. Click here to refer
the activity.
a. It accepts only “String” datatype.
i. In the “update transaction” activity, I am using the “JData” variable that stores
the “Json string” of the transactions extracted from the “ Get transaction”
activity from the “processing” queue.
b. Next, navigating to the “AttachmentFieldName” in the properties, to provide
the field name.
i. Here, I am pasting the “AttachmentFieldName” copied from the “Interact”
as “ValidationImage”.
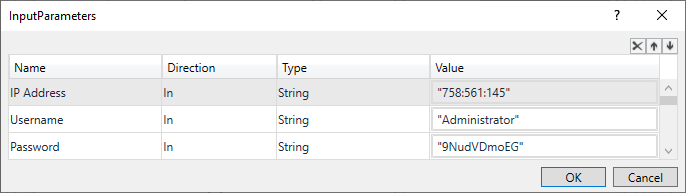
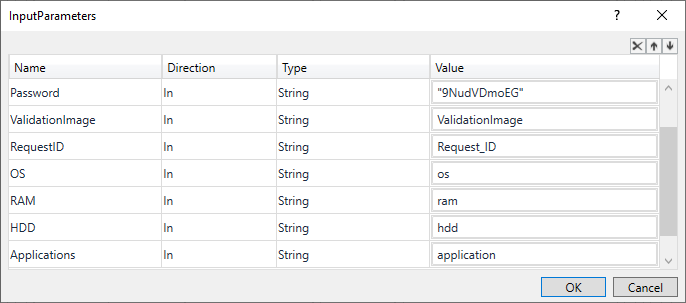
c. Moving to the “InputParameters” field, to update the fields.
d. Click on the three dots to open the “Arguments panel”.
i. Here you have to manually create the Field name and pass the variable
against it.
ii. Click on the “CreateArgument” option and providing the name as
“IP Address”.
iii. Now, I am providing the value as “758:561:145” .
iv. Next, providing the Argument name as “Username” and value as
“Administrator” .
v. Next, providing the Argument name as “Password” and value as
“9NudVDmoEG”.
vi. Then, continued providing the other fields in the transactions as
they are mandatory.
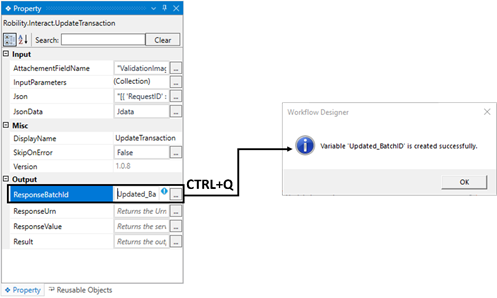
e. Now, moving to the “ResponseBatchID” in the output properties to declare
a variable to get batch Id as return.
i. There are two ways to create a variable-
ii. Method 1 – Click on the "ResponseBatchID" property within the
"UpdateTransaction" activity and enter the variable name. In this case,
we are using “Updated_BatchID." Then, press "Ctrl+Q," which is a shortcut
key to create a variable.
iii. Method 2 - Click on the Variables pane and enter the name
" Updated_BatchID." Then, in the "Variable Types" column, select "String"
from the dropdown menu.
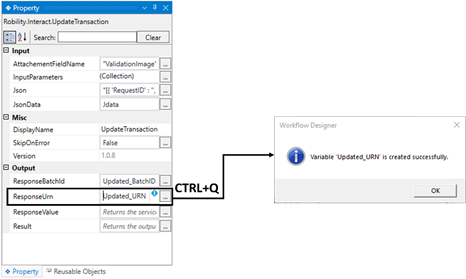
f. Now, moving to the “ResponseURN” in the output properties to declare a
variable to get URN value as return.
i. There are two ways to create a variable-
ii. Method 1 – Click on the "ResponseURN" property within the
"UpdateTransaction" activity and enter the variable name. In this case, we
are using “Updated_URN." Then, press "Ctrl+Q," which is a shortcut key
to create a variable.
iii. Method 2 - Click on the Variables pane and enter the name " Updated_URN."
Then, in the "Variable Types" column, select "String" from the dropdown menu.
2. You can add “Writeline” activity to view the updated “BatchID and URN”
as output of the activity. Below is the sample of the output of the activity.
