
This activity assists the user in extracting details from the created transactions
associated with the specified 'Batch ID and URN' found in the queue on the
'Interact' page.
Technical Reference
|
|
INPUT |
AttachmentFieldName: This parameter indicates to provide the “FieldName” of the Attachment if any created in the Interact. This field name can be extracted from “SmartInteract” in Manager. Refer the below document.
You can either hardcode the values in “String” datatype or can enter the values in “String”.
When left blank, it will not be considered.
This parameter accepts values in “String” datatype. |
|
DataTableFieldName: This parameter indicates to provide the “FieldName” of the “Table” or “Group” if any created in the Interact. This field name can be extracted from “SmartInteract” in Manager. Refer the below document.
You can either hardcode the values in “String” datatype or can enter the values in “String”.
When left blank, it will not be considered.
This parameter accepts values in “String” datatype. |
||
|
DownloadFilePath: Indicates to provide the “FilePath” to download the attachments against the field, if any available in the “Interact”.
You can either hardcode the values in “String” datatype or can enter the values in “String”.
When left blank, it will not be considered.
This parameter accepts values in “String” datatype. |
||
|
FileOverWrite: Indicates to overwrite the “Files” that are being downloaded from the “Interact” in the specified path. By default, the box will be “checked”. |
||
|
InputParameters: This parameter helps you to provide the “inputs” that are required to filter and extract specific values against the transactions in the Project during the execution.
This parameter accepts collection of argument types.
Refer the below documentation to pass the values. |
||
|
QueueName: Indicates to provide the “Queue” name from the “Project” against which the “transaction” needs to be extracted. This field accepts only “String” datatype. |
||
|
MISC |
DisplayName: Displays the name of the activity. The activity name can be customized, which aids in troubleshooting. |
|
|
SkipOnError: Specify the "Boolean" value as "True" or "False." True: Continue executing the workflow regardless of any errors thrown. False: Halt the workflow if it encounters any errors. None: If the option is left blank, the activity will, by default, behave as if "False" were chosen. |
||
|
Version: It indicates the version of the feature being used. |
||
|
OUTPUT |
JsonData: It helps to view the output of the activity as “Json String” for the extracted transactions. It returns in the values in “String” datatype. |
|
|
OutputDataset: It helps to view the output of the activity as “Dataset” if there are any tables or group available in the extracted transactions. It returns in the values in “Dataset” datatype. |
||
|
Result: It provides the ability to view the execution status of the activity. It returns values in "Boolean."
True: Indicates that the activity has been executed successfully without any errors. False: Indicates that the activity has been unsuccessful due to an unexpected error being thrown. |
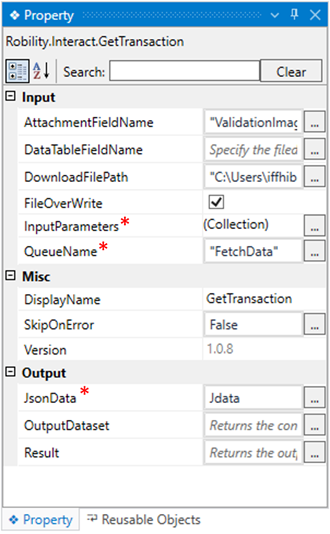
* Represents mandatory fields to execute the workflow
Here’s an example of how the “Get Transaction” activity works –
In the following example, I am continuing from the “Example 2” from the
“Add Transaction” activity. To get a detailed understanding, click here.
Here I am using the “Get Transaction” activity to extract the transaction details such
as the fields and their values, created by, created date, queue name, modified
user’s name and appended batch id and URN etc.
Steps to execute a bot
1. Create a solution for building a workflow or open an existing solution.
2. Place the "Get Transaction" activity next to the “Writeline” activity.
a. It helps to extract the transactions details uploaded in the “Interact” page from
the specified queue on the project.
b. Using this activity, I am going to extract the transactions details with “BatchID”,
and “URN” resulted as output in “Add Transaction” activity in a Json format for
further executions steps.
3. Double click on the activity to provide the details to extract the data from the
transactions.
a. The first field is “QueueName” – Here I am specifying the value as “FetchData”
where the transactions are available in the “Interact” in my project.
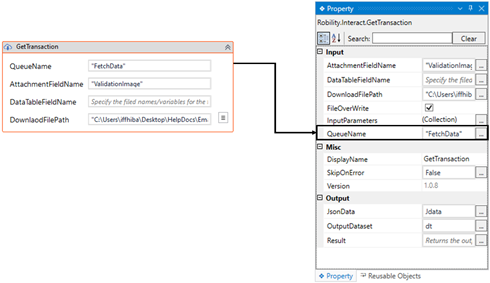
b. Moving to the “AttachmentFieldName”, Here, I am pasting the “AttachmentFieldName”
copied from the “Interact” as “Documents”.

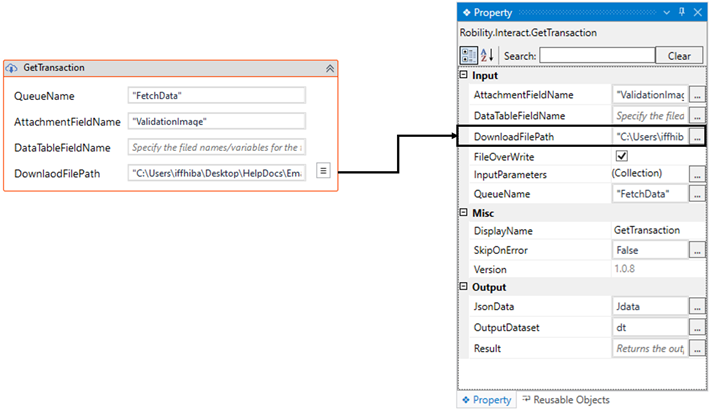
c. Moving to the “DownloadFilePath” , here I am specifying the path from my
system to save the file which is available in the Interact.
i. You can also choose the “FilePath” from the three dots adjacent to it to browse
from the “File System”.
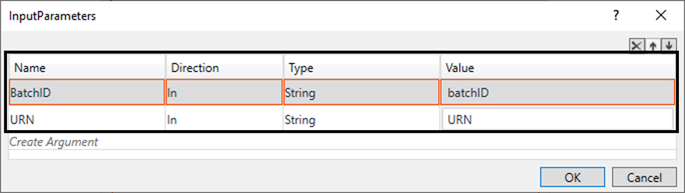
d. Next, navigating to the “InputParameters”, to pass the input variables to filter
and extract the values from the transaction.
e. Click on the three dots to open the “Arguments panel”.
i. Here you have to manually create the Field name and pass the variable
against it.
ii. Click on the “CreateArgument” option and providing the name as “BatchID”.
iii. Now, I am providing the variable “BatchID” variable as value here declared
in the “AddTransaction” activity. Click here to refer.
iv. Next, providing the Argument name as “URN” and value as “URN” variable
declared in the “AddTransaction” activity.
f. Navigating to the “JsonData” property in the output field of “Get Transaction”
activity to declare a variable to view the output of the activity.
i. There are two ways to declare a variable,
ii. Method 1 – Click on the "ResponseValue" property within the "Get Transaction"
activity and enter the variable name. In this case, we are using " Jdata." Then, press
"Ctrl+Q," which is a shortcut key to create a variable.

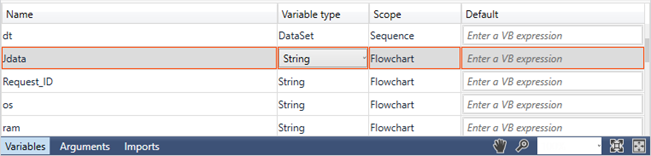
iii. Method 2 - Click on the Variables pane and enter the name "JData" Then, in the
"Variable Types" column, select "String" from the dropdown menu.
4. Now, placing an “Writeline” activity to view the output from the “Get Transaction”
activity. Below is a sample of the output of the activity, viewed in the log file.
![]()
You can also view the output of the activity in the “Log File” if write log activity
has been used to print the output.