
The Deserialize XML activity is used to convert structured XML format, which
can be passed as a "string" or an "XML Object," into an XDocument.
The output of the deserialized XML activity empowers the user to execute
various actions, including extracting nodes/attributes and creating
nodes/attributes within the XML Document.
XML is a markup language employed to define the structure and content of
data, while XDocument represents the output yielded by the Deserialize XML
activity.
Technical Reference
|
|
INPUT |
DelayAfter:It helps the user to add a delay to start the execution of the further activity. The format of the delay here is milliseconds. By default, it will be set to zero. When the option is left blank, no delay is considered. |
|
DelayBefore: It helps the user to add delay before the execution of the current activity. The format of the delay here is milliseconds. By default, it will be set to zero. When the option is blank or zero, no delay is considered in the activity's execution. |
||
|
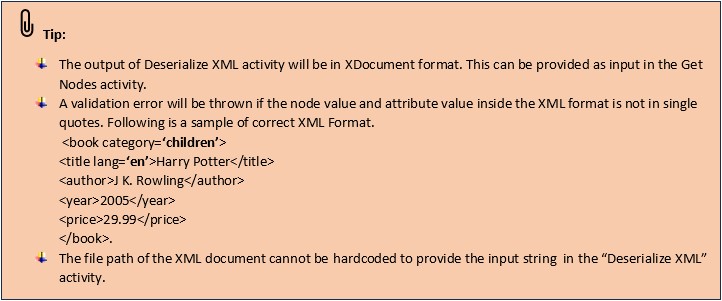
InputString: Specify the XML nodes that need to be passed as input here. Either you can hardcode the value or you can call the value as a variable (from the output of other activities). The XML format needs to be passed within double quotes. Click here to view the XML format. |
||
|
MISC |
DisplayName: Displays the name of the activity. It can also be customized for troubleshooting purposes. |
|
|
SkipOnError: Specify the Boolean value as “True or False.” True: Continues to execute the workflow irrespective of any error thrown. False: Stops the workflow if it throws any error. None: If the option is specified as blank, by default the activity will perform as “False” action. |
||
|
Version: It specifies the version of the XML automation feature in use. |
||
|
OUTPUT |
XML Document: It helps you to view the output value of the XML object as a deserialized XDocument format. The “output value” accepts in “Xdocument variable” datatype. (Refer to the steps in creating a workflow.) |
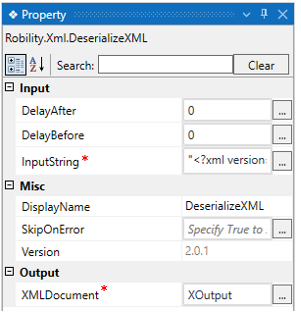
* Represents mandatory fields to execute the workflow
Use case
The following illustration demonstrates the process of obtaining the most popularly
used book titles and their corresponding IDs using the XML feature.
A private library has been requested to extract and provide a list of the most popularly
used book titles along with their respective IDs to its administrative office.
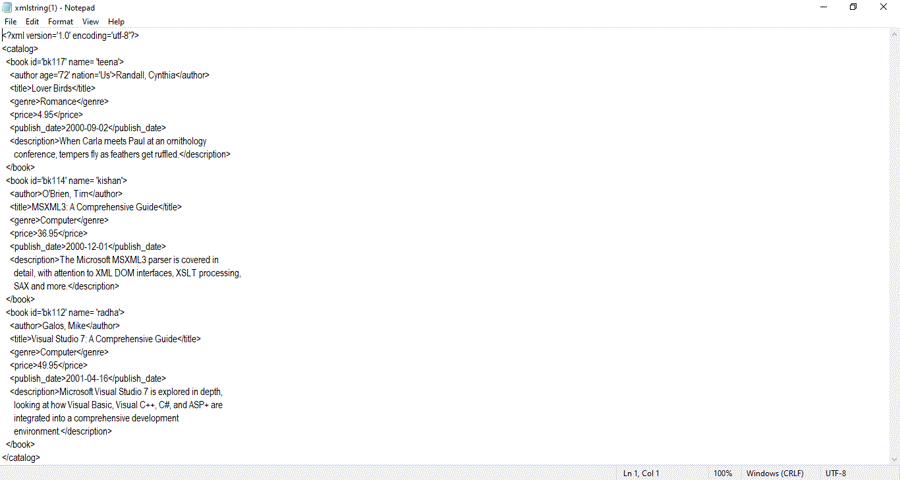
The input is an XML response that has been extracted from the library's website
and is present in a text document. This response contains a comprehensive list of
book details, including title, ID, author, year, category, description, and price of
each book.
In this scenario, the input will be an XML Object variable specifically designed for
utilizing XML features. Using the XML activities, we will extract the "Book title" and
"Book ID" from this variable. Subsequently, the extracted values of the "Book title"
and "Book ID" will be updated within an Excel spreadsheet under their respective
columns, thus enabling the continuation of the subsequent stages of the process.
Please scroll down to the bottom of the page to access the sample file for this use case.
Steps to execute the bot
1. Create a solution named "BookExtraction."
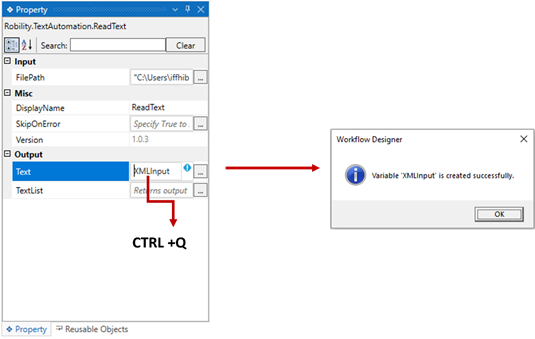
2. Drag and drop the "ReadText" activity from the text automation feature and
set as “StartNode”.
a. Navigate to the properties section and provide the file path of the XML
where the input file is stored. (Refer to the attached XML text document.)
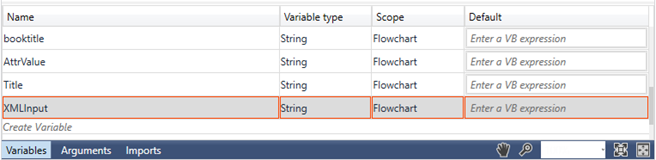
b. Create a variable named "XMLInput" to store the read data from the
"Text" property.
i. There are two steps to create a variable –
ii. Method 1 – Click on the "Text" property within the "ReadText"
activity and enter the variable name. In this case, we are using
"XMLInput." Then, press "Ctrl+Q," which is a shortcut key to
create a variable.
iii. Method 2 - Click on the Variable pane and enter the name
"XMLInput." Then, in the "Variable Types" column, select
"String" from the dropdown menu.
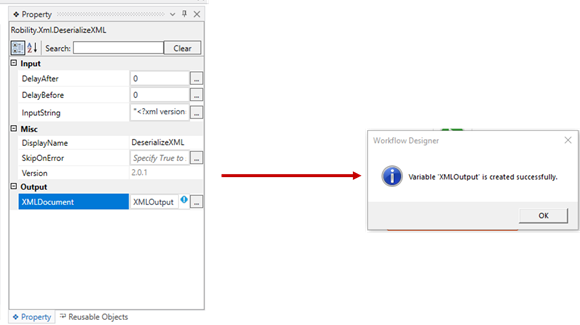
3. Drag and drop the "Deserialize XML" activity from the XML feature and place it next
to the "ReadText" activity.
a. Navigate to the properties and declare a variable named "XMLOUTPUT"
in the "XMLDocument" property. This variable will store the deserialized
output of the XML document.
b. There are two steps to create a variable –
i. Method 1 – Click on the "XMLDocument" property within the
"Deserialize XML" activity and enter the variable name. In this
case, we are using "XMLOutput." Then, press "Ctrl+Q," which is
a shortcut key to create a variable.
ii. Method 2 - Click on the Variable pane and enter the name
"XMLOutput." Then, click on the "DataTypes" column and select
"Browse for types."
iii. The .NET types window will open. Enter the "TypeName" as
"XDocument" and choose "System.Xml.Linq.XDocument," then
click OK.
4. Now, add the "GetNodes" activity and place it next to the "DeserializeXML" activity.
a. Navigate to properties and choose the filter type as "XPath" from the
drop-down. The purpose of selecting "XPath" is to extract the titles
of the “books.”
b. Enter the filter value as "/catalog/book/title" from which the text needs
to be extracted.
c. Declare a variable for the "XmlNode." Let's name it “XPNode.”
d. There are two steps to create a variable –
i. Method 1 – Click on the "XMLNode" property within the
"GetNode" activity and enter the variable name. In this case,
we are using "XPNode." Then, press "Ctrl+Q," which is a
shortcut key to create a variable.

ii. Method 2 – Click on the Variable pane and enter the
name "XNode.” Then, click on the "DataTypes" column
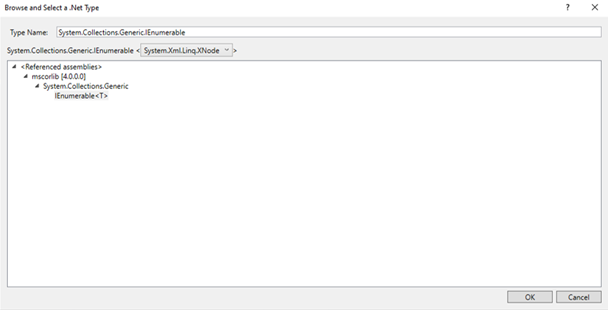
and select "Browse for types."
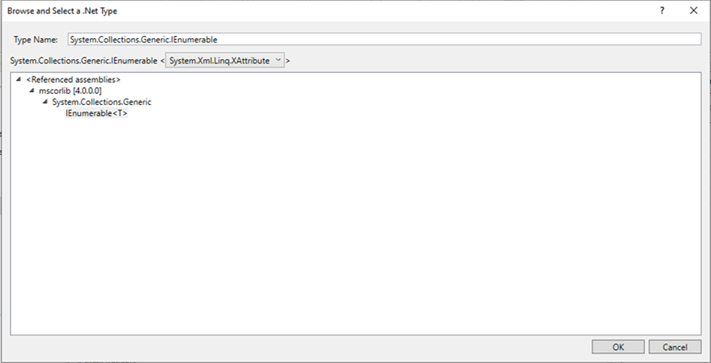
iii. The .NET types window will open. Enter the "TypeName"
as "System.Collections.Generic.IEnumerable" and choose
the value as "System.Xml.Linq.XNode," then click OK.
5. Next, drag and drop the "ForEach" activity to iterate and write each value
that has been extracted from the node using the "XPath expressions."
a. Enter "XPNode" as the input value here, which is where we
stored the extracted book titles.
b. The values from "XPNode" have been assigned to the "Item."
c. Select "System.Xml.Linq.XNode" as the "TypeArgument" since
it's a list of values.
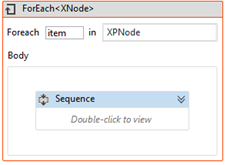
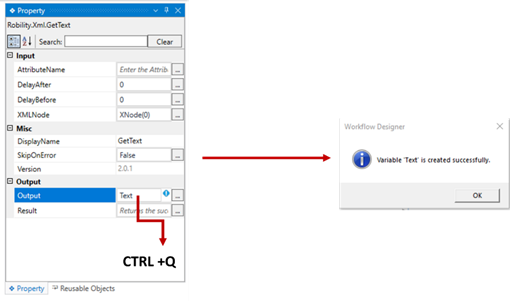
6. Now, drag and drop the "GetText" activity and place it inside the "ForEach"
activity.
a. Navigate to the properties and enter the variable "item" in the
"XMLNode" property.
b. Declare a variable for the "Output" property to retrieve the text.
Let's name it "Text."
i. Method 1 – Click on the "Output" property within the
"GetText" activity and enter the variable name. In this case,
we are using "Text." Then, press "Ctrl+Q," which is a
shortcut key to create a variable.
ii. Method 2 - Click on the Variable pane and enter the name
"Text." Then, click on the "Variable Types" column and select
"String" from the drop-down.
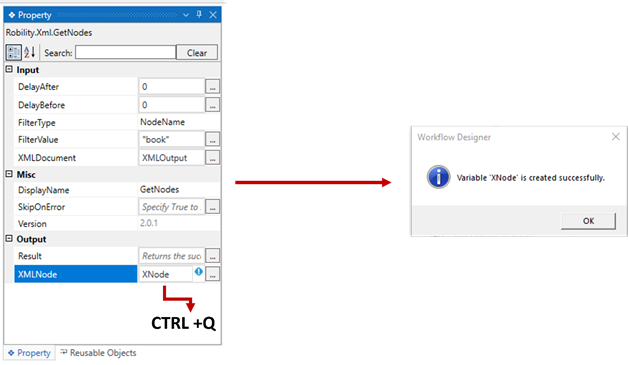
7. Drag and drop the "GetNodes" activity and place it next to the "WriteLine" activity.
a. Navigate to properties and choose the filter type as "Node Name" from
the drop-down.
b. Enter the filter value as "book" from which the text needs to be extracted.
c. Declare a variable for the "XmlNode" segment. Let's call it XNode.
i. Method 1 – Click on the "XNode" property within the "GetNode"
activity and enter the variable name. In this case, we are using
"XNode." Then, press "Ctrl+Q," which is a shortcut key to create
a variable.
ii. Method 2 – Click on the Variable pane and enter the name
"nodex." Then, click on the "DataTypes" column and select
"Browse for types."
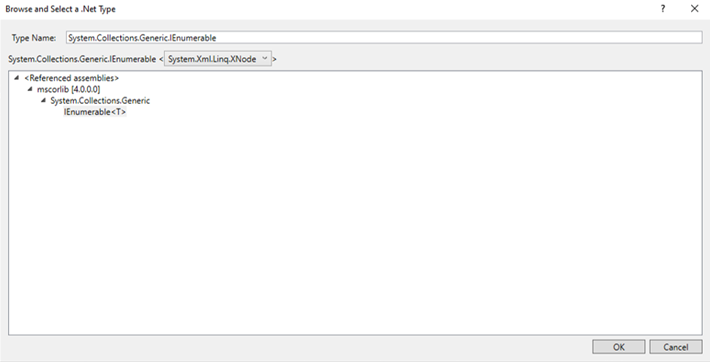
iii. The .NET types window will open. Enter the "TypeName" as
"System.Collections.Generic.IEnumerable" and choose the
value as "System.Xml.Linq.XDocument," then click OK.

8. Next, drag and drop the "ForEach" activity to iterate and write each value that has been
extracted from the "Node" using the "XPath expressions." The purpose of using the
"Node" is to retrieve the "Book ID."
a. Enter "XNode" as the input value here, where we stored the extracted
book titles.
b. The values from "XNode" have been assigned to the "Item."
c. Select "System.Xml.Linq.XNode" as the "TypeArgument" since it's a
list of values. Click here to know how to choose “TypeArgument.”
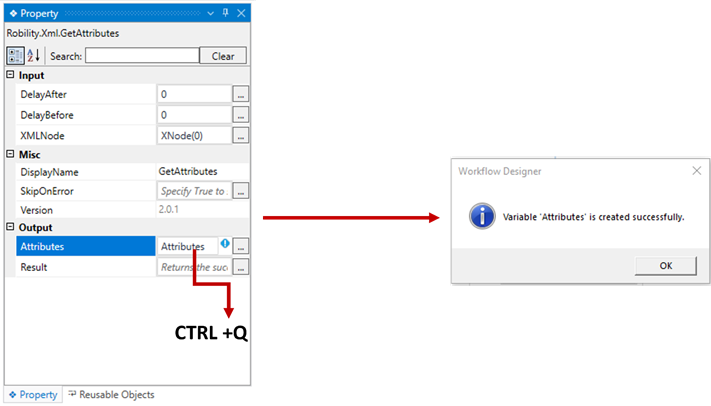
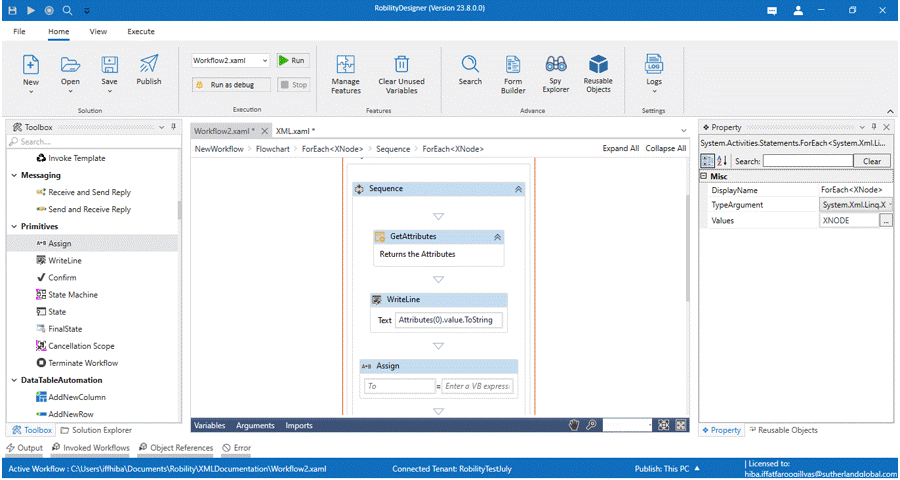
9. Drag and drop the "GetAttributes" activity and place it inside the "ForEach" activity.
The purpose of using the "GetAttribute" is to extract the value corresponding to the
"Book ID."
a. Navigate to the properties and enter the variable "item" in the "XMLNode"
property.
b. Declare a variable for the "Output" property named "Attributes" to obtain
the list of values available in the node list.
i. Method 1 – Click on the "Output" property within the
"GetAttributes" activity and enter the variable name. In this case,
we are using "Attributes." Then, press "Ctrl+Q," which is a shortcut
key to create a variable.
ii. Method 2 – Click on the Variable pane and enter the name
"Attributes." Then, click on the "DataTypes" column and select
"Browse for types."
iii. The .NET types window will open. Enter the "TypeName" as
"System.Collections.Generic.IEnumerable" and choose the value
as "System.Xml.Linq.XAttribute," then click OK.
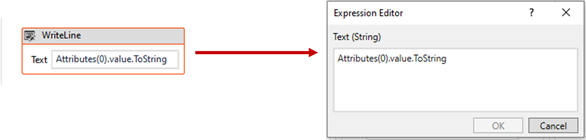
10. Add a "WriteLine" activity to the workflow to inspect the extracted value.
a. Enter the input string as "Attributes(0).Value.ToString" to retrieve the
value of the attribute available in the node against the attribute name.
11. Add an "Assign" activity and place it next to the "WriteLine" activity. We are going to
assign the values from "Attributes(0).Value.ToString" to the variable "AttrValue." The
purpose of this assignment is to consolidate the values into a single variable.
a. Create a variable named "AttrValue" in the variable panel.
b. Click on the "Variable Types" column and select "String" from the “dropdown”
menu.
c. Enter "AttrValue" in the "To" field of the assign activity.
d. Enter "Attributes(0).Value.ToString" in the "Value" field of the assign activity.
12. Then add the “GetText” activity and place it next to the “Writeline” activity.
a. Navigate to the properties and enter the “AttributeName” as “AttrValue”.
b. Enter the variable as “item” in the “XMLNode” property.
13. Place the "GetExcelObject" next to the "WriteLine" activity and select the input file
path containing the list of inputs.
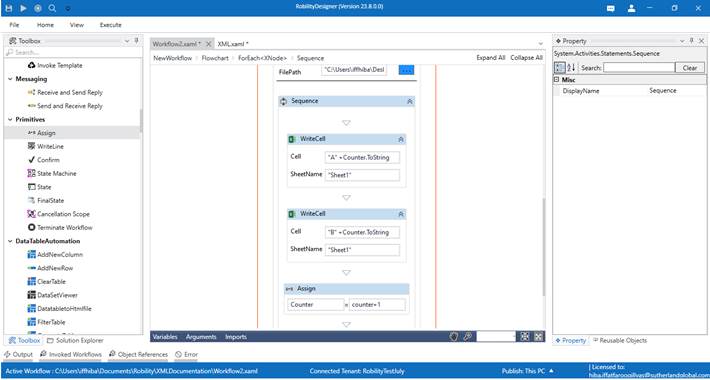
a) Drag and drop the "WriteCell" activity into the scope. Specify the cell
value as "A" + Counter.ToString, since the Book title is located in the
"A" column.
b) Assign the value stored from "GetText" to the "WriteCell" activity and
set the "InputString" value as "BookTitle."
c) Indicate the sheet name as "Sheet1," where the data is stored.
d) The purpose of using a counter is to increment the values for the
"WriteCell" activity. To accomplish this, include an "Assign" activity.
i. Prior to this, declare a variable named "Counter" and select
the "DataType" as "Int32."
ii. The reason for choosing the integer “DataType” is to increment
the value, and specify the default value as "2," as it consider
from the header as 1. Refer 13th point how to assign the counter
increment value in the “Assign” activity.
e) Drag and drop another "WriteCell" activity into the scope. Specify the
cell value as "B" + Counter.ToString, as the Book ID is located in the "B"
column.
f) Transfer the stored value from "GetText" to the "WriteCell" activity and
set the "InputString" value as "Text."
14. Place an "Assign" activity next to the "GetExcelObject" scope and input the declared
variable, in this case, "Counter." Specify the "To" value as "Counter," and set the "Value"
as "Counter + 1." This increments the counter for further use.
The bot executes the workflow and extract the "Book titles" and "Book id" and updates
them into the excel sheet.
Please find the attached Sample XML file for reference below in creating a workflow.