All the credential details of the users for an application are stored in the
credential vault in manager. This activity is used to obtain the credentials which
is uploaded to the credential vault. It is also useful to activate/login to
applications involved in this process.
Where to find the vault key?
After adding the credential details on the “RobilityManager” for the application,
the vault key for the respective project will be configured.(Click here to get
detailed information on how to create credentials for the application.)
Follow the below steps to find the vault key in the Designer.
Before moving to the Designer, refer the steps to create the credentials for
the project.
1. Launch the Designer and create a solution named as
“CredentialManagement”.
a. . To access the "Vault Key," select the corresponding project from the
"Publish" section located at the bottom of the Designer. This selection should
align with the project for which the credential vault has been configured.
The default setting for the publish option is "This PC" (as demonstrated in
the GIF below).
b. Upon selecting the project, the vault key will be integrated into the solution
explorer, appearing as the "Credential key" within the "Resource" category.
2. The presence of the "Credential key" within the "Designer" interface is
contingent upon the configuration of the "Credential Manager" for the specific
project. It will only be visible when the project aligns with this credential
management configuration.
3. Click on the “Solution explorer” to view the “Credential key” in the resource.
Technical reference
|
INPUT |
ApplicationName: The Application name list will be auto-filled once the “Vault key” has been configured. Choose the “Application name” from the drop-down to extract the credentials from. |
|
|
Lock: This property indicates whether the “Application” should be locked during the execution. Specify “True” or “False” to enable or disable the lock status during the extraction of credentials.
True: Enables to lock the “Application” during the execution of the bot.
False: Disables to lock the “Application” during the execution of the bot.
None: If this option is left blank, the property will not take effect, and by default, the application will be in unlocked status. |
||
|
TenantName: This field will be automatically filled once the vault key is configured against the solution. It displays the “Tenant” name which the solution has been configured. |
||
|
MISC |
DisplayName: Displays the name of the activity. The activity name can also be customized to help in troubleshooting. |
|
|
SkipOnError: It specifies whether to continue executing the workflow even if it throws an error. This supports only Boolean value “True or False”. By default, it is set to “False.” True: Continues the workflow to the next step None: If the option is specified as blank, by default the activity will perform as “False” action. |
||
|
Version: It specifies the version of the Robility Manager feature in use |
||
|
OUTPUT |
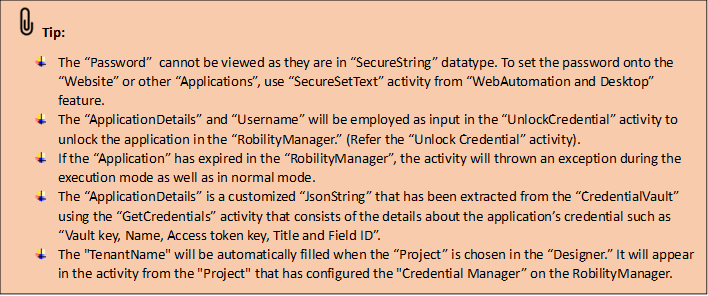
ApplicationDetail: This facilitates the extraction and viewing of the activity's output in a "String" datatype, representing "Application details" extracted from the "Credential Vault."(Refer the tips below to get detailed information) |
|
|
ApplicationTitle: It helps to extract and view the activity’s output in a “String” datatype, representing the “Title” provided in the “Credential vault” against the “Application”. |
||
|
Domain: This facilitates the extraction and viewing of the activity's output in a "String" datatype, representing "Domain Name" if provided while adding the “Credentials” for the “Application”.(Refer the steps in creating the “Credentials). |
||
|
FieldID: This facilitates the extraction and viewing of the activity's output in a "String" datatype, representing "Field ID" if provided while adding the “Credentials” for the “Application”. (Refer the steps in creating the “Credentials). |
||
|
Password: This facilitates the extraction and viewing of the activity's output in a "Secure String" datatype, representing "Password" provided in the “Credential vault” against the “Application”. |
||
|
Result: It helps to view the execution state of the activity. It returns the values in Boolean format. True: It indicates the activity has been executed successfully without any error. False: It indicates that the activity has been faulted due to some unexceptional error thrown. |
||
|
Username: This facilitates the extraction and viewing of the activity's output in a “String” datatype, representing "Username" provided in the “Credential vault” against the “Application”. |
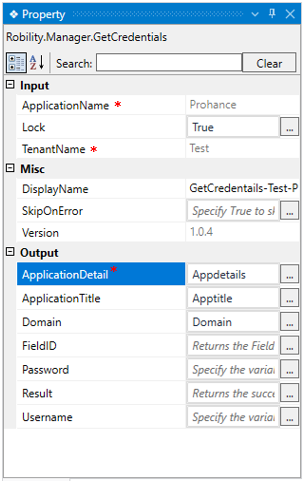
* Represents mandatory fields to execute the workflow
How to use “Create variables” option?
The “Create Variables” option in the “GetCredentials” activity is utilized to create
variables against output properties such as “Application details, Application title,
Domain, Field ID, Password and Username”. This allows users to store credentials
securely with the help of encryption. The variables created can be accessed in
other activities using the output properties as input. This saves time and effort
which would otherwise be spent creating and storing variables.
Follow the below steps to create the variables:
1. Drag and drop the “GetCredentials” activity to the workflow.
2. The “Application” credentials will be binded to the activity from the “Vault key”
configured.
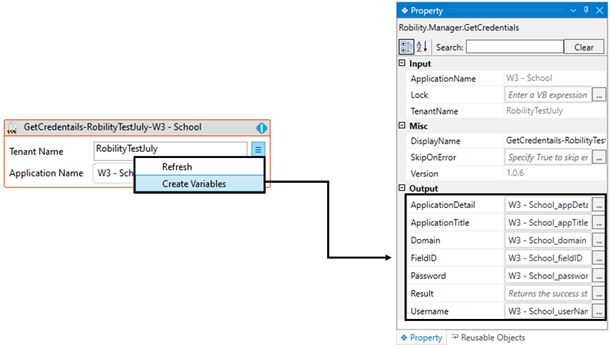
a. Double click on the activity and choose the “Three lines” option available nearer
to the “TenantName”.
b. Click on the “Create Variables” option.
3. The variables will be created against each field in the properties of the
activity.
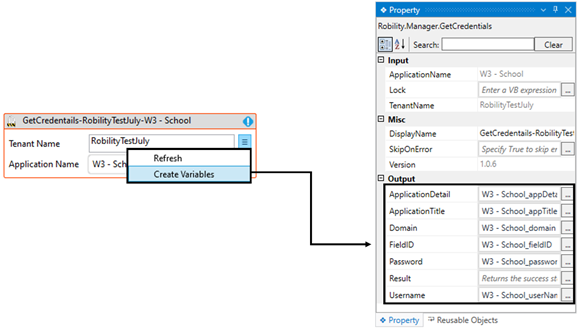
4. The “Variables” will be created along with the “ApplicationName” selected.
For e.g., (W3School_fieldID). Refer the above image.
How to reset or refresh the “Credentials”
when updated ?
When credentials are updated in the "Credential Vault," the refreshed information
can be seamlessly integrated into the workflow, enhancing the accuracy and
security of each execution. This dynamic updating can be functioned through the
“Refresh” button to help in maintaining the reliability of your processes.
Moreover, in cases where an "Application" is removed from the "Credential
Vault," the associated activity within the workflow can be promptly reset through
the utilization of the "Refresh" option.
Follow the below steps to “Refresh” the Application’s credentials:
In the following steps, I am utilizing the workflow that is used to automate in the
Use case. To get detailed information, follow the use case steps. Here I am going
to change the “Application” name in the activity and reset the values.
1. Launch the solution that has configured the “Manager” activity. Here I am using
the “CredentialManagement”.
2. Navigating to the “GetCredentials” activity and double clicking on the activity
to reset the “Application’s credentials”.
a. Choosing the “Three lines” adjacent to the “TenantName” on the activity.
b. Here I am selecting the “Refresh” button to reset the activity.

c. The variables created and the “Application” details will be removed, and the
activity will be refreshed.
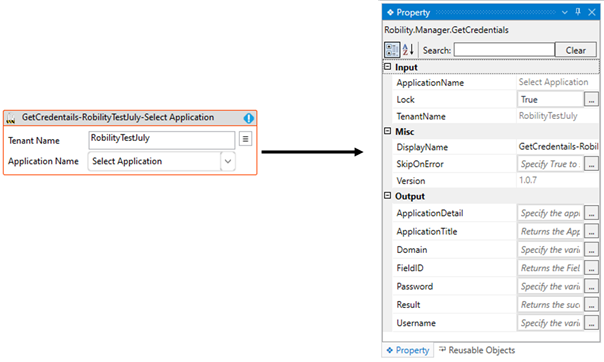
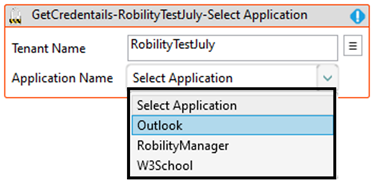
3. Now, I am moving to the “ApplicationName” drop-down to select another
“Application”.
a. Here I am choosing the “Application” as “Outlook”.
4. Now, I am using the “Create Variables” option to set variables for the
“Application” selected to extract the credentials from the “Credential vault.”
Use Case
The following use case illustrates how the "GetCredential" activity is used to
retrieve the "Application Title," "Domain," "Username," and "Password" from
the "Credential Vault."
This automation process is designed to log in to a website using credentials
obtained from the "Credential Vault." The application named "W3 Schools"
is created. Using the "GetCredential" activity, we extract the "Username" and
"Password" to facilitate website login through the "WebAutomation" feature.
During execution, the application remains in a "Locked" status. After
successful login, the "UnlockCredential" activity is employed to "unlock" the
application within the "RobilityManager."
Steps to execute a bot
In the following steps, I have already configured the “Credentials” for the
“Application” named “W3 schools” in the “RobilityManager”. To get detailed
information on how to create an application, click here.
1. Create a solution named as “LoginProcess”.
2. Install the “Manager” feature from the “Manage features”.
3. Drag and drop the “GetCredential” activity from the “Manager” feature.
a. It helps to extract the “Application details” and “Lock” the application
during the execution process.
b. Double click on the activity and the “Application” details will be binded
to the activity from the “Vault key” configured. (Click here to get detailed
information)
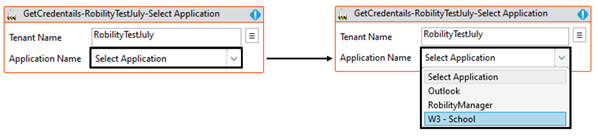
c. Choose the “Application name” from the drop-down.
i. Here we are using the “W3 Schools” as the “Application Name” created
in the “Credential Vault”.
d. Navigate to the “TenantName” and choose the “Three lines” adjacent to it.
i. Select the “Create Variables” option to create the variables against each field
in then output properties of the activity.
ii. The variables has been created automatically against each field binded along
with the “Application name” except the “Result” field. You can create a variable
here to know the execution status of the activity.
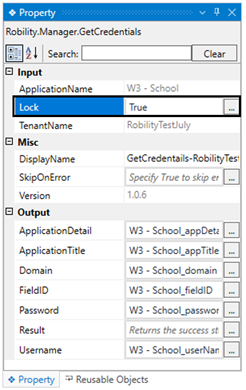
e. Navigate to the “Lock” on the properties of “GetCredentials” activity.
i. It helps to “Lock” the application on the “RobilityManager” during the
execution of the bot.
ii. In this case, we are going to “Lock” the “W3- Schools” application during
the login process. Thus, we are specifying the value as “True”.
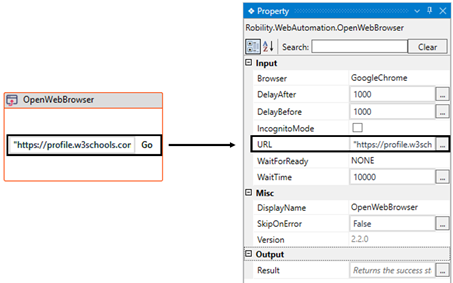
4. Next, add the “OpenWebBrowser” activity from the “WebAutomation”
feature.
a. It helps to launch the websites on the browsers.
b. Double click on the activity and provide the “URL” as
“https://profile.w3schools.com/”.
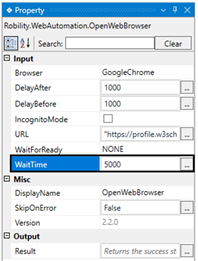
c. Navigate to the “WaitTime” in the properties to customize the wait
time for the start of the activity.
i. By default, the time will be set to “10000” seconds. In this case, we
are decreasing the seconds to “5000” to speed up the automation
process.
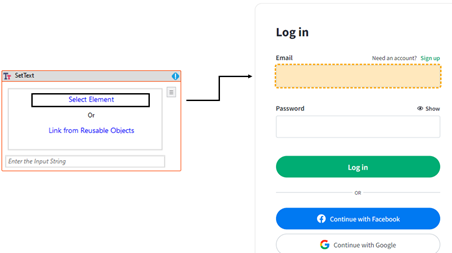
5. Drag and drop the “SetText” activity from the “WebAutomation”
feature and place it next to the “OpenWebBrowser”.
a. It helps to set the text as “String” variables to the websites. To get
detailed information, click here.
b. In this case, we are utilizing the “String” datatype as “Username”
extracted from the “GetCredential” activity to login to the website.
c. Double click on the activity and click on the “Select Element” hyperlink
option.
i. It navigates to the webpage and detect over the “Email” field on the
website.
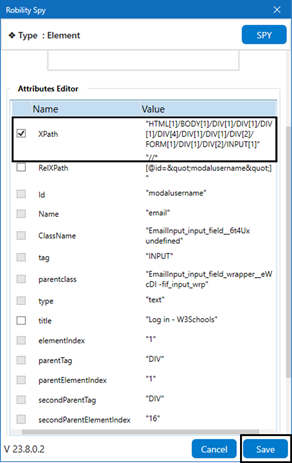
ii. Choose the “Attributes” from the “RobilitySpy” window. In this case,
we are choosing the “XPath” values from the “Attributes” editor.
iii. Now, click on “Save” button.
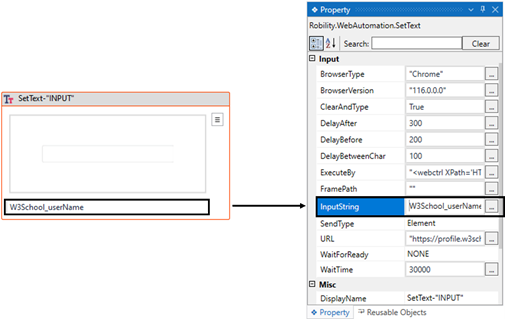
d. Then we need to specify the input to the field in “String” datatype.
i. Here we are using the variable “W3School_userName” which has
been extracted from the “GetCredentials” activity.
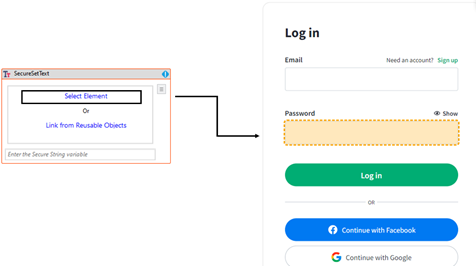
6. Drag and drop the “SecureSetText” activity from the “WebAutomation”
feature and place it next to the “Settext”.
a. It helps to set the text as “SecureString” variables to the websites.
To get detailed information, click here.
b. In this case, we are utilizing the “SecureString” datatype as “Password”
extracted from the “GetCredentials” activity to login to the website.
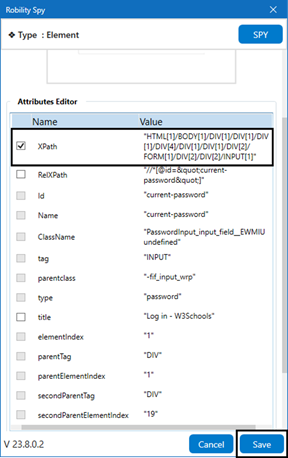
c. Double click on the activity and click on the “Select Element” hyperlink
option.
i. It navigates to the webpage and detect over the “Password” field on the
website.
ii. Choose the “Attributes” from the “RobilitySpy” window. In this case, we are
choosing the “XPath” values from the “Attributes” editor.
iii. Now, click on “Save” button.
e. Then we need to specify the input to the field in “SecureString”
datatype.
i. Here we are using the variable “W3School_password” which has been
extracted as output from the “GetCredentials” activity.

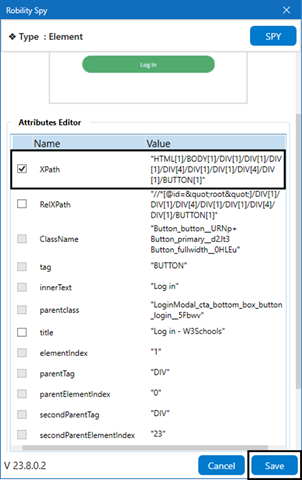
7. Add the “Click” activity from the “WebAutomation” feature and place it
next to the “SecureSetText” activity.
a. Double click on the activity and click on the “Select Element” hyperlink
option.
i. It navigates to the webpage and detect over the “Log In” button on the
website.
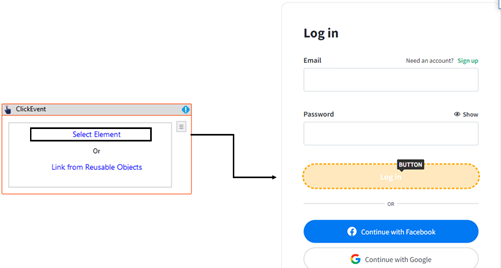
ii. Choose the “Attributes” from the “RobilitySpy” window. In this case, we
are choosing the “XPath” values from the “Attributes” editor.
iii. Now, click on “Save” button.
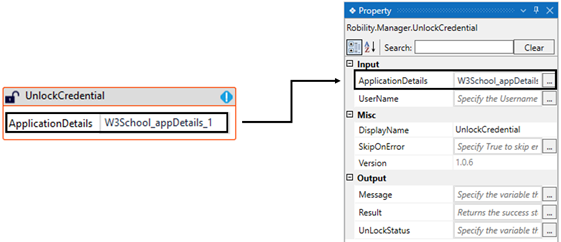
8. Drag and drop the “UnlockCredential” and place it next to the “Click”
activity.
a. It helps to “Unlock” the application on the “RobilityManager”.
b. In this case, we are going to unlock the “W3School” application which
has already been locked by the “GetCredentials” activity.
c. Double click on the activity to provide the “Application Detail”.
i. This “Application Detail” will be extracted as output from the “GetCredentials”
activity.
ii. It will be returned as a customized “Json String” that contains the details
about the application such as “Vault key, Name, Access token key, Title
and Field ID”.
iii. In this case, we are using the “W3School_appDetails_1” variable which
has been extracted as output in the “GetCredentials” activity.
d. Now, navigate to the “Username” from the properties of “UnlockCredential”
activity to provide the username to access.
i. In this case, we are using the “W3School_userName” variable to unlock the
“Credential” in the “vault”.

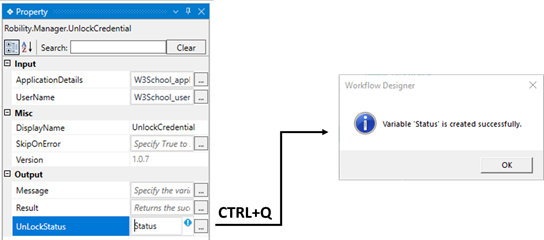
e. Then navigate to the “UnLockStatus” from the output section of the properties
to declare a variable to return the “status” of the “Unlock” field.
i. There are two ways to declare a variable-
ii. Method 1 – Click on the "UnLockStatus" property within the "UnlockCredential"
activity and enter the variable name. In this case, we are using " Status." Then,
press "Ctrl+Q," which is a shortcut key to create a variable.
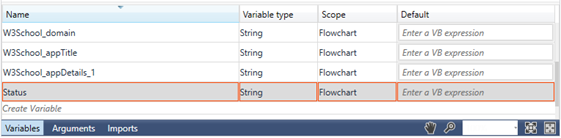
iii. Method 2 - Click on the Variables pane and enter the name " Status." Then, in
the "Variable Types" column, select "String" from the dropdown menu.
9. Finally, drag and drop the “Writeline” activity and place it next to the
“UnlockCredential” activity.
a. In this case, we are using this activity to view the status of the “Application”
whether it has been unlocked or not.
b. Double click on the activity and provide the “InputString” as “Status” extracted as
output from the “UnLockCredential” activity.
10. Now, save the workflow and execute it.
11. The bot will execute the workflow and extract the “Credentials” from the “Credential
Vault” which is utilized in the login process of the “Website”. Further, unlocks the
credential once the login process has been completed.