
The Json input's details can be seen in a tree view using this activity. The input can
be a Input file, Json object or a variable. Here the Json object can be seen hierarchically.
This makes it easier to view the entire file information. It is represented in a similar way
the files and folders are displayed on the left pane of Windows Explorer.
This activity works within the JSON scope activity.
(Navigate to the bottom of this page to download the sample file for this activity)

Technical Reference
|
|
INPUT |
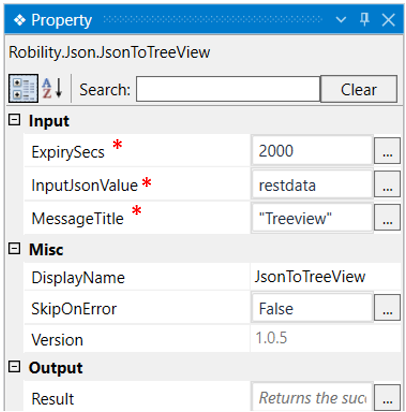
ExpirySecs: Specify the number of seconds for the table to be displayed. By default, the time is set to 10 seconds. We can change the expiry seconds to our requirement. |
|
InputJsonValue: Mention the variable declared in GetJsonObject activity which contains the Json file. |
||
| MessageTitle: Specify the message title to be given to the table within strings. | ||
|
MISC |
Display Name: Displays the name of the activity. You can also customize the activity name to help in troubleshooting. |
|
|
SkipOnError: It specifies whether to continue executing the workflow even if it throws an error. This supports only Boolean value “True or False.” True: Continues to execute the workflow irrespective of any error thrown. False: The workflow aborts if it throws any error. |
||
|
Version: Specifies the version of the Json feature in use. |
||
|
OUTPUT |
Result: Returns the success state of the activity in Boolean values. |
* Represents the mandatory fields to execute the workflow


Use Case
The following activity illustrates how we can use the JsonTotree view activity to view
the details of the Json object in a tree view pattern.
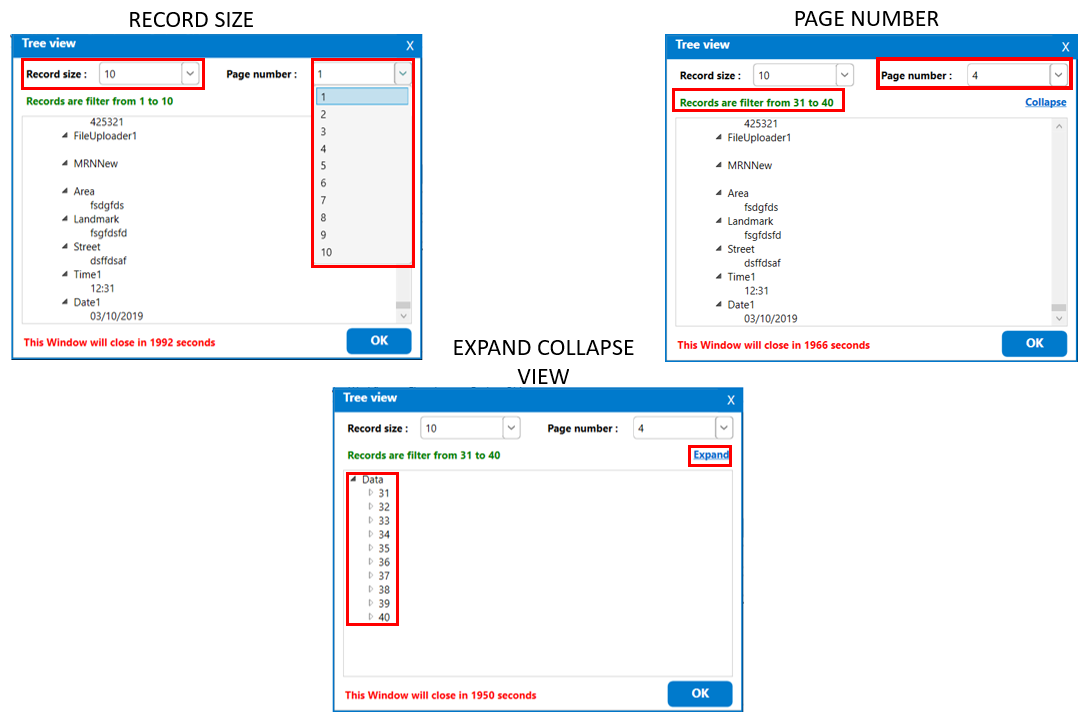
In this example we will be using a Json file that has 100 records of user data as an input file.
The Json tree viewer activity helps to see these 100 records in count of 5, 10, 15, 20 or 25.
Here we will be viewing the MRN, Area, Landmark, Street, Time and Date of a user in a
tree view.
View 1:(Record Size) If we choose the record size as "10", we can view all the details
for 10 users. Use the scroll option in the side bar to view all the details.
View 2:(Page Number) It lets us view the user data page wise and the number of pages
is seen based on the record size chosen. Since we choose the record size as "10", we
will have 10 pages of user data with the details of 10 users in each page.
View 3:(Expand Collapse View) We can choose to expand or collapse the data by
choosing the same within the box, which gives an easier view of the entire file.
Steps to execute the bot
1. Drag and drop Get Json Object activity to the workflow which is the scope.
Declare a variable in the result data box to see the output of the Json file.
Here it is RD.
2. Click on the activity and fill in the required details.
Click here to know in detail about the Get Json Object.
3. Drag and drop a JsonToTree view activity to the scope.
4. Specify the expiry seconds to view the table.
5. Specify the variable declared for the Json file in the InputJsonValue and also give
a message title.
6. Execute the activity in Debug mode to see the output.
The bot executes the activity, converts the details in the Json file to a tree view and displays
the details in a tree view format in which the output can be seen based on the record size
and page number selected from the drop down.
Please find the attached Sample Json file for reference below in creating a workflow."