
The WebAutomation feature requires a plugin/extension to locate elements and
attributes on the webpage. This extension accesses the page debugger in the
backend, facilitating communication and collaboration with native applications.
This enhances the ease of automating tasks on a website. By seamlessly
integrating with the page debugger in the backend, the extension empowers
the WebAutomation feature to efficiently identify and interact with various elements
and attributes present on the webpage.
Prerequisites for Web Automation
1. Ensure that the Robility automation extension is enabled to inspect web
elements on a webpage.
2. Make sure the necessary registry entry is in place to facilitate the installation
of the extension in the browser.
3. Verify the required native application entry for seamless communication between
the browser extension and the associated activity.
4. Establish dynamic port communication between the NativeApp to create a
communication port for the feature, enabling automation on the website.
How to Install Extensions?
For Enterprise Version:
Upon installing the Designer, we validate the availability of extensions on the browsers.
If the required extensions are not installed on the browser, a prompt will appear, asking
the user to install the extension. Once installed, it becomes available in the respective
browser, necessitating user intervention for activation. Follow the steps below:
1. Installation on Designer: When opening the respective browser (Edge/Chrome), a
prompt appears, asking to enable the extension. Click "Enable" to activate and start
automation on the respective browser.
2. Installation of Runner: Upon installing the Runner, it will validate the availability
of the “Extensions” and if it’s not available, it will install automatically, without user
intervention. When launching the respective browser (Edge/Chrome), a message
prompts you to enable the extension. Click "Enable" to activate and initiate automation
on the respective browser.
For Version 6:
Extensions are force-installed using the "ExtensionInstallForceList" policy for both Runner
and Designer in their respective browsers. Users cannot manually uninstall or disable the
extension. No user intervention is required during installation, and it is silently enabled on
the browsers available on the local machine. Locate the registry entry for the
"ExtensionInstallForceList" policy in the following registry path:
- Edge: “Computer\HKEY_LOCAL_MACHINE\SOFTWARE\Policies\Microsoft\Edge
\ExtensionInstallForcelist”
- Google Chrome: “Computer\HKEY_LOCAL_MACHINE\SOFTWARE\Policies\
Google\Chrome\ExtensionInstallForcelist”
Registry Entry
Registry entry is the key to communication between the extension and the activity. This
communication pathway allows the extension to convey information or instructions to
the activity, facilitating the proper functioning of the integrated system.
Moreover, the registry entry serves as a central point for configuration and settings that
govern the behavior of both the extension and the associated activity. It acts as a registry
of parameters, ensuring that the components are aligned in their functionalities and can
effectively collaborate.
There are two registries involved.
For Enterprise:
1. ID - lgnoojafhdgcpllpgolgpmjjdejnneom – It facilitates to enable the extension in the
browser.
2. Robility.Runtime.Automation – It helps to communicate between the extension
and the activity.
Where can we see the Registry entries?
When we install the msi of “Designer” and “Runner”, the registry entry for the respective
browsers (for“Chrome” and “Edge”) are created.
To see the registry entries in your system, enter registry editor in your system search box
and click on the registry editor.
Once the registry editor is open, we can navigate as below to see the registry entry details.
1. HKEY_USERS à Unique SID number (e.g., S-1-5-21-2144601217-6038991-817656539)
àSOFTWAREàGoogleàBrowseràExtensionsàlgnoojafhdgcpllpgolgpmjjdejnneom
(To make sure that the extension is installed in the browser correctly).
2. HKEY_CURRENT_USERàSOFTWAREàBrowseràChromeàNativeMessagingHosts
àRobility.runtime.automation(To make sure that the browser extension and activity
communicates back and forth).
Troubleshooting steps
a) When the activation pop-up message didn’t occur on the webpage, on the start of
the page or when launching the browser, follow the below steps.
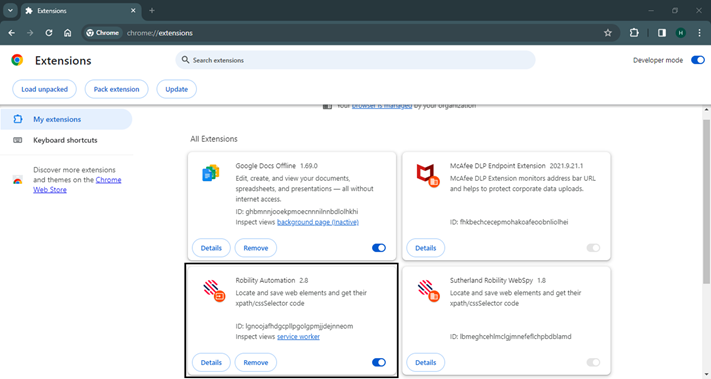
1. Navigate to the “Extensions” on the browser, there you will find the “Robility
Automation”.
2. Toggle the button to enable the extension.
b) How to find whether the extension has been installed on the browser?
1. When the extension activation message failed to pop-up on the launch of the
browser, you can check whether it has been installed.
2. Navigate to the Designer – Configuration – Robility Extensions (Installed or
Uninstalled).
3. If it’s uninstalled, click on the “Install” button against the respective browser.
c) Extension is installed, but unable to spy and detect the elements.
When the “RobilityAutomation” extension is installed and available on the browser, yet the
activities are throwing error as “Activity is not working properly, please close and
re-open the browser and try again.” This indicates that the extension has been installed
but has been blocked to communicate with the applications.
Dynamic Port Communication:
It indicates the communication port between the applications. There are two native app hosts
that “WebAutomation” require to create dynamic ports to enable communication. When these
are blocked or not able to create the communication, then the system administrator might
have configured the “Group Policy” to prevent the Extension from working.
How to troubleshoot to check whether the “NativeApp” is working?
There are two ways to troubleshoot it.
1. Check if the RobilityAutomation extension is enabled on the browser.
2. Enable “Developer mode” available on the top of the page.
3. Navigate to the “RobilityAutomation” extension and click on the “Service worker” link.
4. Another window will be opened as “DevTools” where the console native app will
write the log.
5. If you are log contains error message as “Failed to connect”, the port communication
has been disabled.
6. Contact your system administrator to update the group policy. But if the message
states as
“True”, and the issue still persists, please contact Robility support team.
Another way to check if the “ConsoleNativeApp” has started working,
1. Check whether the “Host-manifest_edge.json” and “ConsoleNativeAppEdge.exe” is
available on the below folder—“C:\\ProgramData\Robility7\Edge”.
2. Copy the “NLog” configuration file and paste it somewhere else to access it.
3. Open the “NLog” file pasted in the destination folder, at the bottom, you will find the
<logger level min = “info”>, change the log level to “Trace”.
4. Now, paste this file in the path “C:\\ProgramData\Robility7\Edge”.
5. Then, launch the website to trigger the log of the native app.
7. Check the log file at “C:\\ProgramData\Robility7\Logs”. If the log file states as “False”
in the status, the port communication has been disabled.
6. Contact your system administrator to update the group policy. But if the
message states as “True”, and the issue still persists, please contact
Robility support team.
Edge Group policies: (Version6)
When the organization blocks the group policies for browser extensions, then follow the
below instructions.
ExtensionInstallForceList:
This policy will control the extensions to install silently without user interaction which will
also not allow the user to uninstall the extension manually from the browser.
The policy must contain the ID as the Robility Automation extension on the browsers.
You can check the policy available in the below Registry entry path:
Computer\HKEY_LOCAL_MACHINE\SOFTWARE\Policies\Microsoft\Edge\
ExtensionInstallForcelist.
Chrome/Edge Web Store Access:
The applications may rely on Chrome extensions or features provided by the Chrome Web
Store. Access to the specified URLs (https://clients2.google.com/service/update2/crx and
https://clients2.googleusercontent.com/crx) may be required to download or update
necessary extensions.
Whitelisting of URL:
Ensure whether the below URLs are whitelisted if the extension is not working or throws
exception.
For Version6: https://chromewebstore.google.com/detail/sutherland-robility-websp
/lbmeghcehlmclgjmnefeflchpbdblamd
Enterprise: https://chromewebstore.google.com/detail/robility-automation/
lgnoojafhdgcpllpgolgpmjjdejnneom