Desktop automation helps the user to automate any tasks on the desktop applications.
To begin the automation process, we need to start spying the elements with which
the activity has to be performed. This is when the Robility Spy plays a major role.
How does the Robility spy work?
1. Robility spy has various components needed to choose an element on a desktop
application that makes it easier and simpler to automate.
2. Select an element required to spy on the application.
3. Each element has different UIA attributes attached to it and the Robility spy helps
us to choose the required attribute for the specified element.
4. When we click on the element, by default all the attributes are chosen automatically.
i. In scenarios, when the elements from the application change according
to the resolution of the machine, we can change the attribute’s value.
ii. These attributes cannot be unchecked but the values against can be
hardcoded or passed through variable in the Execute_by window.
5. The following are the best practices to choose an attribute for dynamic changes.
i. We can use the result from the “GetAttributes” activity to validate the attributes
and elements from the application.
ii. To check whether the application is launched to automate, use “ApplicationExist”
activity to validate.
iii. To keep a static attribute value to avoid discrepancies in the automation, input
the variable in the values against the attributes.
Technical reference
|
|
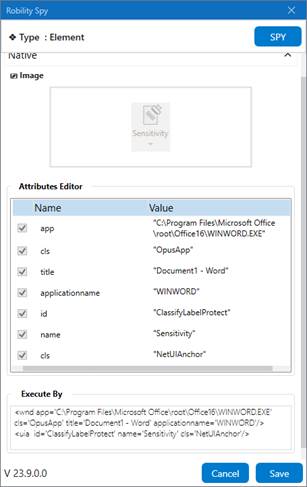
Image |
Image: Displays the image of the element that has been detected on the application. The user will not be able to edit the image, they have to re-spy the element again to change it. |
|
Attributes Editor |
App: Indicates the “Exe” location path of the application that has been detected to automate. It will be selected by default and the user cannot unselect the attribute. The values can be edited for the attributes. |
|
|
Cls: The class name of the element will be available here. It indicates the parent class of the element detected. It will be selected by default and the user cannot unselect the attribute. The values can be edited for the attributes. |
||
|
Title- The title of the application will be available here. It will be selected by default and the user cannot unselect the attribute. The values can be edited for the attributes. |
||
|
ApplicationName: The name of the application will be available here. It will be selected by default and the user cannot unselect the attribute. The values can be edited for the attributes. |
||
|
Id: The ID of the detected element of the application. It will be selected by default and the user cannot unselect the attribute. The values can be edited for the attributes. |
||
|
Name: The name of the element detected will be available here. It will be selected by default and the user cannot unselect the attribute. The values can be edited for the attributes. |
||
|
Cls: The class name of the element will be available here. It indicates the class of the automation element chosen. (Refer the execute by section in image).It will be selected by default and the user cannot unselect the attribute. The values can be edited for the attributes. |
||
|
ExecuteBy |
This area displays the element values and its attributes that has been chosen from the Attributes editor. Any changes made in the attribute’s editor field will be reflected here. This field cannot be edited, only changes will be reflected.
The tag starting with “Wnd” refers to the attributes and its values of the application from where the element is detected.
The tag starting with “uia” refers to the “Automation element” attributes and values detected. |