The queue configuration helps the user to set up and manage queues within the
Robility Manager platform. Queues are used to store and manage items of work,
often in a First-In-First-Out (FIFO) order, for processing by robots. It can be
customized to meet the needs of the user, such as setting different priorities, limits,
and expiration times for different types of work items. This allows users to optimize
the performance of their robots and ensure that the most important tasks are
completed first. Proper queue configuration and management are essential for
orchestrating complex processes efficiently and ensuring that your robots work
seamlessly.
How to configure queues for your project?
The users will be able to configure the queues after fields has been set up. Follow
the below documentation to walk through the Queue configuration page.
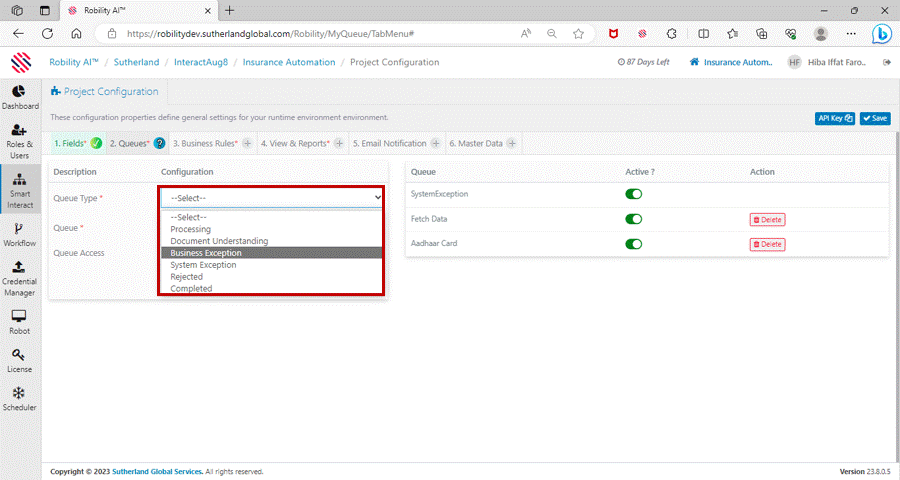
a) Queue Types
There are 6 queue types in which the fields are configured to set rules. Each
queue type has its own set of parameters and rules that can be configured.
This makes it easier to manage workload and keep the robots running smoothly.
Additionally, queues can be used to manage exceptions and errors, ensuring
that any issues that arise are handled quickly and efficiently.
Use Case
The following illustration helps you to understand how to configure queues
against the project.
In this scenario, the input will consist of an Excel file containing a list of OS details.
Using the information provided, including the OS type, RAM, HDD, and Applications,
the server is to be created. Once the server creation process, specific to the relevant
OS, is completed, it must be recorded back into the Excel file.
The fields and queues can be established according to our specific use case.
Here we are continuing the process from field configuration step.
Now let’s configure the queues:
The following steps helps you to set up the queues in your project. In our specific
use case, 6 queues needs to be created and configured.
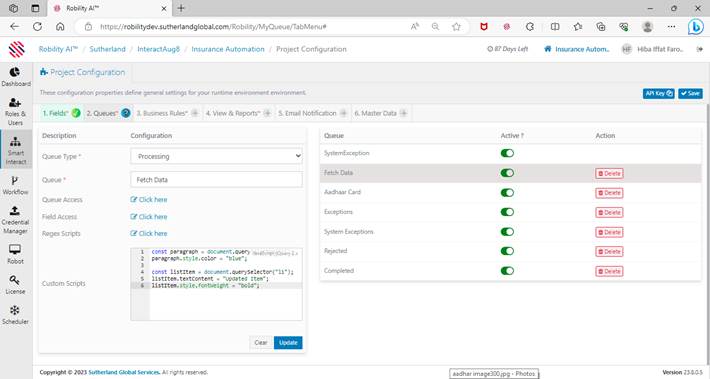
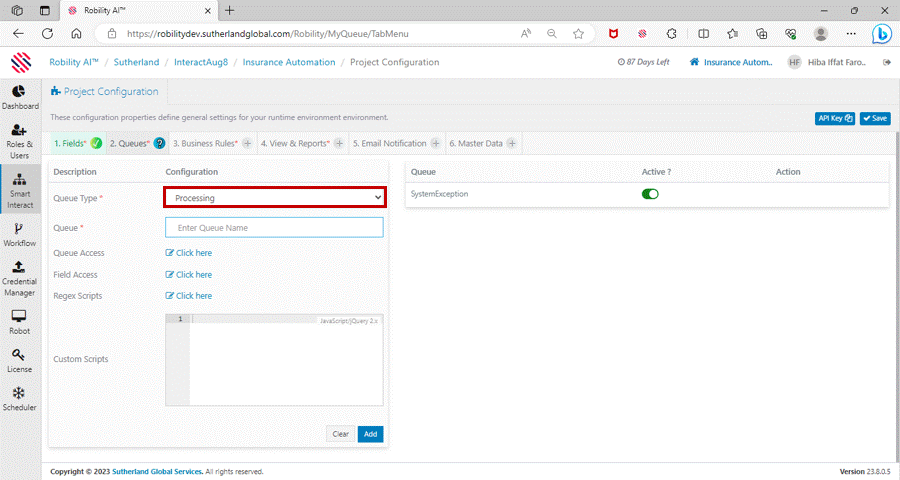
Queue 1 - Processing:
The processing queue enables the transactions to move into process for execution
of the automation. The fields that need to be processed can be configured. Let's
see how this works. After setting up the fields, they need to be managed with
rules during the automation process. This processing queue will move the
transactions into the execution process to initiate the automation. Follow the below
steps to create a queue name for processing queue.
1. Select the project in which you want to configure the Interact. Here choose
the project as “Server creation” .
2. Navigate to the “Smart Interact” at the left-hand side of the page.
3. You will be directed to the project configuration page.
4. Select the queue configuration step.
5. Choose the queue type as “Processing” from the drop-down list.
6. Enter the queue name as “FetchData”.
7. Select the “Click here” option on the queue access to provide the access
to the users available in the project. (Refer queue access to know more).
8. Select the “Click here” option on the field Access to configure the fields
to process. (Refer field access to know more).
9. Select the regex script and add script against the field name.
(Refer Regex and custom scripts to get detailed information).
10. Select the Custom script and provide the javascript for the fields to
process.
You can provide either regex or custom scripts.
To know about how to access the fields and scripts, click here.
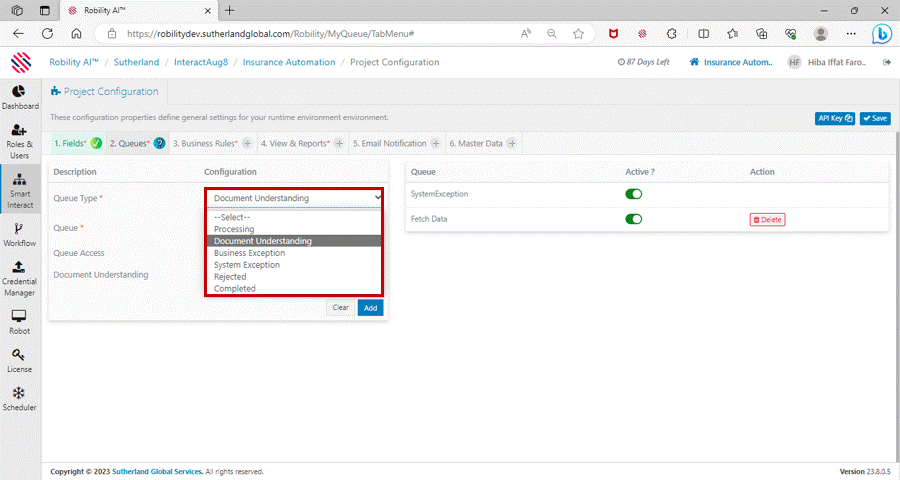
Queue 2 - Document Understanding:
Document understanding refers to the process of extracting meaningful
information from structured & unstructured documents, such as text files,
PDFs, images, and scanned documents.
This framework will facilitate the processing of incoming files, from file digitization
to extracted information validation, all in an open, extensible, and versatile
environment. It helps combine different approaches to extracting information
from multiple document types. The main aim is to make the process of extracting
data as easy as possible: creating one single workflow that will extract data from
a variety of documents. The acceptable cards are Aadhar, PAN card, Voter card
and driving license. Follow the blow steps to create a queue name for business
exception. Here we are continuing from Fetch data queue.
1. Select the project in which you want to configure the Interact. Here choose
the project as “Server creation” .
2. Navigate to the “Smart Interact” at the left-hand side of the page.
3. You will be directed to the project configuration page.
4. Select the queue configuration field.
5. Choose the queue type as “Document Understanding” from the drop-down
list.
6. Enter the queue name as “Aadhar Card”.
7. Click here to know about the queue access for the fields.
How to upload the cards for processing through document understanding?
1. Select the “click here” on the document understanding.
2. A pop-up will appear on the window.
3. Upload the sample Aadhar card to be processed by the bot.
4. Click on the upload option and select the file from the local system.
5. Once the file has been uploaded, the type will be automatically chosen
as “Aadhar card”.
6. Click on the Get taxonomy button to extract the details from the provided
Aadhar card.
Queue 3 - Business exception:
The business exception refers to a situation where the workflow process is
disrupted due to unexpected or abnormal conditions that occur while the bot
is executing the automation. These exceptions can be caused by various factors
such as data errors, system issues, user interactions or any other unexpected
events that the bot may encounter while execution. To notify these exceptions to
the user, the cases can be automated to move to business exception queue
so that the user may take actions to prevent this in future. Follow the blow steps
to create a queue name for business exception. Here we are continuing from
Fetch data queue.
1. Select the project in which you want to configure the Interact. Here choose
the project as “Server creation” .
2. Navigate to the “Smart Interact” at the left-hand side of the page.
3. You will be directed to the project configuration page.
4. Select the queue configuration field.
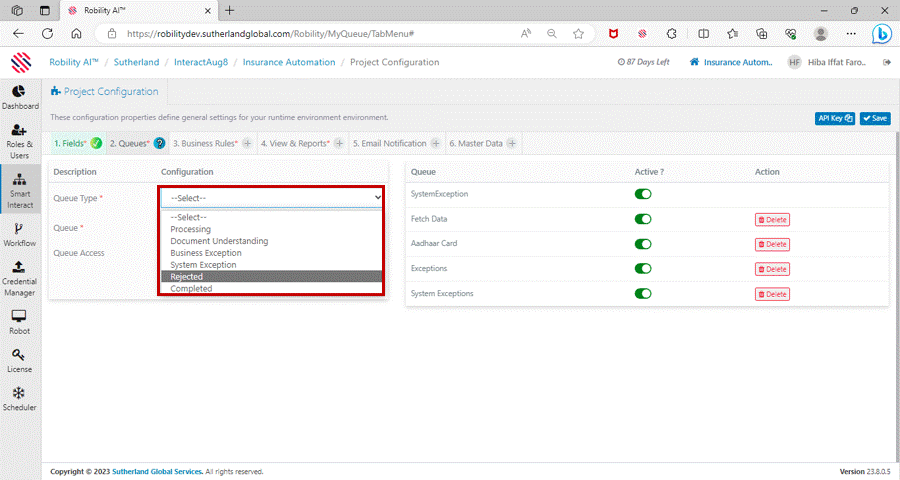
5. Choose the queue type as “Business exception” from the drop-down list.
6. Enter the queue name as “Exception”.
7. Click here to know about the queue access for the fields.
Queue 4 - System Exception:
The system exception refers to an unexpected error or issue that arises from the
underlying technical systems or software applications with which the bot interacts.
Unlike business exceptions, that re related to deviations from normal business rules
or processes, system exceptions grow from problem like software crashes,
connectivity errors, server downtime or any other technical glitches that disrupt the
automation workflow. To notify these exceptions to the user, the cases can be automated
to move to system exception queue so that the user may take actions to prevent this
in future. Follow the blow steps to create a queue name for system exception. Here
we are continuing from Fetch data queue.
1. Select the project in which you want to configure the Interact. Here choose the
project as “Server creation” .
2. Navigate to the “Smart Interact” at the left-hand side of the page.
3. You will be directed to the project configuration page.
4. Select the queue configuration field.
5. Choose the queue type as “System exception” from the drop-down list.
6. Enter the queue name as “System exceptions”.
7. Click here to know about the queue access for the fields.

Queue 5 - Rejected:
The transactions which does not have sufficient information or incorrect data to
proceed with the automation process can be categorized under rejected queue.
These transactions need to be manually verified to check the accuracy of the
data provided. If the data is accurate, then these transactions can be re-processed.
Otherwise, the transaction can be cancelled. Follow the blow steps to create a
queue name for Rejected. Here we are continuing from Fetch data queue.
1. Select the project in which you want to configure the Interact. Here choose
the project as “Server creation” .
2. Navigate to the “Smart Interact” at the left-hand side of the page.
3. You will be directed to the project configuration page.
4. Select the queue configuration field.
5. Choose the queue type as “Rejected” from the drop-down list.
6. Enter the queue name as “Rejected”.
7. Click here to know about the queue access for the fields.
Queue 6 - Completed:
Once all automation process has been completed successfully and performed
the required tasks, the transactions can be moved to completed queue.
This queue enables you to view the completed transactions on the Manager portal.
Follow the blow steps to create a queue name for business exception. Here
we are continuing from Fetch data queue.
1. Select the project in which you want to configure the Interact. Here choose
the project as “Server creation” .
2. Navigate to the “Smart Interact” at the left-hand side of the page.
3. You will be directed to the project configuration page.
4. Select the queue configuration field.
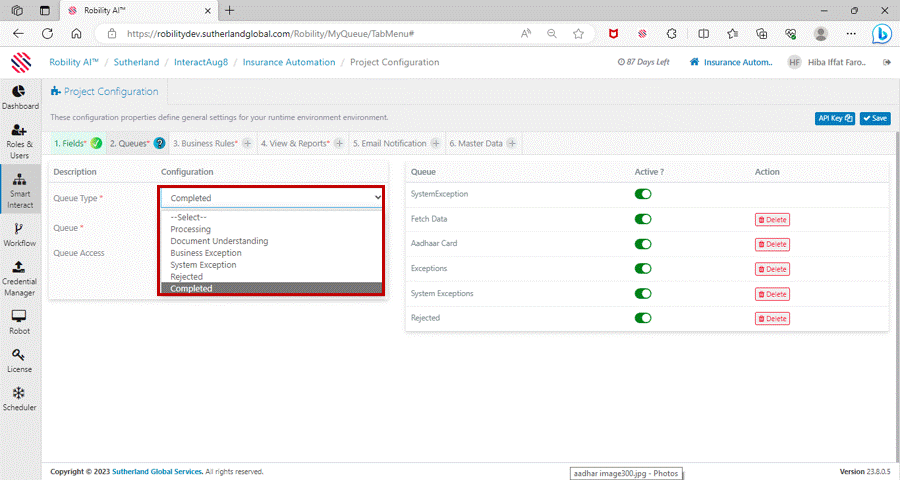
5. Choose the queue type as “Completed” from the drop-down list.
6. Enter the queue name as “Completed”.
7. Click here to know about the queue access for the fields.
b) Queue Access
The queue access enables the user to provide access for the queue to edit,
add, view and backpush.It can also be used to monitor the progress of the
transactions. In addition, users can also be notified of any changes or updates
to the transactions. Finally, this information can be used to analyze the
performance of the transactions and identify any potential issues. This allows the
Tenant Admin to provide the users who has access within the project to enable
queue access. Access to the queues for the users who are accessing the fields
through API, can also be configured.
User Access:
The list of usernames will be displayed from the users who has access to the
project. By default, all users will be configured to “No access”, the tenant admin
can change this accordingly.
1. No Access – By enabling this, the users will not be able to add, edit, view or
backpush the transactions against the queues.
2. Add – By providing this access, it enables the user to add the inputs for the
queue. For e.g., adding the cases for the process execution.
3. Edit – By providing this access, it enables the user to edit the transactions
against the queue.
4. View - By providing this access, it enables the user to only view the transactions
against the queue.
5. Backpush – Backpush refers moving the transaction from one queue to another
queue. By providing this access, it enables the user to backpush the transactions.

API Access:
The list of usernames will be displayed from the users who has access to the project.
By default, all users will be configured to “No access”, the tenant admin can change
this accordingly. This access is provided to access fields for the developers who
execute the bot through Designer using an API. When the users are accessing
through API, the users will not be able to backpush the transactions.
1. No Access – By enabling this, the users will not be able to add, edit, view or
backpush the transactions against the queues.
2. Create – By providing this access, it enables the user to add the inputs for
the queue. For e.g., adding the cases for the process execution.
3. Update – By providing this access, it enables the user to modify or update
the transactions against the queue.
4. Read - By providing this access, it enables the user to only view the transactions
against the queue.

Feed type:
While providing queue access to the user, at the bottom of the pop-up wizard, you
will find the “Feed Type” drop-down. There are two feed types, Manual and Auto.
1. Auto : If Auto is selected, after processing of any transaction in a given queue
is completed, it will not be routed back to MyWorklist and then rerouted to the next
configured queue. Each transaction will automatically move to the next queue.
2. Manual: In the case of manual selection, before progressing to the next queue,
the URN will go to My WorkList and has to be picked up from there for the next level
of processing. Only after that will it move to the next queue. Again, after processing
is completed in this queue, the URN will move to My WorkList and so on and so forth.
c) Field Access
This field occurs only for Processing queue. It enables to view and edit only the
selected fields to process while execution of the automation. It ensures that only
the chosen fields are involved in the automation, enhancing efficiency, and reducing
unnecessary data manipulation. This granular approach empowers users to tailor
the automation's behavior to their precise needs, contributing to a more optimized
and effective workflow.
Show – By enabling this option for against the fields, the user will be able to display
the fields in the queue name.
Edit – By enabling this option for against the fields, the user will be able to modify
the fields in the queue name.
Both show and edit access can be provided for the fields.

d) Regex script
It's a powerful tool used in programming and automation to match and manipulate
text strings based on patterns. Regex scripts are patterns written using a combination
of characters and symbols that define a specific text pattern.
Here, we can use the regex script to identify and validate / match with the data
processed by the bot. Regex script helps the user to match, validate, reject, split,
and replace the data processed based on the project specifications.
Regex configuration
The regex configuration has two different types in which the data can be configured.
The default script allows the user to proceed with the default script available in the
Robility Manager portal whereas Custom script enables the user to provide their
own script to configure.
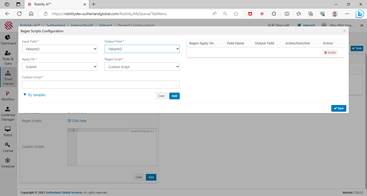
Default script configuration
The following table displays the fields that are available when the regex script type
is chosen as “Default Script”.
|
|
Input Field: It displays the list of fields that has been configured in the previous step of project configuration. It displays only the custom fields and not the default fields. Choose the field that needs to be taken as input to configure the regex script in the automation. |
|
Output Field: It displays the list of fields that has been configured in the previous step of project configuration. It displays only the custom fields and not the default fields. Choose the field that needs to be taken as Output to configure and display the output using the regex script in the automation. |
|
|
Apply On: It indicates to apply the script either at the time of submission of the data or after loading the data into the fields. Choose the options from the drop-down, Submit: It applies the regex script at the time of submitting the data during the execution. Load: It applies the regex script at the time of loading the data during the execution. |
|
|
RegexScript: It enables the user to choose the regex script type based on the project specification. Choose the script type from the drop-down list, Default Script: It enables the user to proceed the automation execution with the default regex script type that are available in Robility Manager. Custom script: It enables the user to provide their own customized regex script to configure and process the transactions. |
|
|
RegexType: This field appears when the regex script type is chosen as “Default script”. It enables the user to avail the types of regexes that are suitable for their project needs. Choose the type from the drop-down list, Matches: This regex type enables the user to search and match the inputs with the chosen regex scenario. IsMatches: This regex type enables the user to find a match which is equal to the input provided. Replace: This regex type enables the user to match the regex and replace the matching value with a specific value. Split: This regex type enables the user to split the characters from the value derived the inputs. Escape: This regex type enables the user to match any special character or meta characters, quantifiers or whitespaces using a backslash. For e.g., (/*) means to match the “*” character in the input. UnEscape: This regex type enables the user to convert the escaped characters back to their original form. For e.g.,(“/n World can be converted to World”) |
|
|
Regex Scenario: This field appears when the regex script type is chosen as “Default script”. It represents the scenario for the regex types. The scenarios differ for each regex type chosen. Select the scenario from the drop-down. To know more about the scenarios, click here. |

Regex Scenarios
The regex scenarios differ for each regex type chosen. Follow the below the
documentation to know about the regex types and scenarios.
|
Regex type |
Regex Scenarios |
|
Matches |
Phone Number: It uses the regex pattern to search and match the phone number from the input field to configure. Zip code: It uses the regex pattern to search and match the zip code form the input field to configure. Email Address: It uses the regex pattern to search and match the email address from the input field to configure. Date: It uses the regex pattern to search and match the date from the input field to configure. Search word: It uses the regex pattern to search and match the word to configure. It enables another field to provide the word that needs to be searched and matched. Currency: It uses the regex pattern to search and match the currency from the input field to configure. |
|
IsMatches |
Phone Number: It uses the regex pattern to find a match which is equal to the phone number derived from the input fields. Zip code: It uses the regex pattern to find a match which is equal to the zip code derived from the input field. Email Address: It uses the regex pattern to find a match which is equal to the email address derived from the input field. Date: It uses the regex pattern to find a match which is equal to the date derived input field to configure. Currency: It uses the regex pattern to find a match which is equal to the currency derived input field to configure. |
|
Replace |
Find word and replace: It enables the user to find the word and replace with the specified word. Enabling this option, provide two more fields to enter the word for “Find” and a word to “Replace” |
|
Split |
Words: It uses the regex pattern to split the characters from the word derived from the input field. Digits: It uses the regex pattern to split the characters from the digits derived from the input field. Hyphens and Slash - It uses the regex pattern to split the hyphens and slash from the word derived from the input field. Round Brackets: It uses the regex pattern to split the round brackets from the word derived from the input field. |
|
Escape |
Escape: It uses the regex pattern to add the backslash to the value from the input fields to escape it. |
|
UnEscape |
UnEscape: It uses the regex pattern to convert the escaped characters to original form. |
Custom Script Configuration
The custom script under the regex script configuration allows the user to provide
their own customized regex pattern/ script to find, match, validate, split, or replace
the inputs derived from the fields. The following table displays the fields that are
available when the regex script type is chosen as “Custom Script”.
|
|
Input Field: It displays the list of fields that has been configured in the previous step of project configuration. It displays only the custom fields and not the default fields. Choose the field that needs to be taken as input to configure the regex script in the automation. |
|
Output Field: It displays the list of fields that has been configured in the previous step of project configuration. It displays only the custom fields and not the default fields. Choose the field that needs to be taken as Output to configure and display the output using the regex script in the automation. |
|
|
Apply On: It indicates to apply the script either at the time of submission of the data or after loading the data into the fields. Choose the options from the drop-down, Submit: It applies the regex script at the time of submitting the data during the execution. Load: It applies the regex script at the time of loading the data during the execution. |
|
|
RegexScript: It enables the user to choose the regex script type based on the project specification. Choose the script type from the drop-down list, Default Script: It enables the user to proceed the automation execution with the default regex script type that are available in Robility Manager. Custom script: It enables the user to provide their own customized regex script to configure and process the transactions. |
|
|
Custom Script: It enables the user to provide their own custom script in the box. The custom script must be the regex script only. |
e) Custom scripts
The custom script enables the user to provide customized JavaScript query to
automate the task on the Manager. This helps to simplify the process and reduce
the time and effort needed to complete the task. Scripts can be written to perform
a wide range of tasks, such as input validation, data manipulation, and reporting.