Business regulations, for transactions involve setting up criteria for fields by
choosing conditions and corresponding values. These regulations establish the
data parameters, such as limits on ranges, specific formats, or other requirements
to ensure that transactions adhere to standards. The setup usually includes
conditions like greater than, less than, equal to or a range of values providing an
approach to validate and handle transactions. This methodology guarantees
consistency and precision in managing data within the workflow.
Benefits
1. These regulations enable the customization of field validations by establishing
conditions that govern the behavior and acceptance criteria for data.
2. Through this configuration process one can enforce requirements on fields
like dates, numbers, text formats and more. It creates a framework for ensuring
the integrity and reliability of data within the automation process.
3. By selecting and defining these conditions appropriately the system can be
effective.
4. Manage transactions while reducing errors.
5. It ensures that only accurate and relevant data is further processed or acted
upon.
Why do we need to Set rules for the transactions?
1. Rules allow the robot to make decisions based on real-time data or moving
transactions based on conditions during execution, enabling dynamic and
adaptive behavior.
2. With validation rules, the robot can follow different paths or actions based
on specific criteria or conditions encountered during runtime, enhancing flexibility
and accuracy.
3. It also helps in defining how the robot should react or handle errors, exceptions,
or unexpected situations that may arise during the execution of a transaction.
4. It allows for customization and personalization of the automation flow, tailoring
the actions based on the immediate requirements or circumstances, which might
not be predetermined.
Utilization of “Rule Configuration” window
1. Click on the “Create Rule” button and the rule configuration window will pop
up on the window.
2. Rule Name - Enables you to provide the name for the rule which is customizable
according to the user preference.
3. Source Queue – Enables to choose the queues added from the drop-down to
set as the “Source” queue from where the transactions needed to be selected for
the validation process.
4. Destination queue - Enables to choose the queues added from the drop-down
to set as the “Destination” to where the queue needed to move after the validation
process.
5. FromQueue Field – It allows the user to select the field names available from
the selected “Source” queue.

6. Condition: Choose the operation from the drop-down.
· < : It validates to check whether the provided “FieldName” value is lesser than
the specified condition value.
· >: It validates to check whether the provided “FieldName” value is greater than
the specified condition value.
· <= : It validates to check whether the provided “FieldName” value is lesser than
or equal to the specified condition value.
· >= : It validates to check whether the provided “FieldName” value is greater than
or equal to the specified condition value.
· = : It validates to check whether the provided “FieldName” value is equal to the
specified condition value.
· != : It validates to check whether the provided “FieldName” value is not equal to
the specified condition value.
· StartsWith: It validates to check whether the provided “FieldName” value starts
with the specified condition value.
· EndsWith: It validates to check whether the provided “FieldName” value ends
with the specified condition value.
· Contains: It validates to check whether the provided “FieldName” value contains
the specified condition value.
· DoesNotContain: It validates to check whether the provided “FieldName” value
does not contain the specified condition value.
7. ValueType: It enables the user to choose either “Value” or “Comparison” from
drop-down. It helps to validate with the value or compare with the values based
on the conditions.
8. RuleValue: It enables the user to provide the conditional values to validate the
process the values against the selected field name.
9. Expression: It will be enabled only when there are 2 or more conditional values for
the rule. Click on the “+” button and the “AND” expression will be enabled.

10. Action: It displays the “+” and “-“operation to add or remove the conditions
added in the rule.
How to use and create rules for the transactions?
Let’s continue from the use case utilized in the “Field” and “Queue” configuration. Now,
to move the transactions from one queue to another queue with required conditions,
here I am going to create business rules.
Step1:
1. Login to the Manager and navigate to the project where the “Interact” has been
configured.
2. Click on the “Business Rules” which is the third step on the project configuration
setup.
3. Click on the “Create Rule” button to build the first rule.
4. The “Rule Configuration” window will pop-up on the screen.
Step 2:
5. This “Rule Configuration” dialog box helps you to add the conditions, source
and destination queue names, validations etc.
a. The “Rule Name” can be customized accordingly, here I am setting the rule
name as “Indexing the transactions”.
b. Now, click on the “Source Queue” name and here I am choosing the “Index”
queue from the drop-down. It will select the transactions that are available in
the “Index” queue.
c. Next, moving to the “Destination Queue” name and here I am choosing the
“FetchData” queue from the drop-down.
d. For this rule, I am setting up any validations, so click on the “Add” button to
save the rule.
e. Click on “Save” to not lose the configuration and validations added to the
project.
f. This will move the transactions that are loaded into “Index” queue to
“FetchData” queue.

Step 3:
6. Now, I am going to add another business rule for the next process.
7. The rule I’m adding here will be helpful to move the transactions based on
the conditions to another queue.
a. Click on the “Create Rule” button, the rule configuration window will pop
up on the screen.
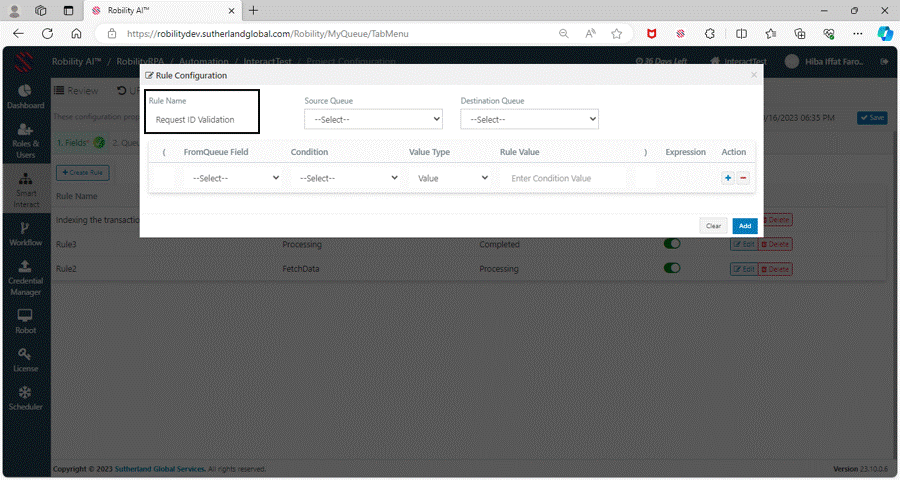
b. Here I am entering the rule name as “Request ID Validation” based on my
use case. Refer the sample excel sheet attached in the “Field configuration”
step.
c. Choosing the Source queue name as “FetchData” queue as my transactions
will be available there.
d. Selecting the “Destination” queue name as “Processing” queue to where I
need to move the transactions.
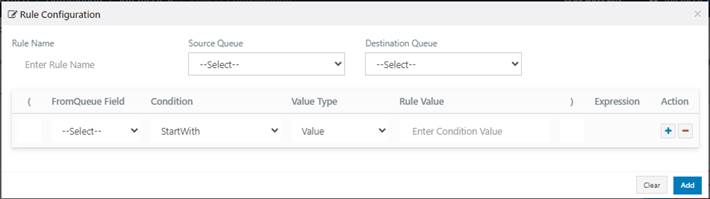
8. Moving to the condition area, here I am choosing the “From Queue Field” as
“RequestID”.
a. Here I am going to set the condition when the transactions are processed, the
bot will validate the condition here and then moves them to the “Processing” queue.
9. Next, click on the “Condition” field, here I am choosing the condition as “StartWith”.
a. Choosing the value type as “Value”.
b. Setting up the condition value as “REQ” will enable the bot to validate whether
the “REQUESTID” field starts with the “REQ” or not.
10. Now, click on “Add” button to save the configuration.
11. Click on “Save” to not lose the configuration and validations added to the project.
12. This will move the transactions that are loaded into “Index” queue to “FetchData”
queue.