
Reply
When to use Reply activity
This activity helps you Send a Reply to an E-Mail from the Outlook.
Figure 1
|
Activity Name |
Picture |
|
Reply |
|
Technical Reference
|
Figure 1.1
|
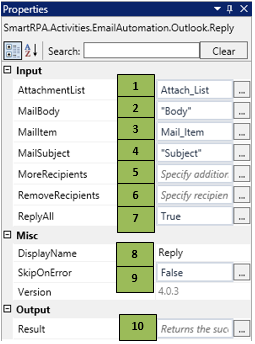
S.no |
Description |
|
1 |
Specify the list of attachments to be added while replying. The Attachment file path will be given as string |
|
|
2 |
Specify the required body of the E-Mail |
|
|
3 |
Specify the mail item which we need to send the reply to |
|
|
4 |
Specify the subject of the E-Mail |
|
|
5 |
Add more recipients, if required |
|
|
6 |
Remove the selected recipients before replying |
|
|
7 |
Specify True to select the reply all option |
|
|
8 |
Displays the action that the activity performs in the workflow |
|
|
9 |
Specify whether to continue executing the workflow if the activity fails |
|
|
10 |
Returns the reply status as either True or False |
Scenario
Assume you want to reply to an email.
Illustration
![]() Activity: The Reply activity helps you reply to an email after reading that email.
Activity: The Reply activity helps you reply to an email after reading that email.
Let's start building the bot
Step 1 Open the SmartDesigner tool
Step 2 Open a new workflow
Step 3 Drag a Reply activity from the Outlook Automation.
- Go to the property section and specify the attachment list as List<String> in AttachmentList
- Specify the mail body in the Body section
- Specify the mail item which you read previously using the Read Activity, which holds the mail you need to send the reply to
- Specify the mail subject in the Subject field
- In case of adding any extra recipients, add their email addresses in the MoreRecipients field
- In case of removing any recipients, add their email addresses in the RemoveRecipients field
- Specify True in the ReplyAll, if you need to send the reply to all recipients.